Setting Up the zenwsimport DNS Record

Enabling workstations to contact the Import Server is the key to successful workstation import. There are several methods to do this: the command line used in Step 7 can be automatically pushed to the workstation using the ZENworks Application Launcher; the hostname zenwsimport can be made available either by way of DNS or a hosts file; or the ZENworks Application Launcher can be used to set a registry value. For the Lab Guide, we will use DNS to quickly enable locating the Workstation Import Server.

By default, the ZFD 3 workstation registration agent looks for the import service running on the server with a hostname of zenwsimport. To use DNS, the workstation must be able to ping the service at zenwsimport. Therefore, you must create an entry in DNS, or put zenwsimport in each workstation's HOSTS table.

  1. Switch to your ZENworks server.

  2. Click the Start menu > Settings > Control Panel > Administrative Tools > DNS.

  3. In the DNS window, double-click the DA-02 server object in the left-most pane.

  4. Right-click the Forward Lookup Zones folder > click New Zone from the pop-up menu.
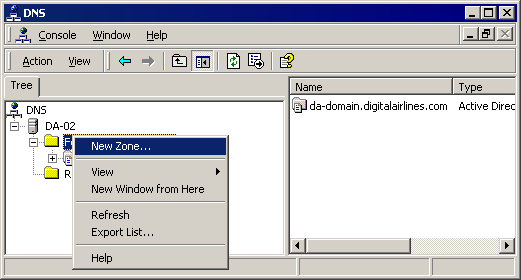

    Screen shot of the DNS dialog box.

  5. In the New Zone Wizard Welcome screen, click Next.

  6. In the Zone Type window, select the Standard primary option > click Next.

  7. In the Zone Name window's Name field, type DigitalAirlines.com > click Next.
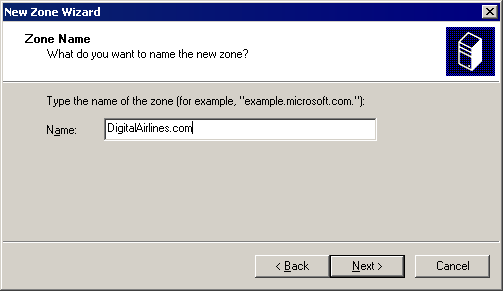

    Screen shot of the New Zone Wizard page. DigitalAirlines.com is displayed in the Name field.

  8. In the Zone File window, accept the default Create a New File With This File Name option > click Next.

  9. In the Completing the New Zone Wizard window, click Finish.

  10. In the DNS window, double-click the Forward Lookup Zones server object in the left-most pane so it expands to reveal your new DigitalAirlines.com zone.

  11. Right-click the DigitalAirlines.com zone > click New Host.

  12. In the New Host window's Name field, type zenwsimport. In the IP Address field, type 10.0.0.202 > click Add Host > click Done.
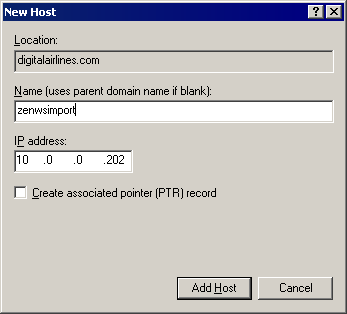

    Screen shot of the New Host dialog box with the IP Address field filled in.

  13. Close the DNS utility.