2.8 User
The User tab is used to create, modify and view accounts for:

Users within the service management system can have one of the following Roles:
and one or more of:
If a User is assigned multiple Roles, the User Roles of Supervisor or Technician, Finance and Manager are consolidated within one User view. Therefore, if a User is assigned Finance, Manager and Supervisor/Technician access, they can view all functionality related to these Roles within the User view. If the User is also assigned Admin and Customer access, next to their login name, the options of Setup and Customer will be displayed.
The Supervisor can create User accounts within the User >Users tab.
The system Administrator can synchronize the system with a Directory Server to import Customer and User details. Imported Users can only be modified through the appropriate server console, not via the application. For further details about this topic refer to the Authorization section within the Administrator Guide.
Alternatively, the Administrator can also import Customers via a .CSV file.
2.8.1 Customers
The Customers tab is used to create, modify and delete Customer Accounts.
A Customer is a User assigned the Customer Role. They can be internal or external to the organization and can raise Incidents through the Customer Portal or via email. Service Desk staff can also generate requests on behalf of the Customer.
Service Desk Customers can be created within this tab. The Administrator can also import Customers from a .CSV file, or synchronize the system with a directory server.
NOTE:If Customers are imported using a directory server, the option to create Customers from the Users tab is disabled.
Creating a Customer Account
Customer Information includes the following tabs:
-
Information
-
Aliases
-
Items
-
Requests
-
Contracts.
Information Tab
This tab is used to enter contact information about a Customer, creating a new Customer account.
NOTE:If Custom Fields are to be created for Customer Information, it is recommended the Administrator complete the customization prior to creating Users. (See Administrator: Custom Fields.)
To create a Customer account using Internal Authentication:
-
Select User>Customers
-
Select New
-
The Customer Information screen appears with the following fields:
Customer Information Fields
Access
Title
If enabled, select the appropriate title from the drop-down options. (This field is displayed if the Enable Titles option is set to Yes in the Admin>Setup>Setup>Privileges>Customer tab.)
First Name*
Customer's First Name.
Last Name*
Customer's Last Name.
User Name*
The login User name credentials for the User. If this is imported via LDAP or Active Directory, it can not be edited. Otherwise, enter a Username. Note that the value must be unique.
Password/ Confirm Password
The Default Password is set to the Customer's email address or a random string can be enabled by the Administrator in Setup>Privileges>System.
Customers can reset their password from the Customer Portal, or a Service Desk User can reset it in the customer account details using the Reset Password button through the Customer> Information tab.
Web Access
Web Access allows Customers to view their account information and Incidents via the Customer Portal.
Contact
Primary Email*
The Customer's Email address. System messages are sent to this address.
Send To
This field becomes when alternate email addresses are entered on the Aliases tab.
Select the most appropriate email address to be set as the default address applied to Customer correspondence. When the Send To field is set to an alias address, the Primary Email address is not included in the cc list, unless specified in the request Information tab cc list.
Org. Unit
The Organizational Unit, be it a Company or Department with which the Customer is associated.
(Organizational Units are created by the Supervisor, in Users >Organizational Units.)
Line Manager
If relevant, assign a system user with the Customer Role who can approve/reject requests made by this Customer, as part of the Change Management or Service Request approval process. (This information can not be edited if the line manager details are set by the LDAP synch.)
Room
This field is visible if the Display Rooms option is set to Yes in the Setup>Privileges>Customer screen and there are Room details configured in Organizational Units.
Address 1
First line of Customer's address.
Address 2
Second line of Customer's address.
City
Customer's city details
State
Customer's State details. Options will be displayed for the State, once the Country is selected, if Regions are configured for the Country in the system.
Zip/Postcode
Customer's area code.
Country
Customer's country. The country selected will determine the time zone and state options for the Customer.
Email Locale
Set the default language for email correspondence.
Phone
Enter Phone details.
Fax
Enter the Customer's fax number, if relevant.
Pager
Enter the Customer's pager details, if relevant.
Mobile
A mobile number can be entered as a contact number or for use with SMS (Short Mail Service message). An SMS can be sent to notify the assigned Technician when a request is created.
SMS Messaging options:
-
From the drop-down list, select the SMS Service Provider.
-
Override SMS Address. If your service provider does not appear in the list, click this checkbox and enter an alternate Service Provider.
SMS Override
Enter SMS Gateway override details for the Customer, if a number other than the one entered in the Mobile field is to be used to send/receive updates via SMS. Enter the complete SMS details in email address format, i.e., 000777891@smsgateway.provider.com.
Partner
Customer of
Nominate the Partner Organization associate with the Customer. This is an external service provider who manages the Customer's request.
(The option is enabled by the Administrator in Setup Privileges> Use >Edit Customer Partner. The Partner Organizations are defined by the Supervisor in the User>Partner Organizations tab.)
Locale
Time zone
The Customer automatically adopts the default Timezone set for the system. However, the Timezone can be manually adjusted here for the specific Customer.
Last Login
Auto-populated with the date the Customer last logged into the system.
Host
The IP address of the last login for the Customer
GPS
The GPS coordinates of the last known address for the Customer. (This field is displayed when the Record GPS option is enabled in Admin>Setup>Setup>Privileges>Customer tab.)
Roles
Current*
Multiple Roles can be assigned to a User. Select other Roles the Customer will use, by ticking the check boxes.
Note: If the Technician Role is selected, a Supervisor must be allocated.
Default Portal
The Default Portal is the user interface a Customer, who is assigned multiple Roles, accesses by default when they log into the system.
NOTE:If the Users Default Portal is set to Customer, the User details will not be accessible in the Users list, but included in the list within the User>Customer tab.
Details
Notes
Click on the field to enter any Customer relevant information.
-
* Denotes mandatory fields
-
Click Done.
Emailing Customers Credentials

To email a newly created Customer details regarding their system log in details, click the Email button within the Customer Information screen. If Random Passwords is enabled, selecting Email will reset the Password and forward the details to the Customer. If Password Questions is enabled in Setup>Privileges>System, selecting Email will send a link to the Customer directing them to a page that includes the security questions set for their account and reset the password based on the answers provided. Customers must complete this process within an hour of the email being sent.
vCard Button

Select this option to download and open the Customer's information in an electronic business card format, to email or save outside the system.
Creating Request

To create a request, select one or more customers, and then click Create Request. The Create Request page will be displayed.
For more information, see Create Request in the Administration Guide.
Aliases Tab
The Aliases tab is used to enter additional email addresses. Email addresses in the Aliases tab allow the Customer to send emails to the System or Team support addresses from more than one address. The system creates requests from these emails. Notifications for requests created using an address in the Aliases tab, are sent to the main email address and cc'd to the alias address that was used to create the request.
When one or more alias email addresses have been created for a Customer, a Send To field is displayed on the Customer Information screen, which allows the most appropriate email address to be set as the default address applied to Customer correspondence. When the Send To field is set to an alias address the Primary Email address is not included in the cc list, unless specified in the request Information tab cc list.
To add an alias email address:
-
Select User>Customers
-
Click on the Customer name
The Customer Information screen appears.
-
In the Aliases tab click Edit
-
Click Add
-
Enter an alias email address
-
Click Save.
When an alias email address has been created for a Customer, a Send To field is displayed on the Customer Information screen, which allows the alias email address to be set as the default address applied to Customer correspondence.

To remove an alias email address, in Edit mode, tick the checkbox next to the relevant email address and then click Remove.
Items Tab
The Items tab lists the Items owned by the Customer. To access Shared Items, tick the Include Shared option. To view or edit the Item details, select the Item Number hyperlink. Select the Excel button to output the Item List to Excel format.
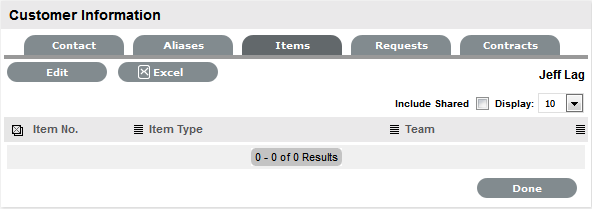
To add an Item:
-
Select User>Customers
-
Click on the Customer name
The Customer Information screen appears.
-
In the Information tab, click Edit
-
In the Item tab, click Add
The Find Item editor is displayed.
-
Search for the relevant Item
-
Select the Item # hyperlink
The selected Item will be associated with the Customer.
-
Click Save
-
Select Done.
Requests Tab
The Requests tab is visible after the Customer has been created. It lists all requests related to the Customer and allows the User to create new requests for the Customer. To view details of a request, select the Task # or Problem Report hyperlink. To create a request for the Customer, select the New button.

Contracts Tab
The Contracts tab displays a Customer's current contract status. A Customer can be assigned an SLA or, when Billing is enabled, a Contract. A Customer can only have one active Contract, but contracts can be queued within the Contract >Customer tab, as required.
When Contracts are in use throughout the application, the timeframe set for Service Levels and Contract history are displayed within the Contracts tab. It is also possible to assign a Service Level and/or Contract within the Contracts tab.
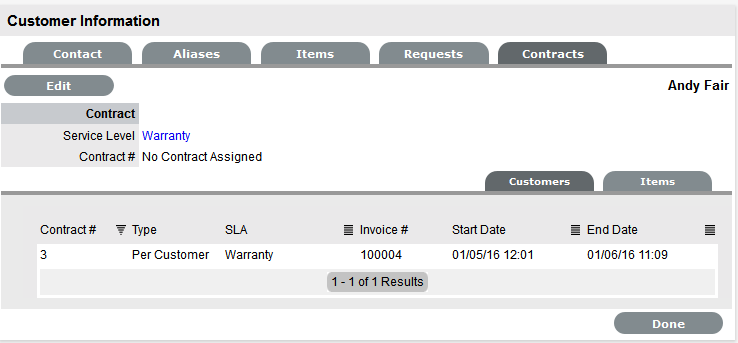
To create a new Contract for a Customer:
-
Select User>Customers
-
Select the Customer Name
-
Move to the Contracts tab
-
Click Edit
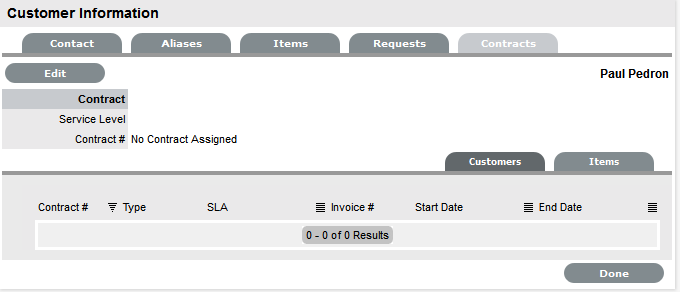
The system will display the Add button in the Customers tab
-
Click Add
The SLA options are displayed.
-
Select a Service Level from the list
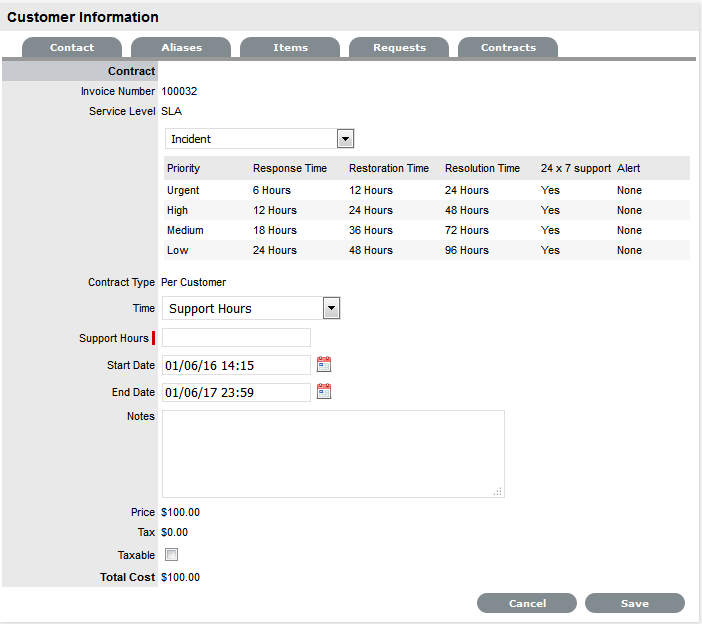
When selected, the screen expands to display the Time, Start and End date fields.
-
Define the Contract Time period
For the Per Customer Contract Type the Time Period for the Contract can be defined:
If Subscription is selected, the Start and End Dates are automatically completed by the system, but can be edited if required.
If Time Limited Subscription is selected, the Support Hours field is displayed and the number of support hours purchased by the Customer should be entered. Also, the Start Date and End Date fields should be completed manually, entering the length of time for the subscription period.
If Support Hours is selected, the number of support hours purchased by the Customers should be entered
If Support Hours By Month is selected, define the number of Support Hours covered per month and on which day of the month the Contract is designated as the Rollover Day. The Start Date and End Date fields are automatically completed as an annual contract subscription but can be edited, as required.
If the Start Date is set as a future date, the Pending Contract status is assigned.
-
Click Save
-
Click Next to continue
The system reverts to the Contracts summary screen.
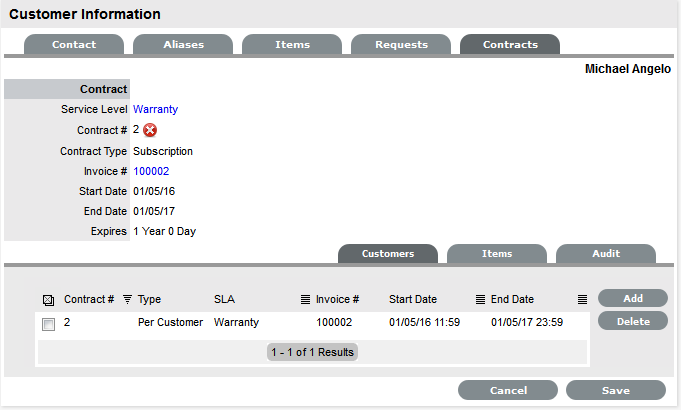
-
Click Save. Click Done.
To delete a current Contract, as a Supervisor User, select  next to the Contract Number. Alternatively, to delete a current or queued Contract, within the Contract>Customers tab check the field next to the relevant Contract # and select the Delete button.
The Items tab within the Customer>Contracts screen is used to list all the Items with a Contract that are owned by a Customer.
The list of requests with the time recorded against the Contract is displayed within the Audit tab. The Summary view displays the list of requests with total number of Notes and Time allocated to the Contract, while the Detail view includes a breakdown of all Notes and the associated time related to each request.
Searching for Customers
To search for Customers within the Users>Customers tab:
-
Go to Users>Customer
-
Select

-
Enter any known Customer details to find a specific Customer or to generate a Customer List based on date of creation, enter a Before or After creation date for the Customer.
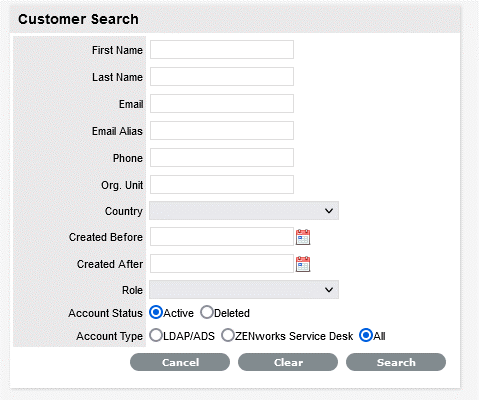
-
Click Search.
The results will be displayed in a table with the Customer Name and contact information.
-
Click on the Customer Name to open the Customer Information module or select the Email Address to send an email.
NOTE:To search for a Customer who has been deleted in the system, conduct the search within the Administrator Portal.
2.8.2 Organizational Units
Customers can be assigned to a Company within the system. This can be refined by allocating the Customer to a Department, and if relevant, to a specific Room. This information is stored within the Organizational Unit details.
NOTE:Companies can exist without Departments, but Departments and Rooms can only be created as part of Company information.
Technicians can also be assigned to service specific Organizational Units.
Organizational Unit Filters
The Organizational Unit list can be filtered to display the following views:
|
System List Filters |
Description |
|---|---|
|
Organizations |
Shows the Companies supported by the service desk. |
|
Org. Units |
Lists all Departments included within Companies. |
|
All |
Lists complete Org Units, with Company and Department names. |
To change the List View, select the relevant option from the Filter list.

Organizational Units and External Authentication
Organizational Unit relationships can also be mapped from an authentication server. By default this is not enabled. To activate Customer Organizational Unit mapping, as an Administrator go to the Advanced tab for the selected authentication server within Admin>Setup>Authentication. Select Yes for the Import Customer Organizational Units option.
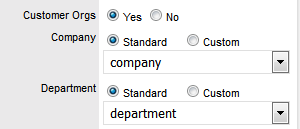
NOTE:The details of the Org. Units are not populated upon this synch, only the Org Unit names. For the Org Unit details to be assigned to Customer or User Information, create the Org Unit in the Supervisor>User>Org Units tab and ensure the Org Unit name is identical to what is stored in the authentication server. If the details are not identical, the system will create another Org. Unit.
Details Tab
Use the Details tab to create an Organizational Unit.
Creating an Organizational Unit
To create an Organizational Unit:
-
Select User>Organizational Units
-
Click New
-
Complete the Organizational Unit Name
-
Select Organizations or Org. Units within the Filter drop-down list
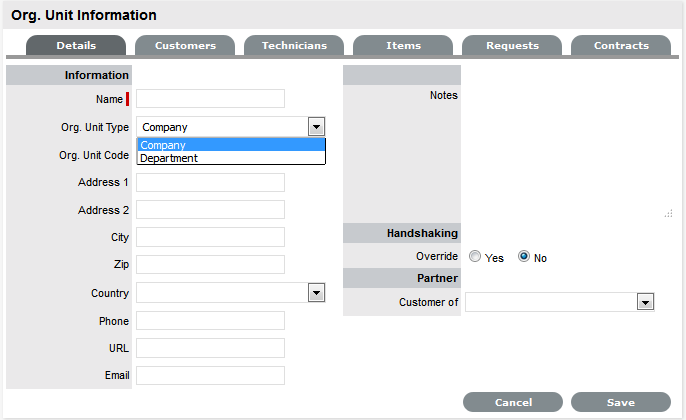
-
Enter other details, if required
-
Select Handshaking override option, if relevant
If the System Default Handshaking Close Action days is to be adjusted for the Org. Unit, select Yes in the Handshaking Override field. Enter the number of Days to lapse before a request will close if the Customer does not respond to the handshake email notification.
-
If appropriate, set the Partner Organization
(The Partner Organization is an external service provider that includes Partner Users who can manage requests logged with the system for Customers associated with the Company or Department being created.)
-
Click Save.
Primary Contact
When multiple Customers are assigned to an Organizational Unit, a Primary Contact person can be allocated for the Org Unit. This is the preferred person the Service Desk will contact for issues relating to the Org Unit.
To assign a Primary Contact:
-
Select User>Organizational Units
-
Select an Org Unit Name
The Details tab is displayed. If Customers have been assigned to the Org Unit a Primary Contact field will be visible.
-
Within the Details tab, click Edit
The Find Customer box is displayed. (Note that this search is only visible when Customers have been assigned to the Org. Unit)

-
Search for the Customer
To view all available Customers click Search without entering a Customer last name in the search field.
-
Click the Customer name to assign them as the Primary Contact
-
Click Save.
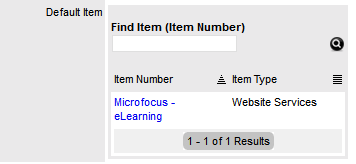
Default Item
When an Organizational Unit owns multiple Items, within the Default Item field an Item can be used as the one to be automatically applied to all requests created via email for the Organizational Unit.
To assign a Default Item:
-
Select User>Organizational Units
-
Select an Org Unit Name
The Details tab is displayed with the Default Item visible at the bottom of the first column.
-
Within the Details tab, click Edit
The Find Item box is displayed.
-
Search for the Item
To view all available Items click
 without entering an Item Number in the search field.
 -
Click the Item Number link to assign it as the Default Item
-
Click Save.
Customers Tab
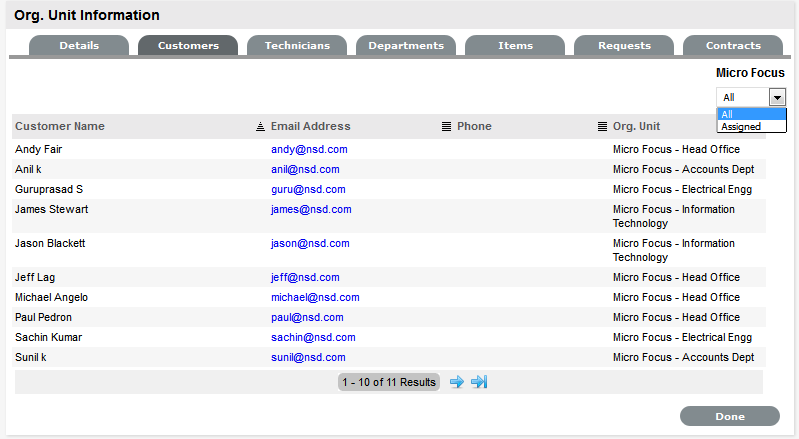
This tab displays all Customers assigned to the Organizational Unit. Customers cannot be added within this screen, as they are allocated to Org. Units when they are created or through the User>Customer>Customer Information screen. The list can be filtered based on Customers directly assigned to the Org. Unit, or all Customers associated with Company Org. Units including those associated with related Departments.
Technicians Tab
The Technicians tab allows support technicians to be assigned as key support staff for an Org. Unit. This means when requests are created, the system checks if the Item’s Organizational Unit has Technicians assigned to service its request. If so, the request is routed to a Technician assigned to the Org. Unit.
Assigning a Technician to an Organizational Unit
To assign a Technician to an Organizational Unit:
-
Select User>Organizational Units
-
Select Org Unit Name
-
Move to the Technicians tab
-
Click Edit
-
Click New

-
Select a Technician name from the drop-down list
-
Click Save
-
Select Done.
Deleting a Technician Assignment
To delete a Technician assignment:
-
Select User>Organizational Units
-
Select the Org Unit Name
-
Move to the Technicians tab
-
Click Edit
-
Tick the checkbox next to the Technician name
-
Click Delete
-
Click Done.
Departments Tab
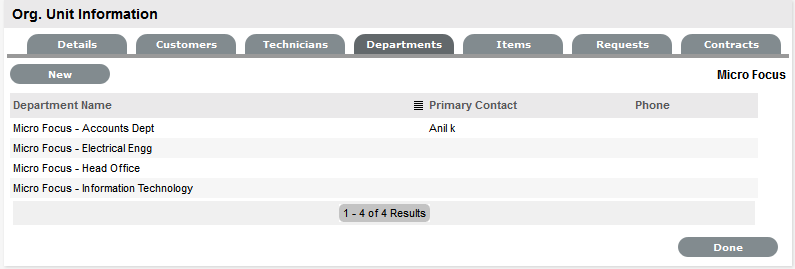
The Departments tab allows Company group information to be refined. Departments are created for a Company within the Departments Tab.
Creating a Department
To create a Department:
-
Select User>Organizational Units
-
Select Org Unit Company Name
-
Move to the Departments tab
-
Click New
-
Enter the Department Name
-
Enter other details, if required
-
Select Handshaking override option, if relevant
If the System Default Handshaking Close Action days is to be adjusted for the Org. Unit, select Yes in the Handshaking Override field. Enter the number of Days to lapse before a request will close if the Customer does not respond to the handshake email notification.
-
Click Done
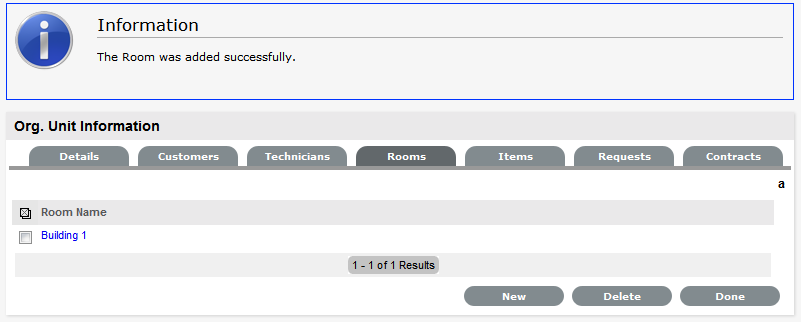
The system will move to the Department Editor, to allow Rooms to be added to the Department.

-
Select the Rooms tab if Rooms are to be added immediately
-
Click Edit
-
Select New

-
Enter the Room details
-
Click Save
-
Click New to add another Room or select Done.
Edit a Department
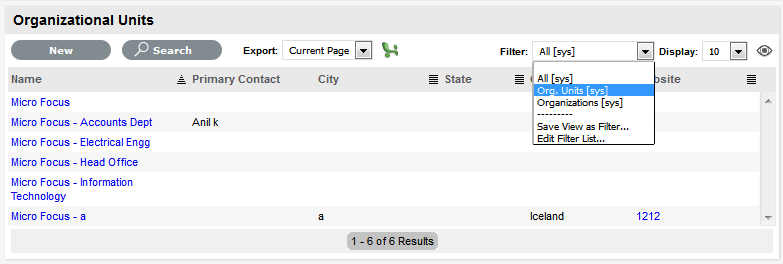
Department details are edited through theOrg. Units Filter of the Organizational Unit list.
To edit a Department:
-
Go to User > Org Units
-
Select the filter option Org.Units (sys)
-
Select a Department from the list provided
-
Click Edit
-
Modify the details as necessary
-
Select Save.
Rooms Tab
To expand Department details, Room locations can be created. This allows Customers to be assigned to specific locations within an Organizational Unit. The Rooms tab is only visible for Department Org Units that are accessed through the Org.Unit filter of the Org Unit list.

Adding a Room to a Department
To add a Room to a Department:
-
Within the Organizational Units list select the Org.Units filter
-
Select the relevant Department/Org.Unit link
-
Move to the Rooms tab
-
Click Edit
-
Click New
-
Enter the Room Name
-
Click Save.
Items Tab
This tab lists all the Items that have been assigned to the Organizational Unit.

Requests Tab
This tab lists all requests generated by the Organizational Unit. To view or modify a request, select the Task# hyperlink.

Contracts Tab
The Contracts tab displays an Organizational Unit's current contract status. An Organizational Unit can be assigned an SLA or, when Billing is enabled, a Contract that manages the period of time the SLA applies to the Org Unit. When Contracts are enabled, an Organizational Unit can have only one active Contract in the system at any one time and must have an assigned Primary Contact.
To update the Service Level assignment when Contracts are disabled:
-
User>Organization Units
-
Select the required Org Unit
The Org Unit Information screen will open.
-
Select the Contracts tab, click Edit
-
In SLA Details, using the drop-down menu, select the SLA
-
Select Save.
When Contracts are in use throughout the application, timeframes are set for Service Levels and Contract history is displayed within the Contracts tab. It is also possible to assign a Service Level and/or Contract within the Contracts tab.
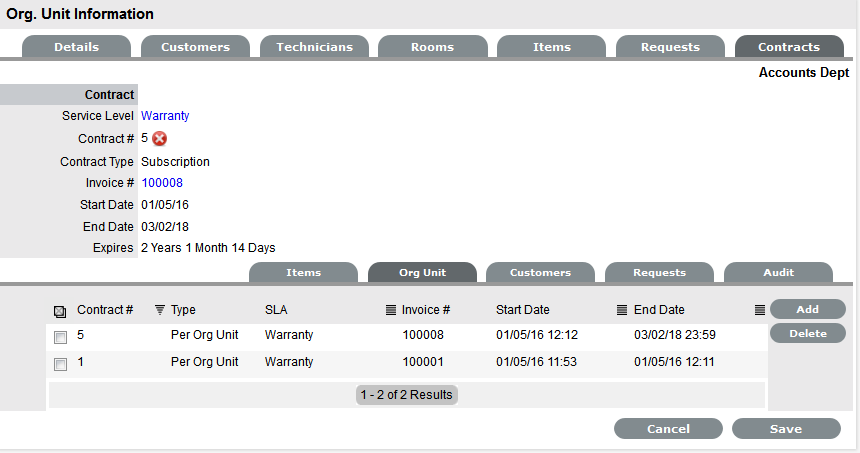
To create a new Contract for an Organizational Unit:
NOTE:To assign a Contract to an Org Unit, a Primary Contact must be nominated for the Org Unit or the system will prompt the User to assign a Primary Contact during the Contract assignment process. This means, prior to creating the Contract assign at least one Customer to the Org Unit and then designate a Customer as the Primary Contact.
To assign a primary contact:
-
Select User>Organizational Units
-
Select an Org Unit Name
The Details tab is displayed. If Customers have been assigned to the Org Unit a Primary Contact field will be visible.
-
Within the Details tab, click Edit
The Find Customer box is displayed. (Note that this search is only visible when customers have been assigned to the org unit)

-
Search for the Customer. To view all available customers click Search without entering a customer last name in the search field
-
Click the Customer name to assign them as the Primary Contact
-
Click Save.
To create a new Contract for an Organizational Unit:
-
Select User> Organizational Units
-
Select the Organizational Unit's Name
-
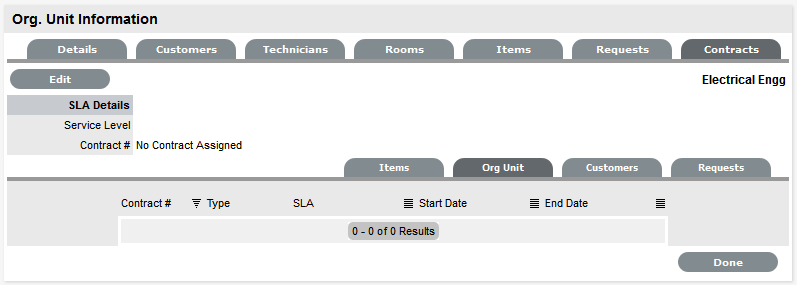
Move to the Contracts tab
-
Click Edit
The Add and Delete buttons become available with the Contracts>Org Unit tab.
-
Click Add
If a Primary Contact has not been assigned to the Org Unit a system prompt will notify the User to create a Primary Contact.
-
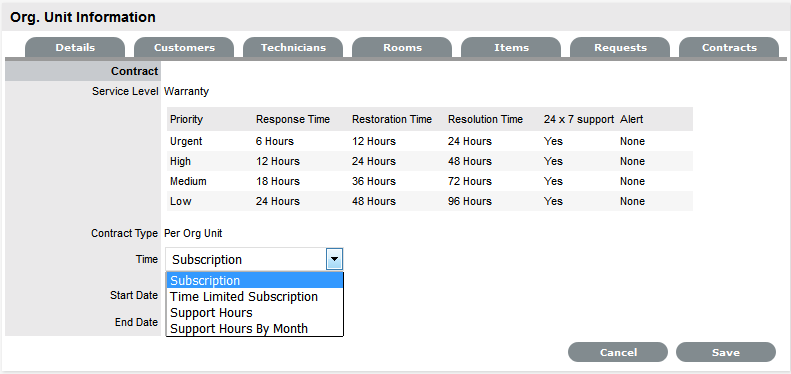
Select a Service Level from the list
When selected, the screen expands to display start and end date fields.
-
For the Per Org Unit Contract Type the Time Period for the Contract can be defined as one of the following:
Subscription if selected, the Start and End Dates are automatically set to a year from the date of creation, but can be edited if required.
Time Limited Subscription if selected, the Support Hours field is displayed and the number of support hours purchased by the Customer should be entered. Also, the Start Date and End Date fields should be completed manually by entering the length of time for the subscription period, or the system will default to entering a year from the date of creation.
Support Hours if selected, the number of support hours purchased by the Customers should be entered.
Support Hours by Month if selected, set the number of hours purchased per month and define which day of the month contract is to rollover to start the new month. The Total Support Hours will automatically be calculated based on the Start and End Dates set for the Contract.
(If a Contract is forward dated with a Start Date set in the future, the Pending Contract status is assigned.
-
Click Save
-
Click Next to continue
The system reverts to the Contracts summary screen, if the contract is forward dated and another contract is not already active, the Enable Contract option button will be available. Select this button if the contract is to commence prior to the set Start Date. Alternatively, other contracts can be queued for the Org Unit by selecting the Add button.
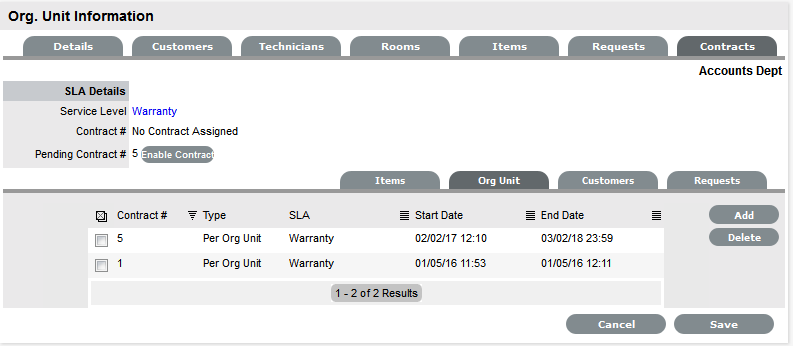
-
Click Save
To process the contract before the set Start Date select the Enable button.
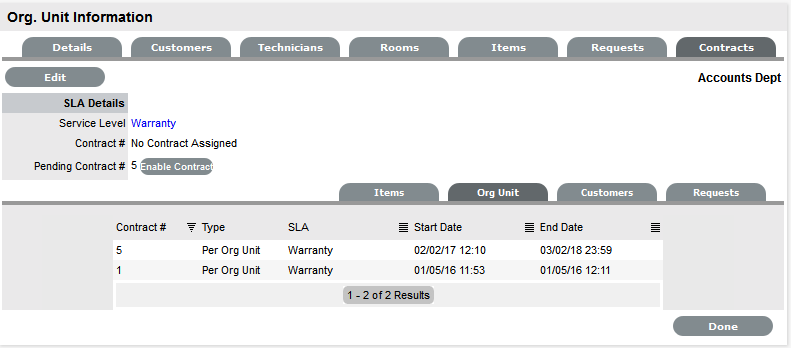
-
Click Done.
A success message is displayed.

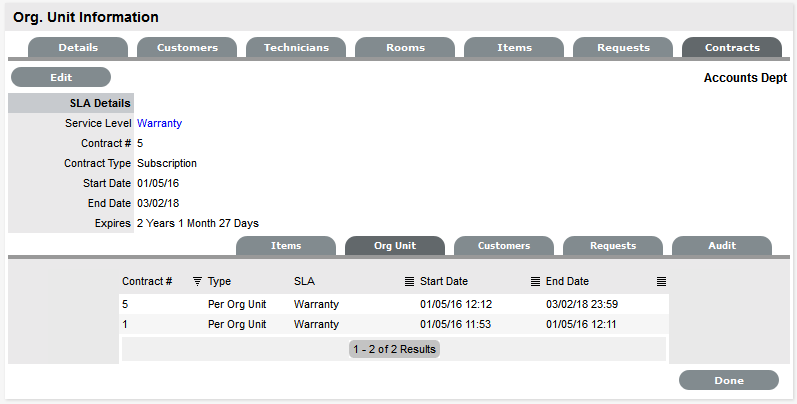
NOTE:If Invoices are enabled, a new invoice is automatically saved within the Finance>Invoices screen for the newly created Contract. If payment is required, a Pending Invoice Number is displayed and once processed, the Contract will be listed in the Org.Unit Information>Contracts>Org.Unit tab.
To delete a current Contract, as a Supervisor User, select  next to the Contract Number. Alternatively, to delete a current or queued Contract, within the Contract>Org Unit tab check the field next to the relevant Contract # and select the Delete button.
The Items and Customers tab within the Org Unit>Contracts screen is used to list all the Items and Customers Contracts that are associated with the selected Org Unit.
2.8.3 Partner Organizations
Partner Organizations are used in the management of requests between Customers/Organizational Units and external service providers within the support system. It allows multiple Partner Users to be available within a Team, and assigned at relevant levels of escalations for working on requests. Users who are assigned the Partner Role must be associated with a Partner Organization and this is done manually within the User Information screen or within the Partner Organization > Technician tab. If a Partner User is created and not associated with a Partner Organization, they cannot be assigned to a Team and therefore cannot work on requests.
Partner Users who are associated via the Partner Organization with a Customer or Organizational Unit that log a request, if assigned within the Team and Layer assigned to the request, will automatically be allocated the request in preference to internal Technician Users.
The Partner Organization capability also allows the banner within the Customer Portal for Customers associated with the Partner Organization, to be branded for the Partner Organization.
Creating a Partner Organization
To create a Partner Organization:
-
Select User>Partner Organizations
-
Click New
-
Complete the Partner Organization Name
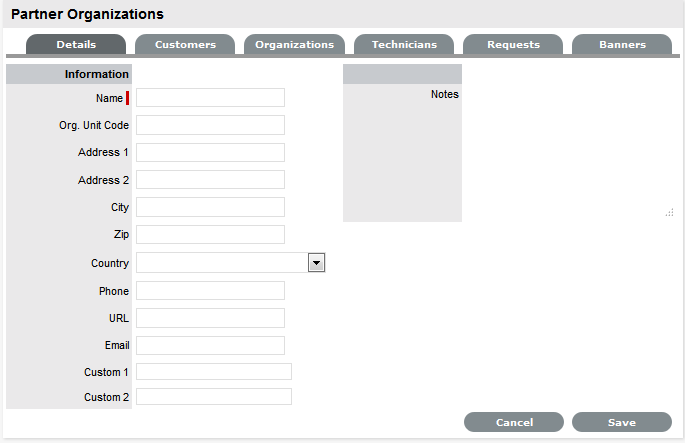
-
Enter other details, if required
-
Click Save.
Customers Tab
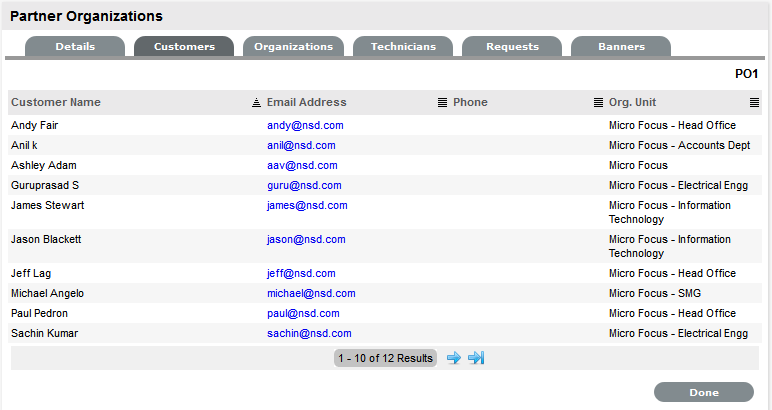
This tab displays all Customers associated with the Partner Organization, either through the Customer Information Screen or via the Customer's association with a related Organizational Unit. Customers cannot be added within this screen, as they are allocated to Org. Units when they are created or through the User>Customer>Customer Information screen.
Organizations Tab
This tab displays all Organizational Units associated with the Partner Organization. Organizational Units cannot be added within this screen, as the association is made within the Details tab of an Organizational Unit Information screen. This means when requests are created, the system checks if a Customer's Organizational Unit is associated with a Partner Organization and if so, priority for assigning the request is given to Partner Users of that Partner Organization within the escalation layer of the assigned Team.

Technicians Tab
The Technicians tab displays Users with the Partner Role who are associated with the Partner Organization. This association can be made within the User Information screen or within this tab. This means when requests are created, the system checks if the Customer is associated with a Partner Organization and if so, priority for assigning the request is given to Partner Users within the relevant Team escalation layer.
When Partner Users are created they are not automatically associated with a Partner Organization, this association needs to be made within their User Information screen or this tab.
To assign a Partner User to a Partner Organization:
-
Select User>Partner Organizations
-
Select Org Unit Name
-
Move to the Technicians tab
-
Click Edit

-
Click New
-
Select a Technician name from the drop-down list
For Partner Users to be available in the displayed list, Users must be assigned the Partner Role within the User Information screen.
-
Click Save
-
Select Done.
Deleting a Partner User Assignment
To delete a Partner User assignment:
-
Select User>Organizational Units
-
Select the Org Unit Name
-
Move to the Technicians tab
-
Click Edit
-
Tick the checkbox next to the Technician name
-
Click Delete
-
Click Done.
Requests Tab
This tab lists all requests assigned to Users associated with the Partner Organization. To view or modify a request, select the Task# hyperlink.

Banners
Within the Banners tab, a banner that brands the Partner Organization can be uploaded. This will override the system Customer Portal banner within Customer Portals for Customers associated with the Partner Organization. The graphic should be 500x70 pixels and PNG format.
Adding a Customized Banner
To add a customized banner within the Banners tab of the Partner Organization:
-
Select the Banners tab
-
Tick the Use Custom checkbox in the top right corner of the screen
-
ClickNew
A window with a browse function appears.

-
Browse to the location of the image and click

The image will be uploaded.
-
Click Save. The uploaded banner will be visible in the Customer Portal for all Customers associated with the Partner Organization.
2.8.4 Users
Users within the service management system that are assigned to support Teams must be allocated one of the following Roles:
-
Technician
-
Supervisor
-
Partner.
The above User Roles can work on requests, relevant to the Processes they have been allocated (i.e., Incident, Problem, Change or Service Requests). The About Roles section of the User Guide provides more information regarding specific User Roles in the system.
User Availability
The User List View includes the User Availability status by default, this is based on work hours configured in the Schedule tab of the User and their Vacation Status.
The following icons may be displayed in the List View:
|
Available |
|
|---|---|
|
|
The User is not on leave and is available for request assignment based on their assigned work hours. |
|
|
The User is not on leave but is not available for request assignment based on their assigned work hours. Or, if no hours are set within the Schedule tab when the "Define Works Hours" is enabled within Admin>Setup>Privileges>User screen and the User is not on vacation, the system will consider Users to be unavailable. |
|
|
The User is On Vacation. If the User logs into the system when assigned this status, they will not have to the User Portal. However, if they are also have Customer Web Access, when they log in to the system they default to the Customer Portal. |
Creating a User Account
When creating a new User, the following tabs are available:
-
Information
-
Aliases
-
Team
-
Skills
-
Types.
Information Tab
Within the User Information tab, User details can be created, viewed and edited. User Roles, Process assignment and default Login credentials can all be customized within this tab.
NOTE:If Custom Fields are to be created for User Information, it is recommended that the Administrator complete the customization prior to creating Users.
To create a new User:
-
Select User>Users
-
Click New
The User Information screen appears.
User Information Fields
Title
Select a title from the drop-down menu options. (This field is displayed if the Enable Titles option is set to Yes in the Admin>Setup>Setup>Privileges>Customer tab.)
First Name*
Enter the User's First Name.
Last Name*
Enter the User's Last Name.
User Name*
Enter a LiveTime User Name (unique).
Password*
Enter a User Password. Note: Passwords can be changed under the Users Tab or reset by the User under their My Account tab.
Roles*
Assign a Role for the User. Each Role has associated permissions.
Every Technician Role assigned also needs a Supervisor assigned.
NOTE:Note: More than one Role can be assigned but only one of Supervisor, Partner or Technician can be allocated per User.
Default Portal*
The Default Portal is the User Interface accessed by default when a User with multiple Roles logs into the system.
NOTE:If the Users Default Portal is set to Customer, the User details will not be accessible in the Users list, but included in the list within the User>Customer tab.
Assignment Template
This option is visible in a new User Information screen if Job Assignment Templates are configured in the User> Assignments tab.
Select a template to assign the new User to multiple Teams, Escalation layers and Processes.
Operations Processes
Assign the licensed access for Request Fulfilment, Incident and Problem Management.
Assigning Processes to the User gives them access to support those Processes and enables them to be assigned as Team members for those Processes' Teams.
Change Processes
Assign the licensed access for Change, Release and Deployment Management. Note, Users assigned Release are automatically assigned Deployment.
Internal Processes
Enable the Users privilege to maintain Service Level, Configuration and Knowledge Management.
Selecting the Configuration and Knowledge options displays the relevant fields that enable granular controls to be set for those processes.
NOTE:The Finance Role is limited to the processes of Configuration and Service Level Management.
Knowledge
If the User is assigned the Knowledge Management process, their privilege to create, edit, delete and/or publish KBAs can be configured.
Configuration
If the User is assigned the Configuration Management process, their privilege to create, edit and/or delete Items within the CMDB can be configured on a per task basis.
Customer Org Unit
If the User is also allocated a Customer Role within the system, this field is displayed. Enter Company or Department details that apply to the User in their Customer Role.
Line Manager
(This field is visible if the User is also assign a Customer Role within the system. The information can not be edited if the line manager details are set by the LDAP synch.)
If relevant, assign a system user with the Customer Role who can approve/reject requests made by this Customer.
Primary Email*
Enter the User's email address. System messages are sent to this address.
Send To
This field becomes available for Users that have the Customer Role and have alternate email addresses entered on the Aliases tab.
Select the most appropriate email address to be set as the default address applied to Customer correspondence. When the Send To field is set to an alias address the Primary Email address is not included in the cc list, unless specified in the request Information tab cc list.
Phone
Enter telephone details.
Mobile
A mobile number can be entered as a contact number or for use with SMS (Short Mail Service message). An SMS can be sent to notify the assigned Technician when a Service Request is raised.
SMS Messaging options:
-
From the drop down list, select the SMS service provider.
-
Override SMS Address. If your service provider does not appear in the list, click this checkbox and enter an alternate Service Provider.
SMS Override
Enter SMS Gateway override details for the User, if a number other than the one entered in the Mobile field is to be used to send/receive updates via SMS. Enter the complete SMS details in email address format, i.e., 000777891@smsgateway.provider.com.
Fax
Enter known fax details.
Pager
Enter pager details.
Salary
An annual salary can be entered. This value is used for reporting.
Forum Moderator
Select this checkbox to designate this User as a forum moderator. See Forums.
Survey Manager
Select this checkbox to enable this User to create and manage surveys in the system.
Supervisor*
Select a Supervisor, if the User has a technician role. Users with the Technician Role must be allocated a Supervisor.
Partner For
When a User is assigned the Partner Role, their associated Partner Organization must be assigned within this field.
Partner
If the User is also assigned a Customer Role, this field allows the Customer to be associated with a Partner Organization who will handle their requests when they are logged in the system.
Available
Shows if the User is available for requests to be assigned to them. This is based on work hours configured in the Schedule tab of the User and their Vacation Status. If no hours are set within the Schedule tab when the "Define Works Hours" is enabled within Admin>Setup>Privileges>User screen and the User is not on vacation, the system will consider them to be unavailable.
Assignment
**Visible when the Assignment Control is enabled in Admin>Setup>Privileges>User.
Set to Off if the User is not to be assigned new requests, irrespective of their Availability status.
On Vacation
Placing a Technician on vacation excludes them from being assigned new requests automatically. When On Vacation is activated a Technician's existing requests are not reassigned.
Training
This option is only visible for Technician Users, and when enabled allows the User to be included in Teams to view requests but does not allow them to put the request in edit mode or add Notes.
Email Locale
Adjust the default language for email correspondence, if required.
Country
The User automatically adopts the default Country set for the system. However, the Country can be manually adjusted here for the specific User.
State
Set the State information based on the Country selected, if required.
Timezone
The User automatically adopts the default Timezone set for the system. However, the Timezone can be manually adjusted for the specific User.
GPS
The GPS coordinates of the last known address.
-
* Denotes Mandatory Fields
-
Complete the User detail information
-
Click Done.
Emailing User Details

To email a User regarding their system log in credentials, click the Email button within the User Information screen. If Random Passwords is enabled, selecting Email will reset the Password and forward the details to the User. If Password Questions is enabled in Setup>Privileges>System, selecting Email will send a link to the User directing them to a page that includes the security questions set for their account and reset the password based on the answers provided. Customers must complete this process within an hour of the email being sent.
vCard Button

Select this option to download and open the User's information in an electronic business card format, to email or save outside the system.
Schedule Tab
By default the Schedule tab includes the On Vacation option, which can be set to Yes when the User takes leave. The system will automatically re-assign the User's active requests, if the Vacation Reassign option has been enabled in the Admin>Setup>Privileges>User tab. If this option has not been enabled, a Supervisor User will need to manually re-assign the requests, if required.
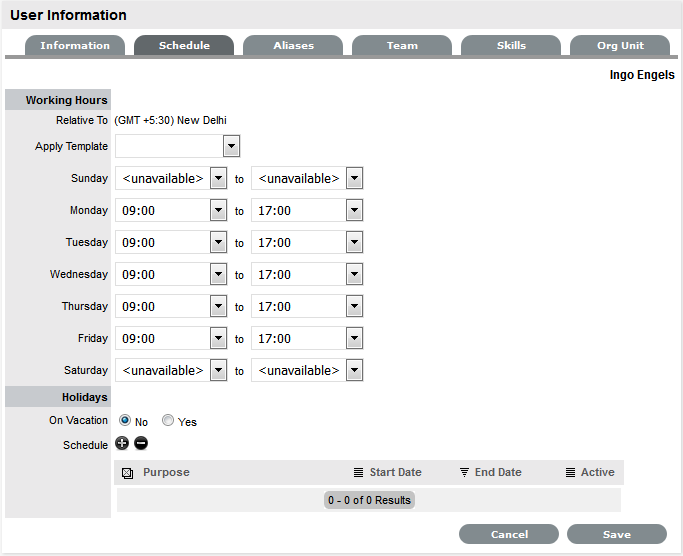
If the system Setup has been configured to Define Work Hours and Schedule Vacations, this additional functionality is available within the Schedule tab.
Define Work Hours
Use the drop-down lists to set the hours of work the User is available for the week. Based on what is set here, the system will assign requests to the User during their available hours. However, if no other Technician is available for requests based on their defined work hours, the system will assign the User new requests outside of their set work hours.
NOTE:If the Technician Define Work Hours option has been enabled, the hours of work MUST be defined, otherwise the system will ignore the Technician Assignment logic and automatically allocate new requests to the Team Lead.
Schedule Holidays
The Schedule Holidays functionality allows the Supervisor to pre-book leave in the system for Users. There are no restrictions on the number of days that can be set, and based on the configuration, when a leave period is activated, the system will automatically re-assign active requests to other available Users applying the Technician Assignment logic. If the request was initially drawn from an Incident Queue, it will not return to the Queue but be reassigned to the most relevant Technician based on the Technician Assignment logic.
As a Supervisor User, to schedule User leave:
-
Go to the Users>User option
-
Select the hyperlink name of the User
-
Move to the Schedule tab
-
Click Edit, to activate edit mode
-
In the Schedule field, select

The Vacation Details window is expanded.
-
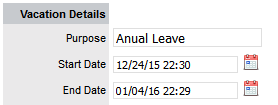
Enter the reason for leave in the Purpose box
-
Complete the Start and End date details
-
Click Save.
The details are recorded in the database and when the Start Date is reached, new requests will not be assigned to the User. After the scheduled End Date, the User account will be automatically re-activated.

NOTE:It should be noted that if the User on vacation is a Team Lead for any Teams where there are no Technicians available for new request assignment, the system will allocate new requests to the Team Lead, regardless of their vacation status.
The Supervisor Events calendar in the Home tab shows when Users are on Vacation:

Aliases Tab
NOTE:This is only applicable if the User has the Customer Role.
Use the Aliases tab to enter additional email addresses. The system creates requests from emails sent to the system account from a valid email address. Email addresses in the Aliases tab allow the User to send emails to the system account from more than one address. Notifications for requests created using an address in the Aliases tab, are sent to the main email address and cc'd to the alias address that was used to create the request.
When one or more alias email addresses have been created for a Customer, a Send To field is displayed on the Customer Information screen, which allows the most appropriate email address to be set as the default address applied to Customer correspondence. When the Send To field is set to an alias address the Primary Email address is not included in the cc list, unless specified in the request Information tab cc list.

To add an alias email address:
-
Select User>Users.
-
Click on the User name
The User Information screen appears.
-
Select the Aliases tab
-
Click Edit to access the Add button
-
Click Add
-
Enter an alias email address
-
Click Save.
When an alias email address has been created for a Customer, a Send To field is displayed on the Customer Information screen, which allows the alias email address to be set as the default address applied to Customer correspondence.
NOTE:An alias will only be used if the User has a Customer Role.
To remove an Alias Email Address, in Edit mode, tick the checkbox next to the Email Address and click the Remove button.
Team Tab
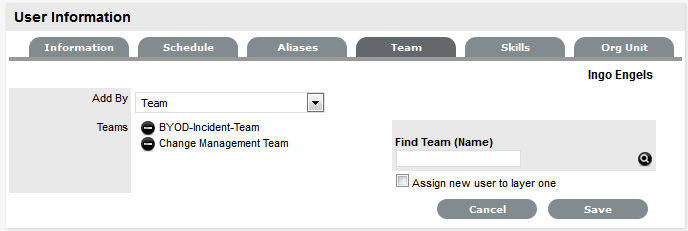
The User Team tab lists Teams associated with the selected User. Use this section to assign the User to one or more support Teams, making the additions by Team or job Assignment templates that have been configured in the system. Processes selected in the Information tab for the User determine the Teams available in the Team tab.
Once a User is assigned to the Team, the Supervisor must configure the escalation layers for the Team to include the new User. However, the User can easily be added to Layer One of escalation when associated with a new Team by ticking the Assign new users to layer one option when assigning the Team within this tab. Also, if Assignment templates are created in the system, by selecting Team Template, the User will automatically be added to Teams, Escalation Layers and Work Groups configured within the selected Template.
NOTE:The User must be assigned the relevant Processes for Support Teams to be shown in Team search results. If an Assignment template is selected and includes Teams for Processes the current User is not allocated, those Teams will not be included on the Template.
To add a User to a Team within the Team tab:
-
Click Edit
-
Using Add By Team, enter a Team Name in the Find Team field and click
 or leave the field empty and click
The Teams for Processes that the User is assigned are displayed in the search results.
-
Tick "Assign new user to layer one", if relevant
-
Select a Support Team link
The User is assigned to the Team and layer one of escalation if appropriate.
-
Click Save.
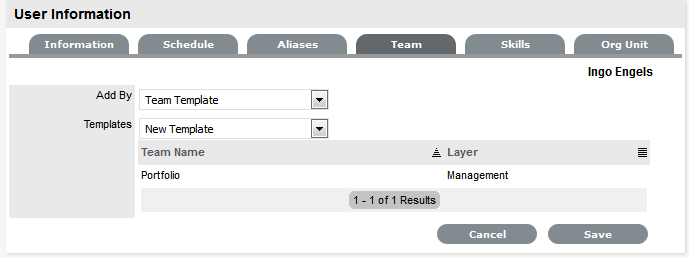
To add a User to a Team within the Team tab using Assignment templates:
-
Click Edit
-
Within the Add By field, select Team Template
Job Assignment Templates that have been configured in the User>Assignments tab are displayed, but only including Teams consistent with the Processes assigned to the User

-
Select one or more Template options
-
Click Save
The User is automatically included in the Teams, Escalation Layers and Work Groups configured in the Template.
To remove a User from a Team:
-
Select User>Users
The User Information screen appears.
-
Click on the name of the User
-
Select the Team tab
-
Click Edit
-
Select
 to remove a Team assignment
 -
Click Save
-
Click Done.
NOTE:If a User is the Team Lead or the only person assigned to an escalation layer they cannot be removed from a Team under this tab.
Skills Tab
Use this section to assign any specific Classifications that are to be handled by a Supervisor, Technician or Partner. This assignment assumes areas of expertise for Users assigned to these Classifications. This allows the system to automatically route requests logged against these Classifications to the most appropriate User.
NOTE:Prior to using the Skills tab, Items and Classifications should be configured.
Assigning a Classification
To assign a Classification:
-
Select User>Users>Skills
-
Click Edit to display the Add button
-
Click Add
-
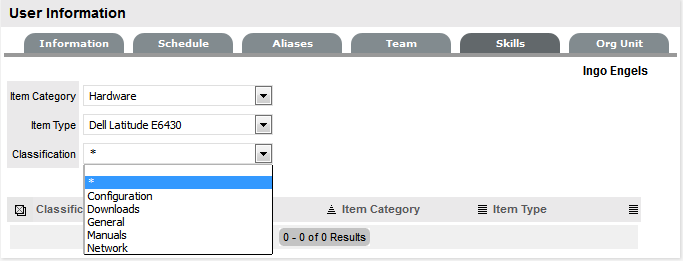
Select the Item Category
The Item Type and Classification Type drop-down list is displayed.

-
Choose an Item Type, if relevant
-
Select * to assign all Classifications as Skills or choose a specific Classification
The list displayed will include all Classifications configured for the Item Category and the Item Type, if an Item Type is selected.
-
Click Save
-
Click Done.
NOTE:The Classification assigned to the User is either based on the Classifications of an Item Category or Item Type, hence displaying two columns. However, the Item Type column will only include information when the Classification selected is specific to that Item Type, and not directly related to the Item Category.
To remove a Classification:
-
Select User>Users
The User Information screen appears.
-
Click on the name of the User
-
In the Skills tab, click Edit
The Delete button appears at the bottom right.
-
Click the checkbox next to the Classification. Multiple Classifications can be checked
-
Click Remove
-
Click Done.
NOTE:The Classification assigned to the User is either based on the Classifications of an Item Category or Item Type, hence displaying two columns. However, the Item Type column will only include information when the Classification selected is specific to that Item Type, and not directly related to the Item Category.
Org Units
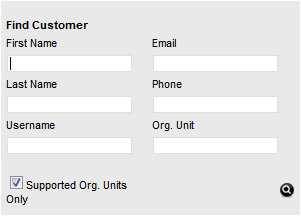
Use this section to assign one or more Org Units to a Supervisor, Technician or Partner, which will result in requests that are logged by these Org Units being routed to the assigned Users. When Users are assigned to support Organizational Units, the Find Customer option during the request creation process, displays the Supported Org. Units Only option. This limits the Customer search results to those Customers who belong to the Org. Units the logged in Technician is assigned to support.
Assigning an Org Unit
To assign an Org Unit:
-
Select User>Users>Org Units
-
Click Edit to display the Find Org. Unit search field
-
Enter any known Org Unit details or leave the field blank to return the full list of Org Units recorded in the system

-
Click

-
Click on the Org Unit name hyperlink to associate it with the User
Multiple selections may be made, if required.
-
Click Save.
Removing an Org Unit
To remove the association between a User and an Org Unit:
-
Select User>Users
The User Information screen appears.
-
Click on the name of the User
-
In the Org Unit tab, click Edit
-
Select
 next to the relevant Org Unit
The Org Unit details are removed from the tab.
-
Click Save
-
Click Done.
2.8.5 Teams
Technicians are allocated to Teams for the various support processes. For each Process (i.e., Incident, Problem, Change and Service Request) there must be at least one support Team.
Default Teams are assigned to specific Item Types. Support requests generated against an Item Type are then assigned to a Technician within the default support Team for that Process. The Team may be reassigned based on other options provided through the associated SLA(s) and Workflow(s).
Support Teams for Incident and Problem Management include escalation layers, and Technicians are assigned to each of these layers. Incidents and Problems follow the escalation path determined by the service level triggers assigned to the request. For a Technician to be able to edit a request, they must be a member of the assigned Team, although they do not need to be included in an escalation layer.
Service and Change Request Teams are built around the selected Workflow. Technicians are assigned to work groups and each State of the Workflow Lifecycle is associated with a selected work group. When a request moves to a next State, it is assigned to a Technician within the work group associated with that Workflow State. One or multiple levels of escalation can also be configured for the Workflow, which span the lifecycle of the Workflow the Service or Change Team are assigned.
A Service Portfolio Team can be configured in the system, assigning the Users who will manage the development, production and discontinuation of services offered to the organization.
Use this section to:
-
Create new Incident and Problem Teams with escalation layers
-
Create Service and Change Request Teams with workflow assignments

Unknown Team
By default the system includes the system Team, Unknown, within the Teams List. This is the Team used by the application for Incidents created via email. It can be configured to use the system email address or an email account that is an alias for the main system account and Technicians can be assigned like any other Incident Team.
NOTE:The Unknown Team should NOT be re-named and will NOT appear in any other Teams lists throughout the application, i.e., when assigning a Team to an Item or Item Type.
Creating an Incident or Problem Team
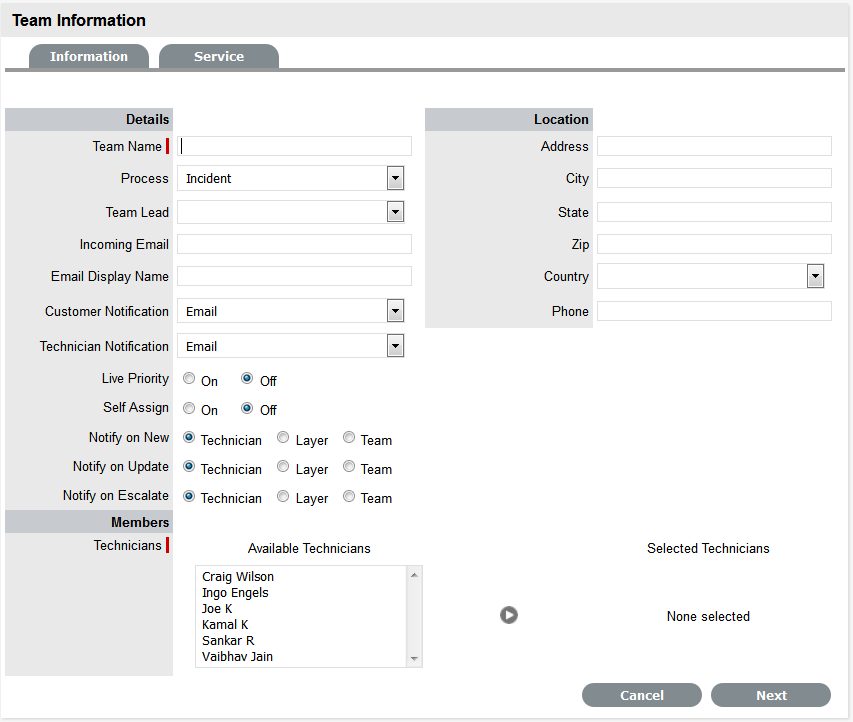
To create an Incident or Problem Team:
-
Select User>Teams
-
Click New
-
Enter the Team Name
-
Select Incident or Problem Process
-
Enter the Team email address, if relevant
-
Define the Team options
Options
Description
Team
Enter the Team Name. (Required.)
Process
Indicates if the Team is to manage Incidents or Problems.
Team Lead
The Technician assigned to supervise the Team and its activities. Options are visible when the Technicians have been assigned to the Team.
Incoming Email
Enter a specific Email Address for the Team,which allows Customers to use directly. This address will need to be configured as an alias to the system support address on the Email Server.
Email Display Name
If desired, enter a name for the Team that will be used in the From address for email responses sent by members of the Team.
Customer Notification
Sets the default notification method applied to requests for Customer correspondence, when requests are assigned to this Team.
The Customer Defined option, derives the method of notification from the setting within the Customer's Profile or Account Information tab.
Technician Notification
Sets the default notification method applied to requests for Technician correspondence, when requests are assigned to this Team.
Live Priority
Routes requests to Technicians who belong to the Team and logged into the system.
Self Assign
When enabled, requests created by a Technician will automatically be assigned to that Technician.
Notify on New
Determines who is informed about the creation of a new request.
Technician - notifies only the Technician assigned to the request.(This is the default setting.)
Layer - notifies all members in Layer One of the Team assigned to the request.
Select Team - notifies all technicians in the Team.
Notify on Update
Determines who is informed when a request is updated.
Technician - notifies only the Technician assigned to the request.(This is the default setting.)
Layer - notifies all members in Layer One of the Team assigned to the request.
Select Team - notifies all technicians in the Team.
Notify on Escalate
Determines who is informed when a request is escalated.
Technician - notifies only the Technician assigned to the request.(This is the default setting.)
Layer - notifies all members in Layer One of the Team assigned to the request.
Select Team - notifies all technicians in the Team.
Incident/Problem Queue
Allows the Team to use a holding bay for Incidents/Problems that are received via email or the Customer Portal. (This option is visible if it has been enabled by the Administrator.)
If the Team has only one Technician assigned to Layer One of Escalation, new Incidents are automatically assigned to that Technician and that Technician is notified of the new Incident assignment.
If the Team has multiple Technicians assigned to Layer One of Escalation, the new Incident is placed in the Queue (i.e., it is assigned to the System User) and all members of the Team are notified that a new Incident has been assigned to the Incident Queue.
Queue Visibility
When the Incident Queue is enabled, the option can be refined to allow the Queue to be available for assigned Workflow entry points, or all stages of the assigned Workflow. If All States is enabled, Users can move requests back to the Queue throughout the request lifecycle.
Edit Assign
When set to Yes and a request assigned to the System User (i.e., Queue) is opened in Edit Mode, the system will automatically assign the request to the User editing the request if they are in the Escalation Layer associated with the request.
Close Assign
When set to Yes and a request assigned to the System User (i.e., Queue) is moved to an Exit State of the Workflow, the system will automatically assign the request to the User who prompted the close action.
-
Complete the Team Location details, if required
-
Select Technicians from the Available Technicians list
Highlight Technician names within the Available Technicians list and click the arrow icon to move the Users to the Selected Technicians list.
-
Click Next
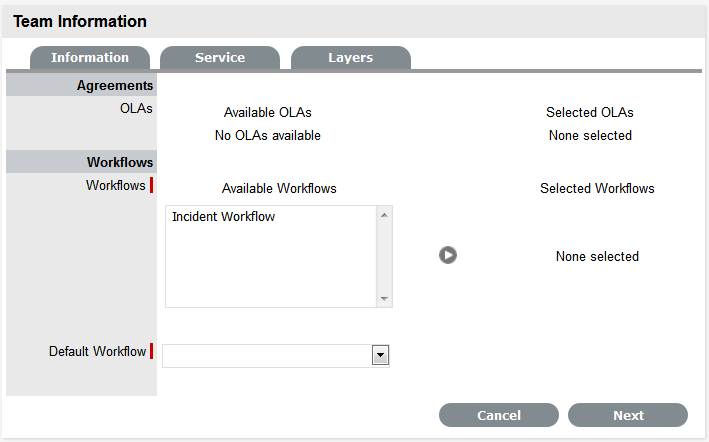
The Service Screen displays all Available OLAs and Workflows
-
Assign the relevant OLAs within Available OLAs list (Optional)
HIghlight the Team Name and click the arrow icon to move an OLA to Selected OLAs list. Assigning an OLA to the Team ensures the Team's details will be selectable when the assigned OLA is associated with a Workflow State.
-
Assign the relevant Workflows within the Available Workflow list
Highlight the Workflow Name and click the arrow icon to move the Workflow into the Selected Workflows list. Assigning Workflows to the Team ensures the Team is displayed as an option within the request Summary tab when the associated Workflows are assigned to a request.
-
If more than one Workflow is assigned, select a Default Workflow form the drop-down list
-
Select Next
The Escalation screen appears. This allows Escalation Layers and Technician assignment to be configured.
-
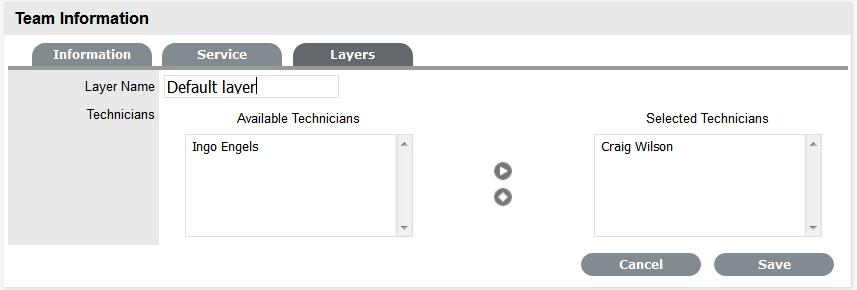
To edit the Default Layer, select the link
-
Move Technicians between the Available and Selected boxes and amend the Layer Name, if required
-
Click Save
-
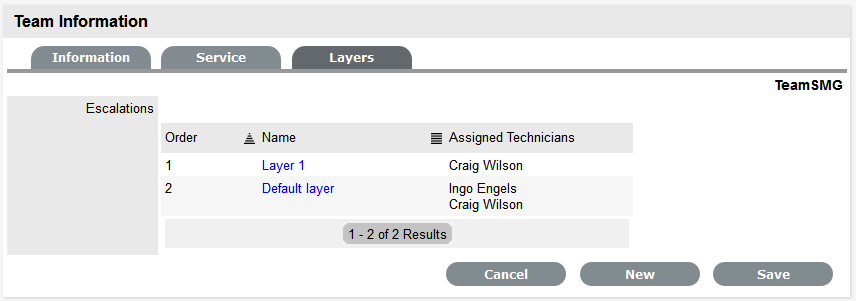
To create additional Escalation Layers, select New
By default the Team Lead will always be assigned to the Escalation Layer upon creation.
-
Click on the Layer link to edit the Technician assignment and Save
-
To delete a Layer, select the Layer Name
-
Click the Delete button and Save.
Creating and Configuring Additional Escalation Layers
Additional escalation levels can be created, if required. The order of the escalation pathway is determined by the order of creation. That is, layer one is entry level support, layer two is the next level of support and so on.
-
Select Team Information>Layers
-
Click Edit to display the New button
The Technicians who are assigned to the Team are displayed in the Available Technicians list
-
Add and/or remove Technicians from the Escalation Layer Members list
-
Click Save.

Editing an Escalation Layer
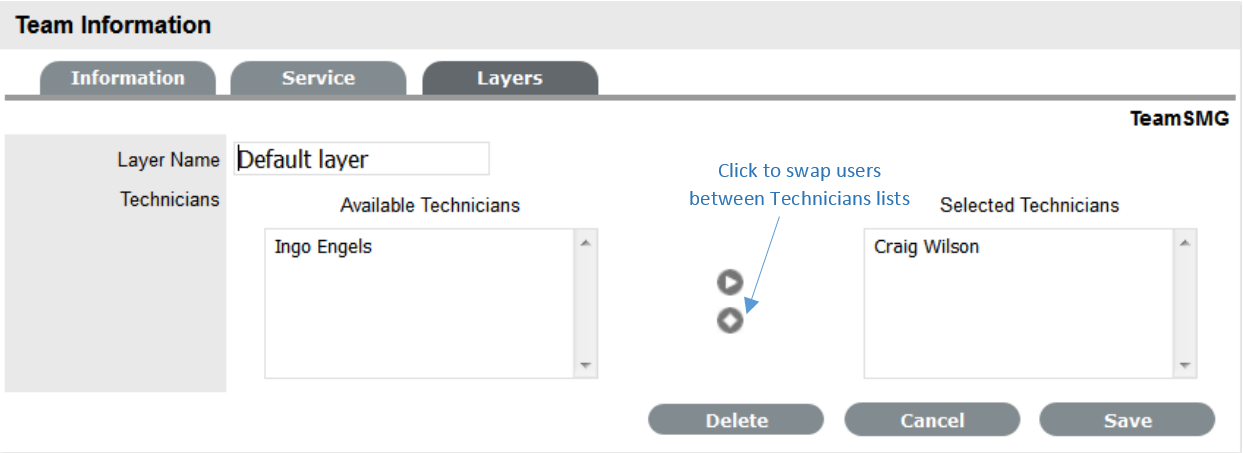
To edit an Escalation Layer with the Team Information screen in Edit mode:
-
Select the Layers tab
-
Click on the Layer name hyperlink
The list of available and assigned Technicians is displayed.
-
Remove and add Technicians, as required
Highlight the User Names within the relevant list and click the arrow to move the User to the required list.
-
Select Save.
Configuration of Escalation Layers
The following process is recommended for configuring Escalation Layers. Level one should contain the majority of Available Technicians who have been assigned to the Team. A smaller but more experienced group should be assigned to the second level. An even smaller and more experienced group should be assigned to the third level and so on until the final level of escalation. Ideally, the last layer should contain only the Team’s Lead Technician.
There are no constraints to prevent individual Technicians from being assigned to more than one level. However, for a Technician to be able to edit a request they must be a member of the assigned Team, although they do not need to be included in an escalation layer.
To remove a User from a Team:
-
In the User tab, click Users
The User Information screen appears.
-
Click on the name of the User
-
Select the Team tab
-
Click on Edit
The Remove button is displayed.
-
Select the checkbox to the left of the Team Name
Multiple check boxes can be selected.
-
Select Remove to delete the User from a Team
The User Name is removed from the Team.
-
Click Done.
Creating a Service or Change Request Team
Service and Change Request Teams are built around the selected Workflow. Technicians and Managers are assigned to work groups and each State of the Workflow Lifecycle is associated with a selected work group. When a request moves to a next State, it is assigned to a Technician or Manager within the work group associated with that Workflow State. One or multiple levels of escalation can also be configured for the Workflow, which span the lifecycle of the Workflow the Service or Change Team are assigned.
Creating a Service Request or Change Team
To create a Service Request or Change Management Support Team:
-
Select User>Teams
-
Click New
-
Enter the Team Name
-
Select the Service or Change Request Process
-
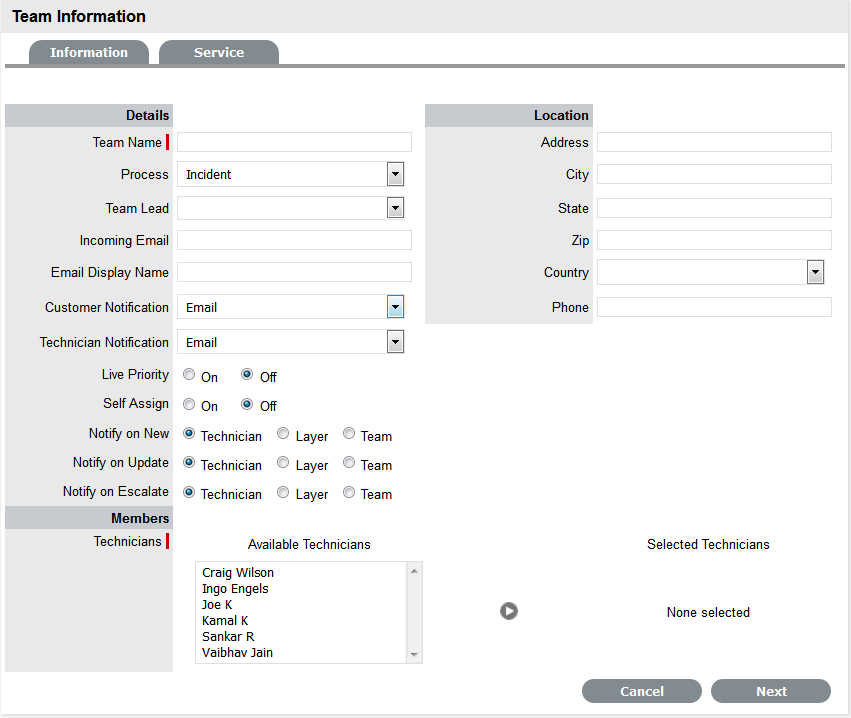
Enter the Team email address, if relevant
-
Define the Team options:
Options
Description
Process
Indicates if the Team is to manage Change or Service Requests.
Team Lead
The Technician assigned to supervise the Team and its activities. Options are visible when the Technicians have been assigned to the Team.
Incoming Email
Enter a specific Email Address for the Team,which allows Customers to use directly. This address will need to be configured as an alias to the system support address on the Email Server.
Email Display Name
If desired, enter a name for the Team that will be used in the From address for email responses sent by members of the Team.
Customer Notification
Sets the default notification method applied to requests for Customer correspondence, when requests are assigned to this Team.
The Customer Defined option, derives the method of notification from the setting within the Customer's Profile or Account Information tab.
Technician Notification
Sets the default notification method applied to requests for Technician correspondence, when requests are assigned to this Team.
Self Assign
When enabled, Requests created by a Technician will automatically be assigned to that Technician.
Notify on New
Determines who is informed about the creation of a new Request.
Technician - notifies only the Technician assigned to the request. (This is the default setting.)
Layer - notifies all members in Layer One of the Team assigned to the request.
Select Team - notifies all members of the Team.
Notify on Update
Determines who is informed when a Request is updated.
Technician - notifies only the Technician assigned to the request. (This is the default setting.)
Layer - notifies all members in Layer One of the Team assigned to the request.
Select Team - notifies all members of the Team.
Notify on Escalate
Determines who is informed when a Request is escalated.
Technician - notifies only the Technician assigned to the request. (This is the default setting.)
Layer - notifies all members in Layer One of the Team assigned to the request.
Select Team - notifies all members of the Team.
Request Queue
(Service Request Teams only)
Allows the Team to use a holding bay for Requests that are received via email or the Customer Portal. (This option is visible if it has been enabled by the Administrator.)
If the Team has only one Technician assigned to the work group associated with the Workflow Default Entry State, new Requests are automatically assigned to that Technician and that Technician is notified of the new Request assignment.
If the Team has multiple Technicians assigned to the work group associated with the Workflow Default Entry State, the new Request is placed in the Queue (i.e., it is assigned to the System User) and all members of the Team are notified that a new Request has been assigned to the Request Queue.
Queue Visibility
(Service Request Teams only)
When the Request Queue is enabled, the option can be refined to allow the Queue to be available for assigned Workflow entry points, or all stages of the assigned Workflow. If All States is enabled Users can move Requests back to the Queue throughout the Request lifecycle.
Edit Assign
(Service Request Teams only)
When set to Yes and a request assigned to the System User (i.e., Queue) is opened in Edit Mode, the system will automatically assign the request to the User editing the request if they are in the Escalation Layer associated with the request.
Close Assign
(Service Request Teams only)
When set to Yes and a request assigned to the System User (i.e., Queue) is moved to an Exit State of the Workflow, the system will automatically assign the request to the User who prompted the close action.
Strong Authentication
If the Manager User Name and Password is required to be re-entered during the processing of a Request in an Approval State, set this option to Yes.
-
Complete the Team Location details, if required
-
Select Technicians from the Available Technicians list
Highlight Technician names within the Available Technicians list and click the arrow icon to move the Users to the Selected Technicians list.
-
Select Managers from the Available Managers list
This is required if a Manager is to be assigned to a Workflow Approval State.
Highlight Manager names within the Available Managers list and click the arrow icon to move the Users to the Selected Manager list.
-
Click Next
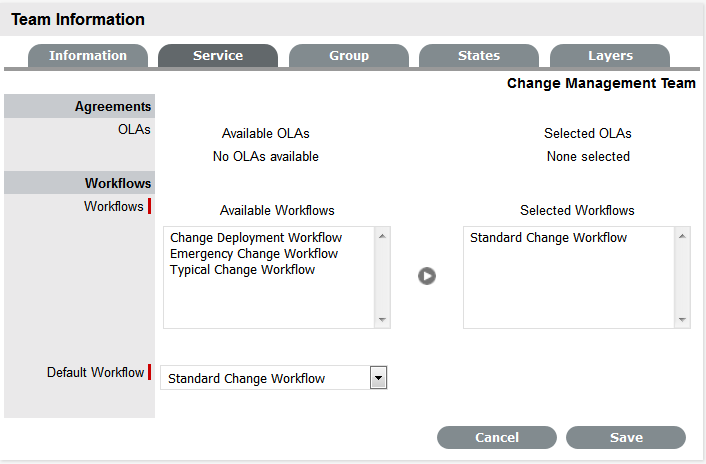
The Service Screen displays all Available OLAs and Workflows
-
Assign the relevant OLAs within Available OLAs list (Optional)
Highlight the OLA and click the arrow icon to move an OLA to Selected OLAs list. Assigning an OLA to the Team ensures the Team's details will be selectable when the assigned OLA is associated with a Workflow State.
-
Assign the relevant Workflows within the Available Workflow list
Highlight the Workflow and click the arrow icon to move the Workflow into the Selected Workflows list. Assigning Workflows to the Team ensures the Team is displayed as an option within the Request Summary tab when the associated Workflows are assigned to a Request.
-
Select a Default Workflow from the drop-down list
This is relevant if more than one Workflow is assigned to the Change Team. The Default Workflow is automatically applied to an RFC that has been allocated to this Change Team.
-
Select Next
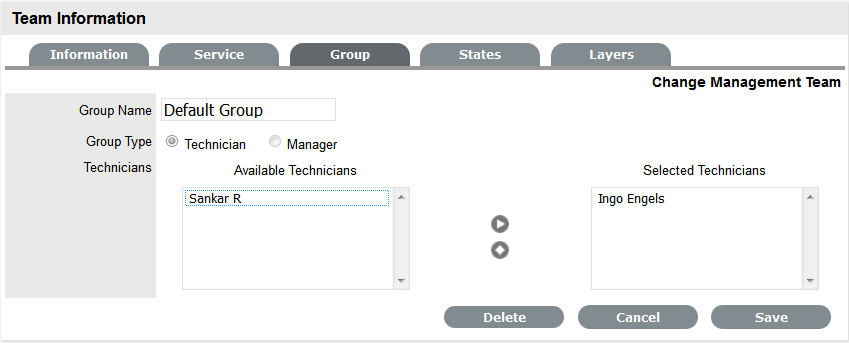
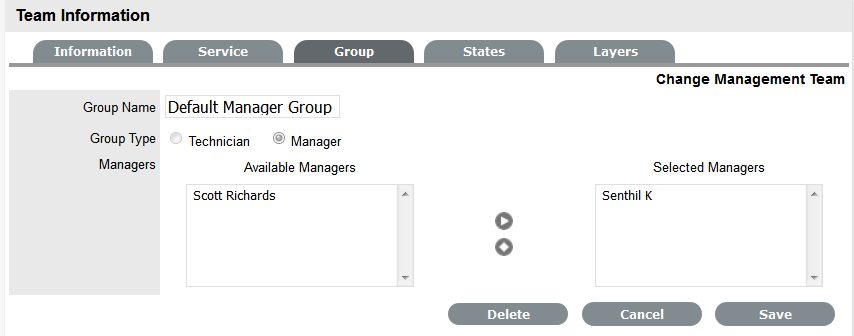
The Group tab displays the Default Technician Group and Default Manager Group. Within this tab multiple groups of Technicians and Managers can be created that are then associated with the relevant stages of the Workflow.
-
Click on the Default Group link
The Team Lead will automatically be applied to the Group. Rename the Work Group, if relevant. Highlight Technician names within the Available Technicians list and
click the arrow to allocate the Technician to the Selected Technicians field.
-
Click Save
Repeat the process for the Default Managers Group.
-
Click New to create any additional Technician or Manager Groups
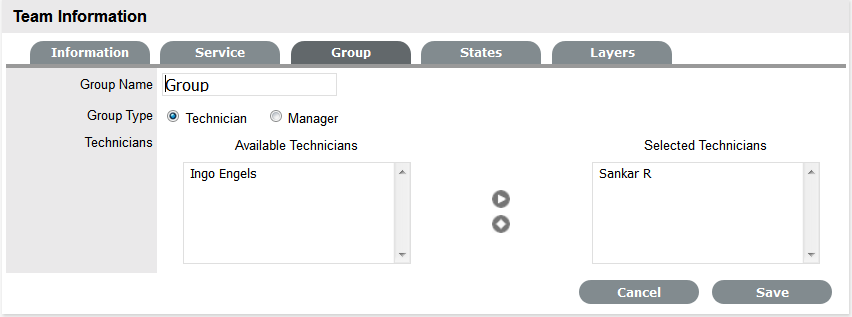
-
Click Save to save the details of a newly created Technician or Manager Group
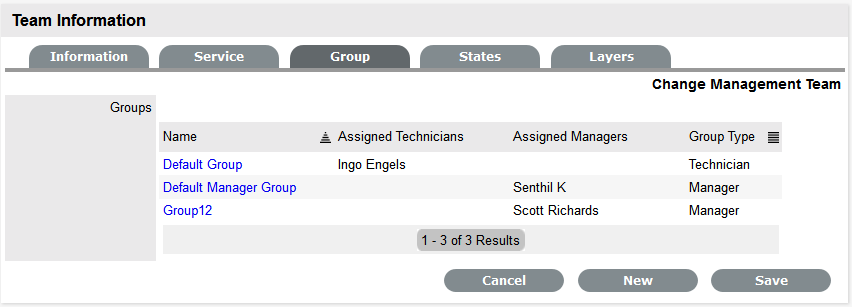
-
Click Next, when all Groups that are required for the Workflow have been created
The Workflows/States of the Workflow Lifecycle are displayed with the system Default Group assigned to each State. The default Manager Group will be assigned to any Manager Approval States.
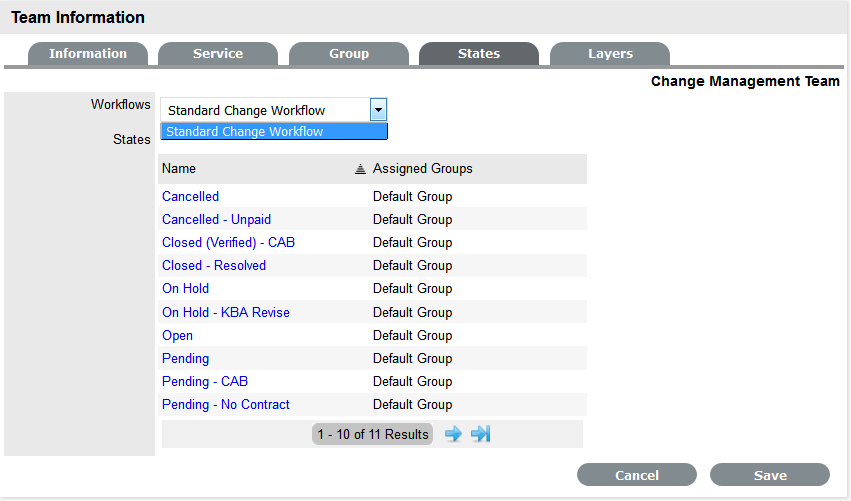
-
To assign a different Work Group to a Workflow State, click the state Name link
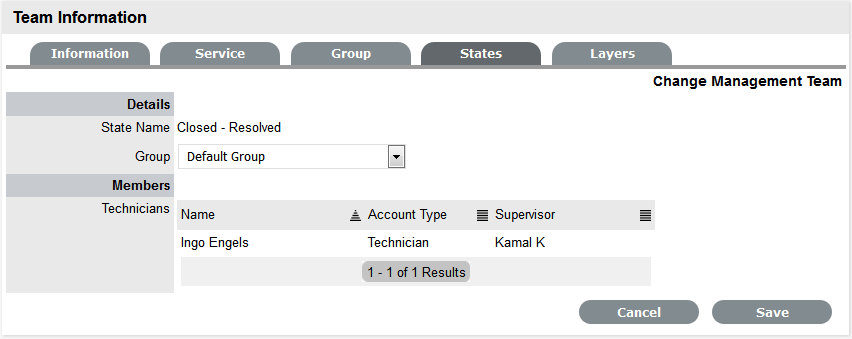
-
Select the relevant Group from the drop-down list
-
Select Save
Repeat the Work Group assignment for each State, where relevant.
-
Click Next
The Layers tab is displayed, where one or more overarching layers of escalation can be applied to the Workflow.
-
Click on the Layer link to assign the relevant Users to the escalation layer and save
-
Click Save and Done.
To remove a User from a Team:
-
In the User tab, click Users
The User Information screen appears.
-
Click on the name of the User
-
Select the Team tab
-
Click on Edit.
The Remove button is visible.
Manager Approval State assignment
For a Manager User to be allocated the privilege of approving a Change or Service Request they must be assigned to a Change or Service Request Team and an Approval State of the relevant Change or Service Request Workflow. Change Workflows must include Approval States (i.e., States where activities are accepted or rejected) before the option to assign a Manager to a Change Team becomes available.
To assign a Manager to a Workflow Approval State:
-
Go to User > Teams
-
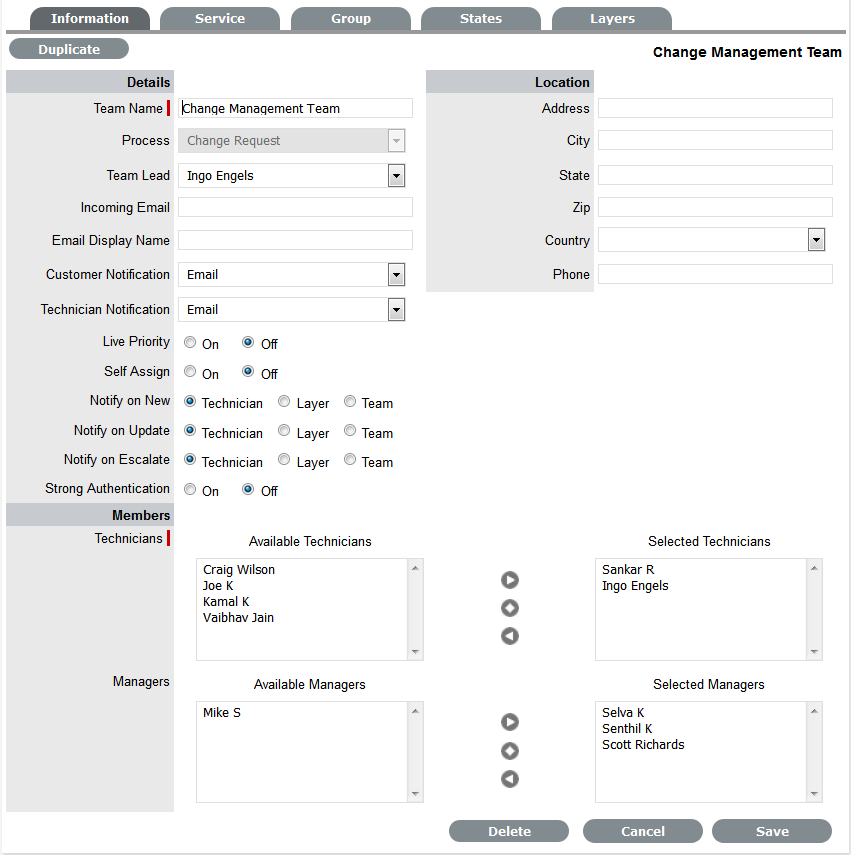
Select a Service or Change Request Team
-
In Edit mode, assign relevant Managers from the Available Managers list
Highlight Manager names within the Available Managers list and click the arrow icon to move the Users to the Selected Manager list.
-
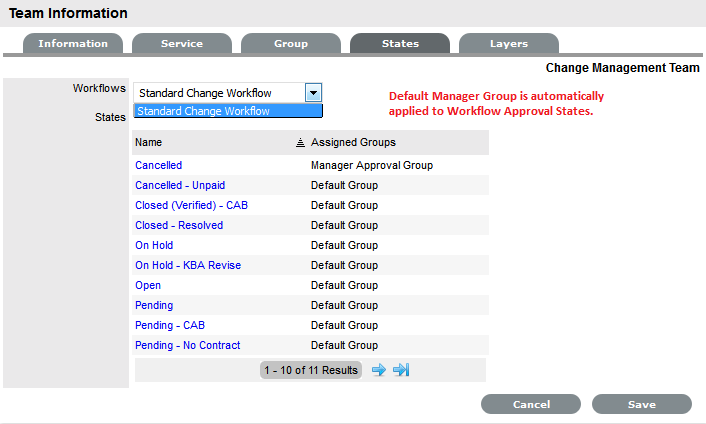
Go to the States tab
-
Select a Workflow
The Default Manager Group, which may have been re-named, is automatically assigned to all Approval States of the selected Workflow.
-
To adjust the assigned Manager Group, select the Approval Workflow State link
-
Select the Manager Group from the drop-down list and save
-
Click Save and Done.
Layers Tab
Requests moving through Service or Change Request Workflows can be escalated to the Team Lead or Supervisor User at any stage of the Workflow that is configured as a Manager Approval State. This action can be achieved by using the Escalate button within the Summary tab of the Request.
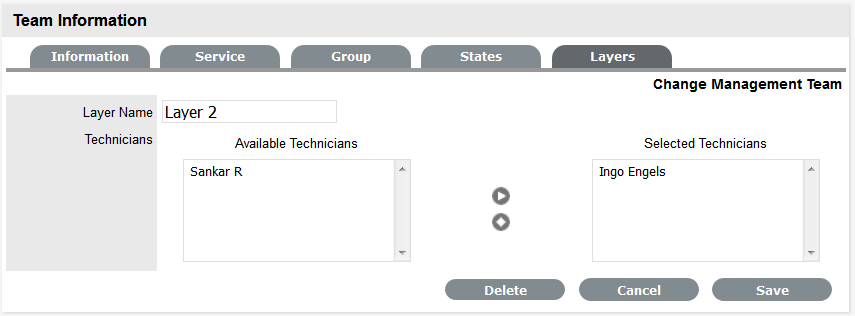
By default escalation layers are created with the Team Lead assigned. To amend or add to the assignment:
-
Go to User > Teams
-
Select a Service or Change Request Team
-
Click Edit
-
Select the Layers tab
-
Click on the Layer hyperlink
-
Amend the assignment, as required
-
Click Save
If additional escalation layers are required, select New and repeat steps 5 to 7.
-
Click Done when all required escalation layers are configured.
Service Portfolio Team
The Service Portfolio Team is responsible for overseeing the creation and publication of all service offerings in the Service Portfolio, which include:
-
Services under development
-
Services in production and operation, stored in the Service Catalog.
-
Retired and discontinued services.
Working with Service Portfolio Teams
To maintain control of the creation, editing and deletion of Service Items within the CMDB, Service Portfolio Teams can be assigned to Service Category templates. Included within these Teams are Groups of Users who are responsible for managing Item information at the various stages of the Service Lifecycle.
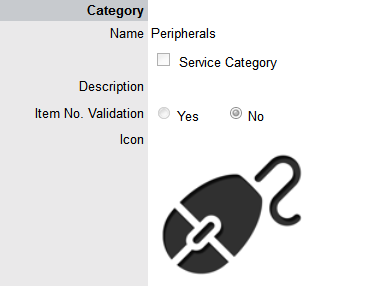
When Service Portfolio Teams are configured within the application, the option to assign a Service Portfolio Team is displayed within Service Category templates in the Configuration>Categories tab. This allows for the Groups that are created within the Team, to be assigned to the different Category Lifecycle States included in the Lifecycle Map displayed in the Item Categories>Life Cycle tab.

Assigning Groups to Category Lifecycle States allows the Users within the Group to edit the details of an Item when it is assigned that stage of the Category Lifecycle.
NOTE:When creating the Teams, it is suggested that the Group names reflect the stage of the Service Lifecycle, for instance Service Design, Service Implementation, Service Operation, Service Quality Control and Catalog Management.
Creating a Service Portfolio Team
To create a Service Portfolio Team:
-
Select User>Teams
-
Click New
-
Enter the Team Name
-
Select the Service Portfolio Process
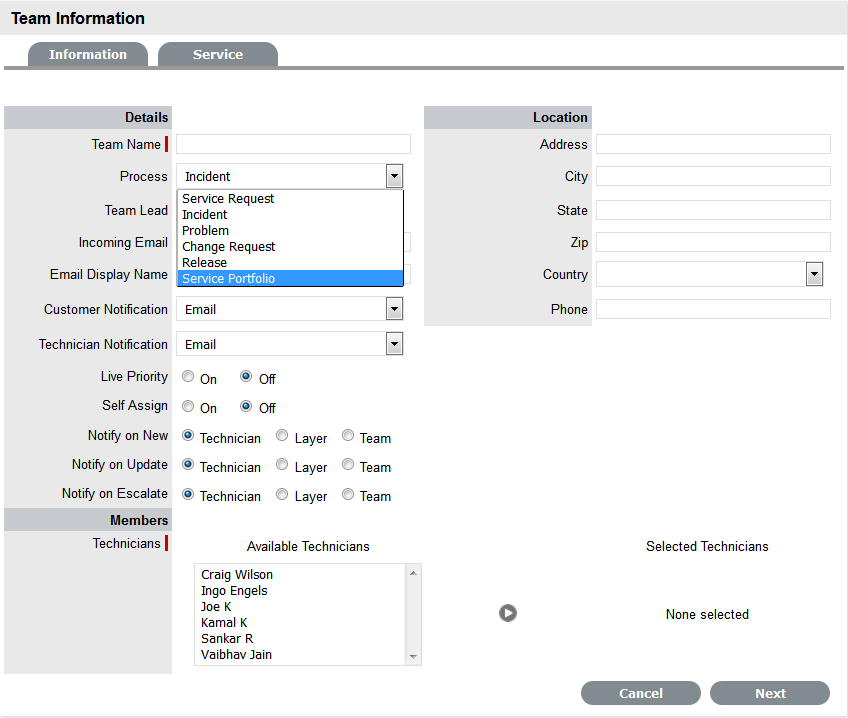
-
Complete the Team Location details, if required
-
Select Technicians from the Available Technicians list
Highlight Technician names within the Available Technicians list and click the arrow icon to move the Users to the Selected Technicians list.
-
Set the Team Lead
-
Click Next
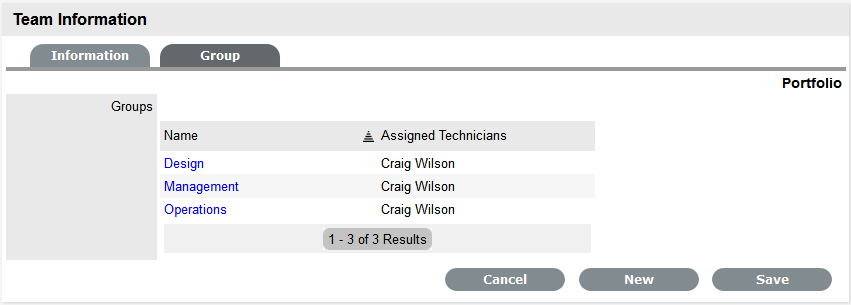
The Service Screen moves to the Group tab where the Users are assigned the various Groups that are provided the privilege of managing Item information and lifecyle status as part of managing the Service Portfolio. Some suggested Groups include Service Design, Service Implementation, Service Operation, Service Quality Control and Catalog Management.
-
For each Group link, click to assign Users to the Team
-
Move Technicians between the Available and Selected boxes
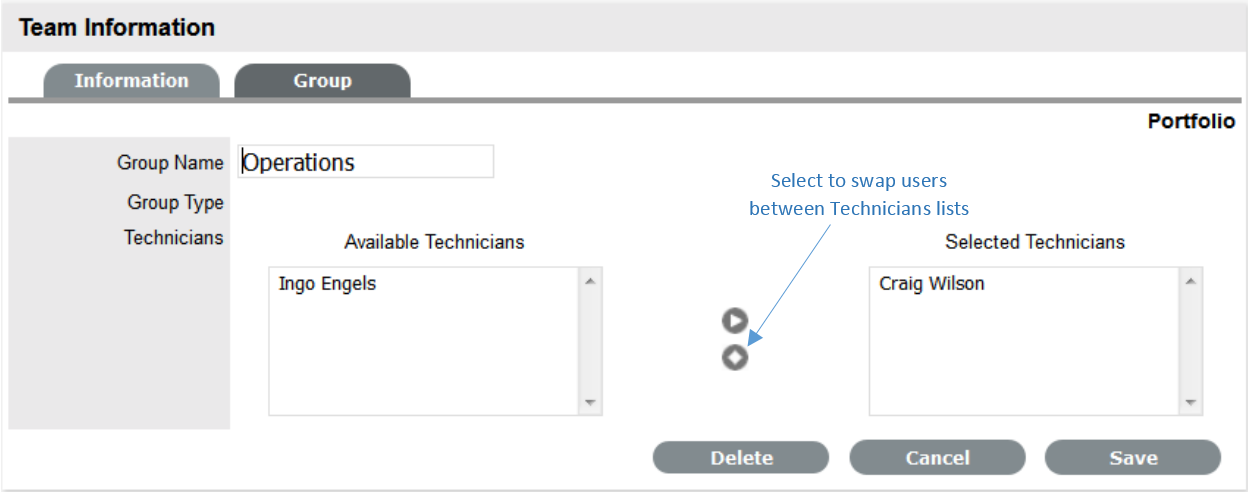
-
Select Save
-
Click New, to add other Groups to the Team
Assign Users as required and Save.
-
Click Done.
Removing Team Members from a Group
To remove a User from a Group, with the Team Information screen in Edit mode:
-
Click on the Group Name hyperlink
The lists of Available and Selected Technicians are displayed.
-
Remove and add Technicians, as required
-
Select Save.
Removing a User from a Team
To remove a User from a Team:
-
In the User tab, click Users
The User Information screen appears.
-
Click on the name of the User
-
Select the Team tab
-
Click on Edit
The Remove button is displayed.
-
Select the checkbox to the left of the Team
-
Click Remove.
If the User is not the only person assigned to an escalation layer of the selected Team, the User will be successfully removed from the Team.
Release & Deployment Team
The Release & Deployment Team is responsible for the planning, scheduling and controlling of changes and updates from Test to Live environments.
Release Managers, as part of a Release Team, direct the process using all information presented to help assess release readiness, and to efficiently identify deployment targets for the deployment phases of a release. This level of control guarantees the Release Manager can deliver updates to the live environment successfully, to all relevant parties, on time.
The Deployment component of the Release Team covers the activities or tasks responsible for moving new or changed hardware, software, documentation and process to the Live Environment.
Working with Release Management Teams
To plan, schedule and control changes and updates from Test to Live environments, Release Management Teams are assigned to Releases within the Change>Releases tab. Included within these Teams are Groups of Users who are responsible for managing the various stages of the Release Lifecycle.
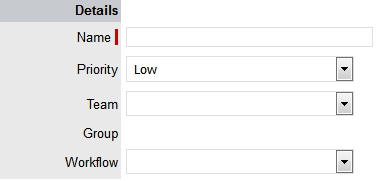
When Release Teams are configured within the application, Technicians with the Release and/or Deployment Process are associated with the Team. Managers with the Release Process are assigned to the Approval States of the Release Workflow. Technicians assigned the Release Process can be assigned to States of the Release Workflow, while Technicians only assigned the Deployment Process are placed in the Deployment Group and are responsible for completing the Deployment Tasks created for a Release.
Creating a Release & Deployment Team
To create a Release and Deployment Team:
-
Select User>Teams
-
Click New
-
Enter the Team Name
-
Select the Release Process
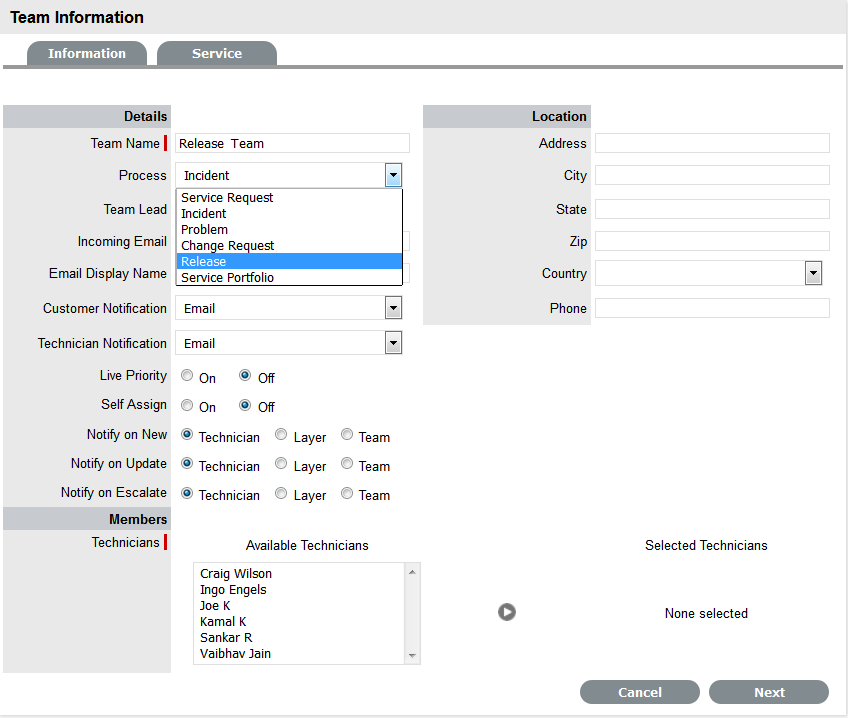
-
Complete the Team Location details, if required
-
Select Technicians from the Available Technicians list
The Technician List consists of Users assigned the Release and/or Deployment Process in their User Information screen.
Highlight Technician names within the Available Technicians list and click the arrow icon to move the Users to the Selected Technicians list.
NOTE:Technicians with the Release Process will be available for assignment within the Release Workflow States in the Team Information>States tab
Technicians only assigned the Deployment Process will be available for assignment to the Deployment Group, who will complete the Deployment Tasks generated as part of the Release.
-
Set the Team Lead
The Team Lead options are drawn from the Assigned Technicians who are assigned the Release Process.
-
Select Managers from the Available Managers list
The Manager List consists of Users assigned the Release Process in their User Information screen.
Highlight Manager names within the Available Managers list and click the arrow icon to move the Users to the Selected Managers list.
-
Click Next
The Information screen moves to the Service tab where the Release Workflows are associated with the Team.
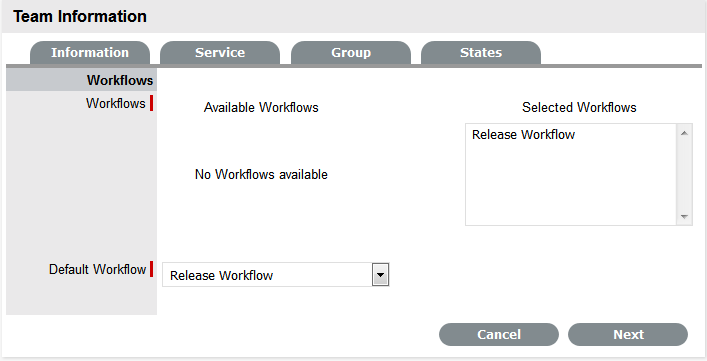
-
Move the relevant Available Workflows to the Selected Workflows field
-
Set the Default Workflow
If a single Workflow is assigned to the Team it is automatically applied as the Default Workflow.
Assigning Workflows to the Team ensures the Team is displayed as an option within the Deployment Summary tab when the associated Workflows are assigned to a Task.
-
Click Next
The screen defaults to the Groups tab that lists the default deployment, manager and release Groups. The Groups automatically apply the Team Lead to the Groups and require additional Technician and User assignments.
-
Select the Default Deploy Group
The Group Name can be edited and the Available Technicians and Selected Technicians fields are now accessible. As a Deployment Group Type, this group of Users will be available for assignment for Deployment Tasks created as part of a Release Workflow.
-
Rename the Group, if relevant
-
Move the relevant Users between the Available and Selected boxes
The Users displayed in the Available Technicians list have been assigned the Deployment Process in their User Information screen.
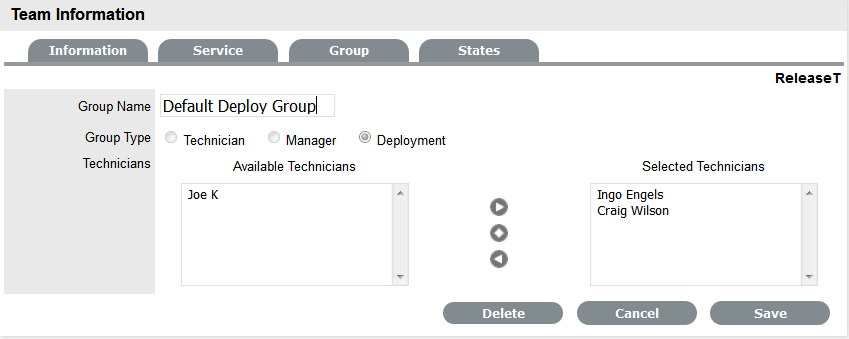
-
Select Save
-
Edit the assigned Users in the Manager and Release Groups
The default Manager Group will be automatically applied to all Approval States of the Release Workflow. The Release Group of Technician Users will be automatically applied to all non-approval States of associated Release Workflows. These assignments can be edited within the States tab.
-
Create additional Manager, Release or Deployment Groups, if relevant
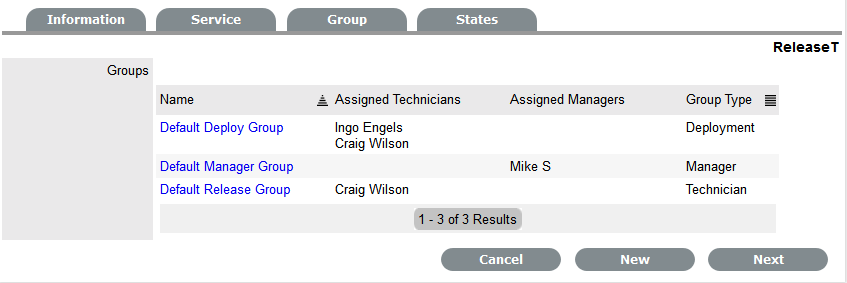
-
Click Next
The system moves to the States tab to display the list of Workflows associated with the Team, and the list of States included in the selected Workflow.
-
Select a State link to amend the assigned Work Group
-
Assign the relevant Group of Users to the Workflow State
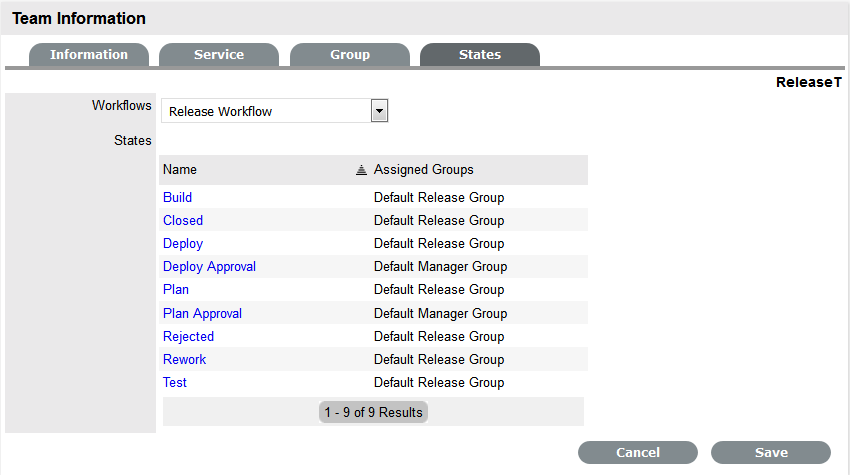
-
Click Save and continue to adjust all the relevant assignments
-
Click Save
-
Click Done.
The Release & Deployment Team is fully configured.
Removing Team Members from a Group
To remove a User from a State or Group, with the tab in Edit mode:
-
Click on the State or Group Name hyperlink to display the list of available and assigned Technicians
-
Remove and add Technicians, as required
-
Select Save.
Removing a User from a Team
To remove a User from a Team:
-
In the User tab, click Users
The User Information screen appears.
-
Click on the name of the User
-
Select the Team tab
-
Click on Edit
The Remove button is displayed.
-
Select the checkbox to the left of the Team
-
Click Remove.
If the User is not the only person assigned to an escalation layer of the selected Team, the User will be successfully removed from the Team.
2.8.6 Assignments
The Assignments tab allows job function templates to be created for new and existing Technician Users. Users can be assigned to multiple Teams, Escalation Layers and, for new Users, Processes by applying the templates. Administrator and Supervisor Users can apply these templates within the User Information screen for new Users, and the Team tab of the User Information screen for existing Users who are assigned the relevant Processes.
For example, a Frontline Support template may be created, where a User is assigned to Layer 1 of an Incident Team and a Work Group of a Service Request Team. They may also be assigned to an Update Customer Group within a Change Management Team. This template could then be easily applied to all Users created directly in the system, within the User Information screen. Or, if the User was created using an authentication server, the template could be applied within the Team tab of the User Information screen.
Creating an Assignment Template
Before creating an Assignment template, be sure all the relevant Teams and Escalation Layers or Groups exist in the system. However, should you create additional Teams, Escalation Layers or Groups at a later date, the Assignment template can easily be updated.
To create an Assignment Template:
-
Select User>Assignments
-
Click New
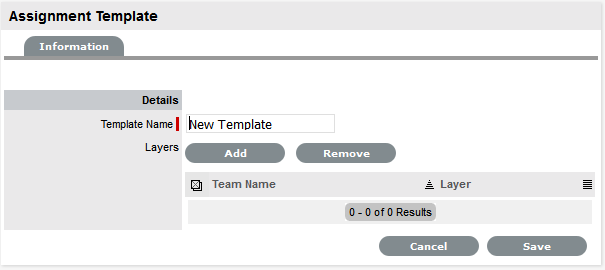
-
Enter the Template Name
-
Click Add
The Find Team editor is displayed.
-
Enter a Name to find a specific Team, or leave the field blank to return a list of all Teams and click

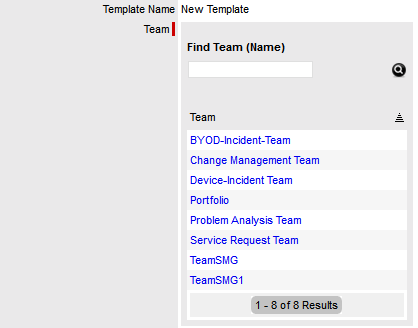
-
Select the Team name link
The Layer or Groups drop down list is displayed.
-
Select an option from the available list
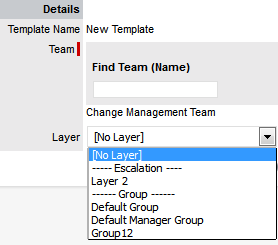
-
Click Save
-
Repeat steps 4 to 8, until all relevant assignments have been created for the template
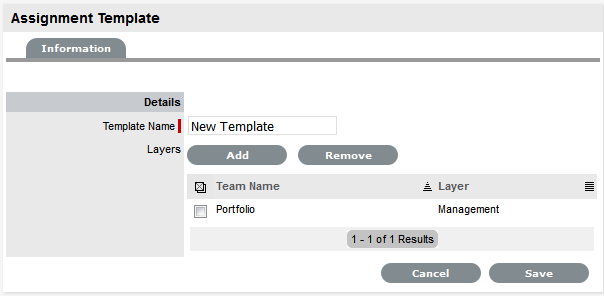
-
Click Save.
The template is now available within the User Information screen for new User creation, or the Teams tab for existing Users.
Editing an Assignment Template
To make changes to an existing User Assignment template, such as adding or removing Teams and the related Layer or Group assignment:
-
Select User>Assignments

-
Click on the relevant Template Name hyperlink
-
Click Edit
-
To remove a Team/Layer association, check the box next to the Team Name
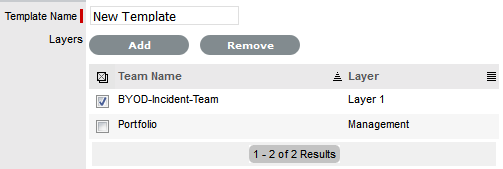
-
Click Remove
-
To add a Team/Layer association, click Add
-
Enter a Name to find a specific Team, or leave the field blank to return a list of all Teams and click


-
Select the Team name link
The Layer or Groups drop down list is displayed.
-
Select an option from the available list

-
Click Save
-
To save all changes, click Save.
The screen defaults to the Assignments list view.
Deleting an Assignment Template
To delete an Assignment template from the system:
-
Select User>Assignments
-
Click on the relevant Template Name hyperlink
-
Click Edit
-
Select Delete
A warning message is displayed.
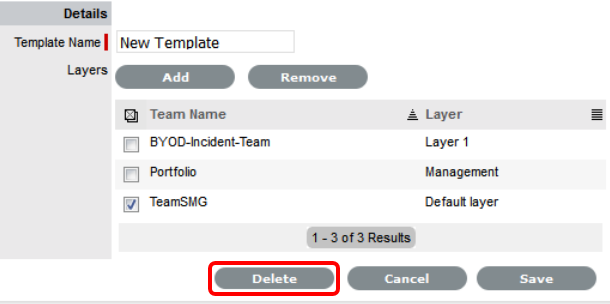
-
Click OK.
The screen defaults to the Assignments list view.
Applying Assignment Templates to New Users
For new Users created directly in the system, the Assignment template is available within the User Information screen. By selecting a template, the newly created User is automatically associated with all relevant Processes, Teams, Escalation Layers and Groups. To remove a Team assignment after a template has been applied during the new User creation, deselect the Process and the Team Name will be removed from the assigned list.
To use an Assignment template for a new User:
-
Select the User>Users tab
-
Click New
-
Enter the User details
-
Within the Assignment Template field, select the relevant option
All Processes are automatically ticked for the User.
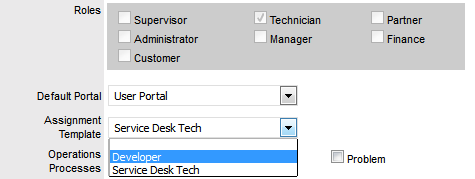
-
Uncheck any Processes that are to be removed for the User
The Team association will automatically be removed from the Team Name list.
-
Complete remaining User details, including assigning a Supervisor and Email address
-
Click Save.
Applying Assignment Templates to Existing Users
For Users who have active accounts in the system and are assigned the relevant Processes, the Assignment template is available within the Team tab of the User Information screen.
To apply a template to an existing User:
-
Go to User>Users
-
Select the Technician Name hyperlink
-
Click Edit
-
Verify the User has all the relevant Processes with the User Information screen
-
Select the Team tab
-
Within the Add By field, select the Team Template option
The drop down list of Templates is made available.

-
Select the relevant Template from the list
-
Click Save.


