Backing Up Data
You can use SBCON to create a tape backup of the eDirectory database or of the file system on your servers or workstations. The prerequisites listed here use SBCON as the Storage Management Engine (SME).
Prerequisites
- Understand the process for loading SBCON.
See Loading SBCON
- Ensure that you know the workstation password if you are backing up a workstation. For DOS workstations, make sure the Target Service Agent was loaded with the /Password parameter instead of the /Trust parameter, as explained in Table 2.
- Set the backup server and its tree as the primary resource using the Novell Client. This lets you view the tape devices in NWBACK32.
- If you are backing up the eDirectory database, ensure that eDirectory synchronization and communication are functioning properly.
Before starting the backup, make sure eDirectory is fully functional. This means that all partitions are synchronizing correctly.
If your backup host and targets communicate across a WAN, check the status of the WAN links to verify that they are operating properly.
- If you are backing up the file system, make sure you have Read and File Scan rights to the directories/files you are backing up.
- Ensure that you know what type of backup you want to perform: full, differential, or incremental.
For more information, see Backup Types.
- If you use the Advanced Options, ensure that you know the file system structure of the target you are backing up. You will be prompted for the paths to the volumes and directories that you want to include in or exclude from your backup.
- Ensure that you have loaded the drivers for your specific device and controller board.
- Ensure that the required files for your target are loaded.
- Ensure that you have loaded the SBCON files for your specific target.
See Loading the Target Service Agents.
- Ensure that media is inserted into your storage device.
You can back up your data two ways: from a server using SBCON or from a Windows workstation using NWBACK32.
Backing Up from the Server
When you back up your data from one server to a target server or workstation, you should use the command line.
-
Load the SBCON modules.
See Loading SBCON.
-
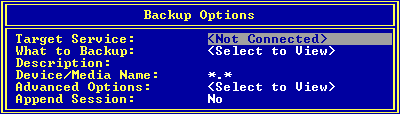
Click Main Menu > Job Administration > Backup.
-
Click Target Service to select the NetWare server running your backup or restore Target Service Agent.
To be able to select the server, you need to load the correct Target Service Agent (TSA). See Loading the Target Service Agents.
If you do not see the target you want on the list, check for these possible causes:
-
Select a target from the Target Services list.
The following table describes the targets that can be selected for backup.
Cluster-enabled pools |
The cluster-enabled pool you want to back up |
The file system |
The server whose file system you want to back up |
The eDirectory database |
The server with TSANDS loaded |
A workstation |
The workstation's host server, and then the workstation |
Server-specific information |
The server whose server-specific information you want to back up, and then choose to back up the file system. |
-
When prompted, enter the username (and context, if required) for the target.
If SBCON rejects the username you entered, you probably need to include the context where the User object is located. For example, instead of entering ADMIN as the username, enter .CN=ADMIN.O=company_name or .ADMIN.company_name.
You must include the context in the username at this point if the username you use exists in an eDirectory container that is different from the bindery context set on the server running the engine.
-
(Conditional) If requested, enter the password for the target.
SBON will take a few moments to attach to that target.
If you select the default values on this form, a full backup of the source is performed. Otherwise, if you want to perform an incremental or differential backup, select Advanced Options.
-
Click What to Backup and press Enter.
-
Press Insert, select the volumes and files you want to back up from the screen, and press Esc.
The selected volumes and files appear in the List Resources screen.
-
Enter a descriptive name for the backup session in the Description field.
This is a descriptive name of the job, which will help you identify the specific backup session; if a restore is necessary, you can easily identify the session you need. There is no special requirement for what to enter as the session description.
HINT: You might want to include the full path of the data (for example, SYS:HOME\REPORTS\JULY.02) which you will need to know if a restore session is necessary.
-
Click Device/Media Name and select a device.
A list of available objects is displayed in the Select a Device screen.
If you accept the default value, the engine selects the device and media which you have designated as the default.
NOTE: If there is only one media type available, it will be treated as the default.
If your device has more than one storage device attached, select an available device from the list. If the device contains multiple media, select the media for the backup.
If the storage media does not have a label, SBCON displays a message saying that the media cannot be identified. Set the label before selecting it for a backup job.
-
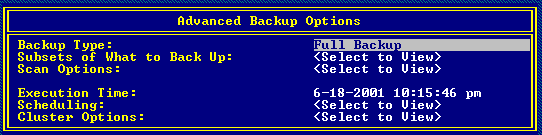
Select Advanced Options.
For more details, see Customizing Backup.
-
Select Append Session.
This option appears only if your device supports appending to previous sessions on the media.
Accept the default YES if you want to preserve all sessions on the media. The backup session is appended to the media at the end of the previous session. Each appended session has separate backup and error logs.
If you want to overwrite the data on the media, enter NO. The media rewinds and existing data is overwritten by the next backup.
HINT: Labeled media is not considered empty media. No sessions are necessary on the media for you to set the Append option to Yes.
Delete the log and error files for any session you overwrite to avoid trying to restore a session that no longer exists.
-
Press Enter to save the settings and continue with the backup.
WARNING: If you are appending a backup session to a media set (two or more tapes), use the tape with maximum space.
-
To return to the Main Menu, press Esc until you back out to the Main Menu.
-
To exit SBCON, press Esc again and answer the confirmation prompt.
Customizing Backup
You can customize your backup using the Advanced Backup Options form when you use SBCON at the server to launch your backup program. This form allows you to specify exactly what you want to back up data. It could be the server, the eDirectory database, workstation, directory, or file. You can even specify subsets of groups. The Advanced Backup Options form activates only after you have selected at least one of the resources (directory/file). Select Advanced Options from the Backup Options form to perform advanced backup sessions. See Backing Up from the Server.
HINT: SBCON displays prompts and messages at the bottom of the screen. For example, you can press F1 for help at any time.
If you want to perform a series of backups and restores and need to change your target, see Changing Your Target.
A custom backup allows you to specify exactly what you want to back up: server, volume, the eDirectory database, workstation, directory, or file.
To customize a backup, do the following:
-
Select Backup Options > Advanced Options.
-
Select Backup Type.
By default, Storage Management Engine (SME) performs a full backup. See Backup Types. Differential and incremental backups are not interchangeable. See Planning a Backup Schedule.
IMPORTANT: If you choose to include migrated data, ensure that your backup media capacity matches the jukebox media capacity.
-
Select Subsets of What To Backup.
The default setting means that everything in the Subsets of What You Want to Backup screen is backed up.
Include/Exclude TSA Resources---Includes or excludes resources such as servers or volumes.
Include/Exclude Directories---Includes or excludes directories.
Include/Exclude Files---Includes or excludes files.
Include/Exclude path/files---Includes or excludes pathnames and files.
-
Select Scan Options.
The How to Scan What you are Backing Up screen appears.
-
Do one of the following:
- If you do not want to accept the default (nothing will be excluded), type Y (Yes) and press Enter.
- Choose to exclude subdirectories, hidden files, system files, etc.
- Enable the Scan-ahead option, if required.
-
Press Esc to Finish.
For information about how SBCON scans data, see Scan Data Sets.
-
Select Execution Time.
The Edit Date and Time screen appears. You can choose the default date and time shown for the backup to begin, or you can type a new date and time. You can change the month/day/year and hour/minute/second fields. The engine should initiate the rescheduled job.
To schedule the job to run another time, press Enter and go to Step 8. Otherwise, go to Step 7.
-
(Optional) Select Scheduling.
Reschedule---Select Yes to reschedule.
Rerun Interval---Specify the duration in terms of elapsed time and days, months or years to rerun an already scheduled job.
The Edit Date and Time screen appears. You can specify the number of days, months, or years after which an already scheduled job will run.
The day, month, or year you enter should not be the actual date when you want the job to run; rather, it is the duration after which the job gets executed.
Example
If you have scheduled a job to run on 03/20/1999 and want to rerun the job after two months and at the same time, then the Rerun Interval field should be the following:
Year: 0, Month: 2, Day: 0
Hour: 0, Minute: 0, Second: 0
Rerun Count---Specify the number of times you want to rerun a job after the current execution.
Keep Finished jobs---Select Yes to keep the job in the queue after execution so that it can be rescheduled when you need it.
NOTE: If you are performing a series of backups or restores and need to change your target, follow the procedures in Changing Your Target.
Backing Up from a Workstation
When you load the backup software from a workstation to the target server or workstation, you are using the graphical interface.
To back up from a Windows workstation, do the following:
-
Run NWBACK32.
See Loading NWBACK32.
-
At the Quick Access window, click Backup.
-
Select what you want to back up.
-
Double-click What to Backup.
-
Click eDirectory, NetWare Servers, or Workstations.
-
Double-click a server to back up.
-
Enter the username and password to authenticate to the server.
A list of resources to back up appears, such as volumes and files.
-
Click the resources to back up.
-
Click OK to finish.
-
Select where you want your backup data to go.
-
Double-click Where to Backup.
-
Change to the correct eDirectory tree structure and context by clicking the Change to Context button on the toolbar.
-
Double-click Queues.
-
Select a Queue object from the list.
-
Right-click the server to open the drop down box.
-
Click Submit the Job.
This step allows you to submit the job to a queue on the chosen server or on the chosen media type.
Queue. Double-click to expand the queue.
Server. Double-click to expand the queue, double-click to select a server, and then right-click to submit the job.
Media. Double-click to expand the queue, double-click to select a server, double-click to view a list of devices, double-click to view a media list, and then right-click to submit the job.
Backing Up Cluster-enabled Pools from the Server
-
Load the SBCON modules.
See Loading SBCON.
-
Click Main Menu > Job Administration > Backup.
-
Click Target Service to select a cluster-enabled pool name.
To be able to select the target, you need to load the correct Target Service Agent (TSA). See Loading the Target Service Agents.
If you do not see the target you want on the list, check for these possible causes:
-
Select a target from the Target Services list.
-
When prompted, enter the username (and context, if required) for the target.
If SBCON rejects the username you entered, you probably need to include the context where the User object is located. For example, instead of entering ADMIN as the username, enter .CN=ADMIN.O=company_name or .ADMIN.company_name.
You must include the context in the username at this point if the username you use exists in an eDirectory container that is different from the bindery context set on the server running the engine.
-
(Conditional) If requested, enter the password for the target.
SBCON will take a few moments to attach to that target.
If you select the default values on this form, a full backup of the source is performed. Otherwise, if you want to perform an incremental or differential backup, select Advanced Options. For more details on the Advanced options, see Customizing Backup.
-
Click What to Backup and press Enter.
-
Press Insert, select the volumes and files you want to back up from the screen, and press Esc.
The selected volumes and files appear in the List Resources screen.
-
Enter a descriptive name for the backup session in the Description field.
This is a descriptive name of the job, which will help you identify the specific backup session; if a restore is necessary, you can easily identify the session you need. There is no special requirement for what to enter as the session description.
HINT: You might want to include the full path of the data (for example, SYS:HOME\REPORTS\JULY.02), which you will need to know if a restore session is necessary.
-
Click Device/Media Name and select a device.
A list of available objects is displayed in the Select a Device screen.
If you accept the default value, the engine selects the device and media which you have designated as the default.
NOTE: If there is only one media type available, it will be treated as the default.
If your device has more than one storage device attached, select an available device from the list. If the device contains multiple media, select the media for the backup.
If the storage media does not have a label, SBCON displays a message saying that the media cannot be identified. Set the label before selecting it for a backup job.
-
Select Advanced Options and set the desired values for all the fields.
For more details, see Customizing Backup.
NOTE: If you set Enable Auto Recovery to NO in Cluster Options, the remaining options become invalid.
-
Select Append Session.
This option appears only if your device supports appending to previous sessions on the media.
Accept the default YES if you want to preserve all sessions on the media. The backup session is appended to the media at the end of the previous session. Each appended session has separate backup and error logs.
If you want to overwrite the data on the media, enter NO. The media rewinds and existing data is overwritten by the next backup.
HINT: Labeled media is not considered empty media. No sessions are necessary on the media for you to set the Append option to Yes.
Delete the log and error files for any session you overwrite to avoid trying to restore a session that no longer exists.
-
Press Enter to save the settings and continue with the backup.
WARNING: To append a backup session to a media set (two or more tapes), use the tape with maximum space.
-
To return to the Main Menu, press Enter and then press Esc until you back out to the Main Menu.
-
To exit SBCON, press Esc again and answer the confirmation prompt.
Backing Up a Workstation
To back up the workstation (the target), a Target Service Agent (TSA) must be loaded on the workstation. (See Loading the Target Service Agents.)
You can select the directories to back up or back up the entire workstation.
Windows 95 and 98 Workstation
Make sure that the W95TSA is installed and configured. It is a part of the Novell Client modules (checkbox for Target Service Agent).
NOTE: If W95TSA is installed and registered, a shield-like icon appears in the system tray and indicates Novell TSA (Listening) message. You will also see an SMS screen popup when you log in to NetWare.
-
At the target workstation, register with the W95TSA.
-
Double-click the shield-like icon that appears in the system tray.
The Novell Target Service Agent for Windows Properties box appears.
-
Enter your user name and password for TSA.
-
Enter the server name that will be servicing this Windows client.
-
Select the disk drive you want to register.
-
(Recommended) Check Auto Register. This automatically registers your workstation with the server after you restart.
-
Click OK.
-
Restart your workstation.
The TSA must be installed and registered with the host server, along with the TSA username and password.
-
At the host server, load TSAPROXY.
-
Select the NetWare server running the target service agent.
-
Follow the procedure from Step 3 to complete your backup.
Windows 2000 and Windows NT Workstation
Make sure that the NT TSA is installed and configured. It is a part of the Novell Client modules (checkbox for Novell Target Service Agent).
The Windows NT TSA has two parts:
TSA Service (TSAMAIN.EXE) is a service that waits for and acts when there is a request from the backup engine.
TSAPrefs (TSAPREFS.EXE) allows an NT administrator to set preferences and monitor the activities of the TSA Service.
-
Right-click Network Neighborhood and then click Properties > Novell Target Service Agent > Properties.
-
Click Preferences and fill in the following fields:
- Workstation: Enter the name of the workstation.
- Preffered Server: Enter the name of the server on which you want to connect. This server must have TSAProxy installed.
- Protocol: Select SPX/IPX or TCP/IP.
- Events to Log: Check the items you want to log: Connection, Registration, Security, or Service.
- Allow Backup User: This grants the backup user rights depending on the group.
- Auto Register: This automatically registers the Windows workstation with the server after you restart.
-
Click Registration.
-
Check the fields in the Registration page and, if correct, click Register.
If information in any of the fields is incorrect, click Withdraw and return to the Preferences page to change the information. Then repeat Steps 4 and 5.
-
Click Connections.
-
Check the fields in the Connections page and then click OK.
If you need to add or change information, click Apply.
You can also delete connections in this page under Current Connections and then click Apply.
Previous | Next