Content Search Guide
CHAPTER 10
This chapter explains how to manage search behavior using the exteNd Director Dynamic Reasoning Engine (DRE) Administration console.
The following topics are covered:
NOTE: Information in this chapter is adapted from the Autonomy Server 2.2 manual from Autonomy, Inc.
The exteNd Director Search subsystem gives you access to the exteNd Director DRE Administration console, a graphical user interface for administering the exteNd Director DRE. You can use the DRE Administration console to:
Reset the DRE after changing configuration settings
Test content queries in isolation locally before deployment
You can start the exteNd Director DRE Administration console from the Windows Start menu or by invoking the executable file.
 To start the DRE Administration console:
Make sure the exteNd Director DRE is running.
On Windows, the exteNd Director DRE is invoked automatically when you start your server. On UNIX, you must start the exteNd Director DRE manually, as described in Installing the exteNd Director Dynamic Reasoning Engine.
Invoke the DRE administrator using one of these methods:
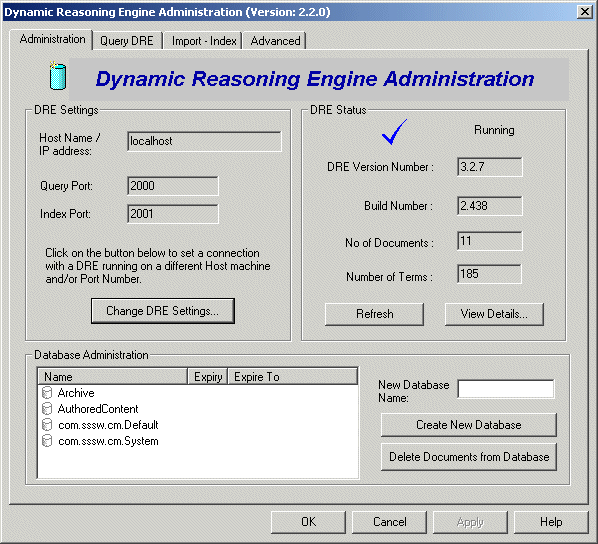
The DRE Administration console tries to connect with the DRE, then displays its main Administration panel on your desktop:
Notice that there is a symbol in the upper-right panel that gives you an immediate visual cue about the status of the DRE:
|
Symbol |
Means |
|---|---|
|
|
DRE is running and has connected to the DRE Administration console |
|
|
DRE Administration console cannot connect to the DRE |
If the administrator cannot connect to the DRE, see Troubleshooting the Conceptual Search Process.
When you change configuration parameters, you must reset the DRE to reinitialize its settings.
Start the Administration console, as described in Starting the exteNd Director DRE Administration console.
You can use the DRE Administration console to remove documents from the DRE or to remove all content—including documents, terms, and probability weightings. After removing any of these resources, you must reindex the remaining content into the DRE before you can search the Content Management (CM) repository again. This section describes the recommended procedures.
To remove documents from the DRE:
Start the Administration console, as described in Starting the exteNd Director DRE Administration console.
Select a DRE database from the list in the Database Administration panel.
TIP: To specify the DRE database for the default CM repository, select com.sssw.cm.Default.
Reindex your content into the DRE, as described in Forcing indexing.
To remove all content from the DRE:
Start the Administration console, as described in Starting the exteNd Director DRE Administration console.
Reindex your contents into the DRE, as described in the section on how to force indexing.
You can use the DRE Administration console to test your queries in isolation to validate whether they return the expected results.
To test queries in the DRE Administration console:
Start the Administration console, as described in Starting the exteNd Director DRE Administration console.
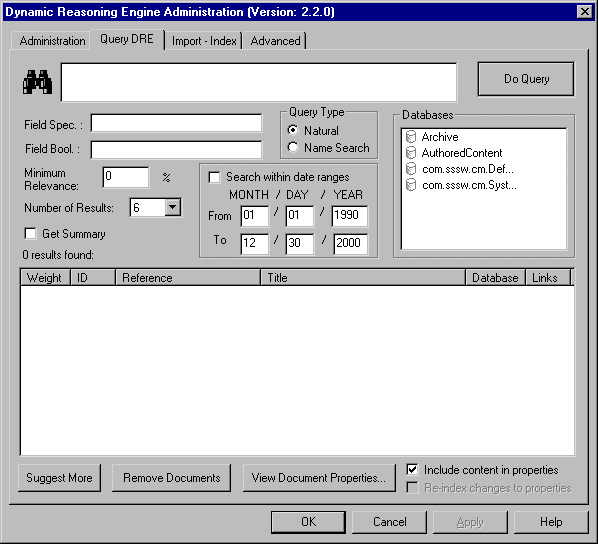
The DRE Administration dialog opens with the Query DRE tab selected:
Make sure the DRE database you want to search appears in the Databases list.
By default, the Search subsystem designates com.sssw.cm.Default as the DRE database to search.
Enter your search query in the text box next to the search symbol:
The query results appear in the results table at the bottom of the dialog.
 For more information about querying in the DRE Administration console, click the Help button at the bottom of the dialog. To learn about supported query types and how to construct queries, see Search Query Types and Querying Content and Metadata.
This section describes how to configure DRE settings in the exteNd Director DRE Administration console.
To modify search options in the DRE Administration console:
Start the Administration console, as described in Starting the exteNd Director DRE Administration console.
Select the Administration tab if it is not already displayed:
Note that the DRE Administration console has successfully connected to the DRE running on localhost at query port 2000, as indicated by the check mark symbol:
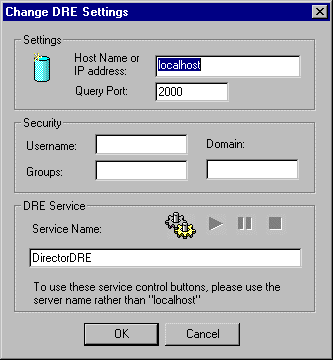
Enter a new DRE host and/or query port and click OK.
The DRE Administration console attempts to connect to the DRE running on the new host and/or port number. If the connection fails, the check mark symbol changes to an alert symbol:
Propagate your changes to the exteNd Director environment using techniques described in Setting search options at design time and Setting search options in an existing exteNd Director project.
This section explains how you can examine DRE content by creating a backup file using the exteNd Director DRE Administration console.
To examine DRE contents by backing up the DRE:
Start the Administration console, as described in Starting the exteNd Director DRE Administration console.
Specify a path to the file that will hold the backup data.
c:\Autonomy\backups\mybackup.idx
Click Backup Now! for the LOCAL IDX BACKUP.
The DRE administrator backs up DRE data in the IDX file you specified. You can open the IDX file in a text editor to examine content, standard metadata, and custom fields associated with each document that has been imported and indexed in the DRE. Here is an excerpt from an IDX file showing information about one document:
  #DREENDDOC
  #DREREFERENCE Production/Employee Classifieds/For Sale: Electric Lawnmower
  #DRETITLE
  #DREFIELD summary=""
  #DREFIELD CHECKSUM=""
  #DREFIELD DREDOCTYPE=""
  #DREFIELD BIAS=""
  #DREFIELD AuthorTemplate=""
  #DREFIELD AUTHOR="B. Greene"
  #DREFIELD CONTENTSIZE="307"
  #DREFIELD CREATED="1002060735000"
  #DREFIELD DOCABSTRACT="Selling 5-year-old electric lawnmower."
  #DREFIELD DOCID="07fce6f50a8e94ef39c96a8164ae0000"
  #DREFIELD DOCNAME="For Sale: Electric Lawnmower"
  #DREFIELD DOCTYPEID="07feb46c1d4e94d3561a6a8164ae0000"
  #DREFIELD DOCTYPENAME="Employee Classified"
  #DREFIELD EXPIRATIONDATE=""
  #DREFIELD FOLDERID="07ffc46c1d4e94d3561a6a8164ae0000"
  #DREFIELD LOCKEDBY="administrator"
  #DREFIELD MIMETYPE="text/html"
  #DREFIELD PARENTDOCID=""
  #DREFIELD PUBLISHDATE=""
  #DREFIELD PUBLISHSTATUS="1"
  #DREFIELD REPOSITORYID=""
  #DREFIELD STATUS=""
  #DREFIELD SUBTITLE=""
  #DREFIELD TITLE="Selling Electric Lawnmower"
  #DREFIELD UPDATETIME=""
  #DREFIELD UPDATEUSER=""
  #DREDOCID 8
  #DRESECTION 0
  #DRETYPE TEXT
  #DREDATE 1002060735
  #DREDBNAME com.sssw.cm.Default
  #DRESTORECONTENT y
  #DRECONTENT
  I'm selling my 5-year-old electric lawnmower. We recently moved to a house with a much larger yard, so using the cord has become problematic. Regrettably, we must revert to a gas-powered unit. Our electric unit is in excellent condition and has never needed any repairs. Asking $100.
TIP: You can restore DRE content from this backup IDX file, as described in Restoring DRE content next.
This section explains how you can restore DRE content from a backup IDX file.
Start the Administration console, as described in Starting the exteNd Director DRE Administration console.
Back up DRE content to an IDX file, as described in Examining DRE content.
Select your backup IDX file and click Open.
The IDX file is added to the list on the Import-Index panel in the DRE administrator.
Select the IDX file from the list and click Index Into DRE now!.
Click the Help button at the bottom of the DRE Administration console to invoke Autonomy online help.
Copyright © 2004 Novell, Inc. All rights reserved. Copyright © 1997, 1998, 1999, 2000, 2001, 2002, 2003 SilverStream Software, LLC. All rights reserved. more ...