3.5 Installing the Free/Busy Service
You should install the first instance of the GroupWise Free/Busy service on an Exchange server where it is convenient for you to test the capabilities of the Free/Busy service. Then you must install the Free/Busy service on all Exchange servers in your Exchange system.
3.5.1 Installing the First Instance of the Free/Busy Service
-
Change to the freebusy subdirectory in the downloaded GroupWise 2012 software image.
-
Run the GroupWise Free/Busy Service Installation program as Administrator:
novell_groupwise_freebusy_service_en_x64.exe
-
Click to begin the installation.
-
Accept the License Agreement, then click .

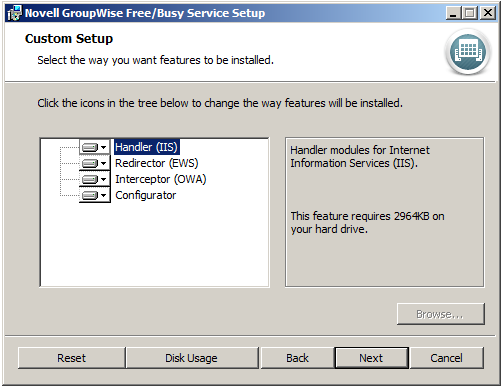
The Custom Setup dialog box lists the components that make up the GroupWise Free/Busy service. For a review of the components, see GroupWise Free/Busy Service Architecture. All components must be installed on the Exchange server.
-
Click to continue.
-
Click to begin the installation.
By default, the GroupWise Free/Busy service files are installed to the following locations on your Exchange server:
Component
Location
Free/Busy Handler
C:\inetpub\wwwroot\ngwfbs
Free/Busy Redirector
C:\Program Files\Microsoft\Exchange Server\V14\
                                 ClientAccess\exchweb\ews
Free/Busy Interceptor
C:\Program Files\Microsoft\Exchange Server\V14\
                                 ClientAccess\owa
Free/Busy Configurator
C:\Program Files\Novell\FreeBusy Service
-
(Optional) Click to display the GroupWise Free/Busy service online Help.
The online Help includes useful links to this GroupWise/Exchange Coexistence Guide and other GroupWise guides.
-
Click to exit the GroupWise Free/Busy service Installation program and start the Free/Busy Configurator.
3.5.2 Installing Additional Instances of the Free/Busy Service
After the first instance of the GroupWise Free/Busy service is running smoothly, you can export its configuration information to use as the default configuration as you install the Free/Busy service on additional Exchange servers.
-
Start the Free/Busy Configurator for the first instance of the GroupWise Free/Busy service.
C:\Program Files\Novell\FreeBusy Service\configurator.exe
-
Click to save the configuration information for the GroupWise Free/Busy service to a text file.
By default, the configuration file is named:
novell_groupwise_freebusy_service_config.cfg
By default, the configuration file is created in the same directory where you installed the GroupWise Free/Busy service.
-
Change the file name and location as needed, then click .
-
Copy the configuration file to all Exchange servers where you plan to install the GroupWise Free/Busy service.
-
On each Exchange server, install the GroupWise Free/Busy service, as described in Section 3.5.1, Installing the First Instance of the Free/Busy Service.
-
From the Installation program, continue into the Free/Busy Configurator.
-
Click .
-
Browse to and select the configuration file that you copied from the first Exchange server, then click .
The information from the configuration file fills in the fields in the Free/Busy Configurator.
You use the same GroupWise configuration information on all Exchange servers.
-
Click the tab.
-
Modify the Exchange server information as needed.
-
Click to copy the configuration information to the Windows registry.
-
Click to validate the Exchange configuration information for the new Exchange server.
-
Test the GroupWise Free/Busy service installation on the new Exchange server as described in Section 3.8, Testing the Free/Busy Service.
-
Repeat this procedure for each Exchange server in your Exchange system.