4.3 Sending Calendar Items
4.3.1 Understanding the Calendar Item Icons
The icons that appear in your calendar give you additional information about items. For more information, see Section 1.8, Identifying the Icons Appearing Next to Items.
4.3.2 Scheduling Appointments
Use appointments to schedule blocks of time on a specific date or range of dates.
You can use Busy Search to check for a time when all the users and resources you want for an appointment are available. For more information, see Using Busy Search to Check Availability.
When you schedule an appointment and include yourself as a participant, GroupWise automatically accepts the appointment for you.
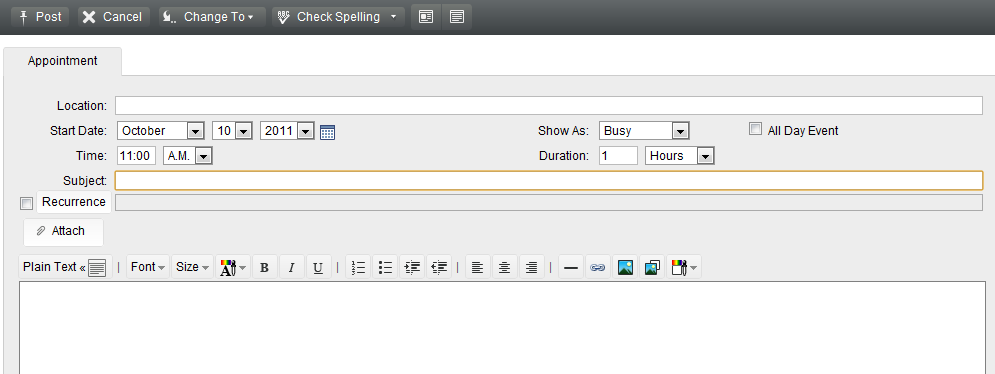
Scheduling an Appointment for Yourself
If you are not available for meetings, you can schedule a posted appointment for those times. When another user includes you in an appointment and does a busy search, the user can see that you are not available at those times, but can still schedule over your appointment.
Posted appointments are placed in your Calendar on the date you specify. They are not placed in your Mailbox or in any other user's Mailbox. Similarly, all posted appointments are saved to your main GroupWise Calendar. To move them to a personal calendar, drag and drop them to the personal calendar after they are created.
-
On the toolbar, click the drop-down arrow next to , then click .
or
In your Calendar, select a date, then click a time in that day.

-
(Optional) Type a subject and a location.
-
Specify the start date.
-
Specify a start time and duration. Duration can be in minutes, hours, or days.
-
Specify how you want the appointment to appear with the drop-down menu. Appointments can appear as , , , or .
-
(Optional) Type a message.
-
Click on the toolbar.
Scheduling an Appointment for Multiple People
-
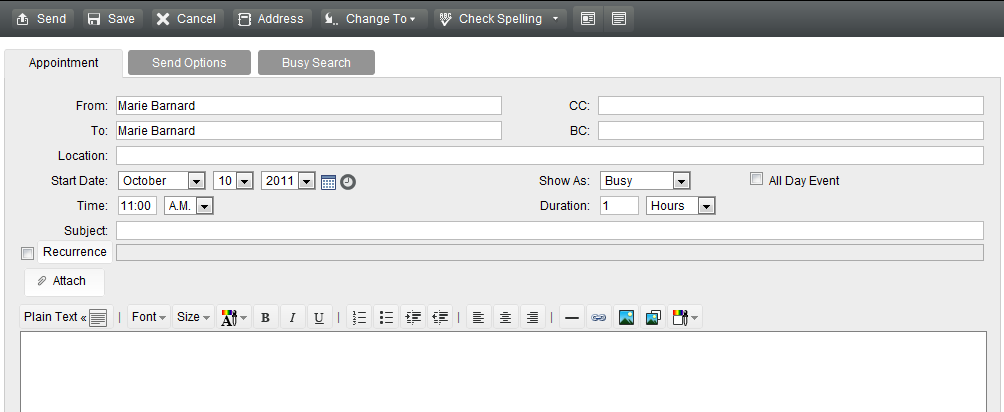
On the toolbar, click .

-
In the field, type a user name, then press Enter. Repeat for additional users. Include any resource IDs (such as conference rooms) in the field. If necessary, type user names in the and fields.
or
To select user names or resources from a list, click on the toolbar to use the Address Selector to add users. For more information on how to use the Address Selector, see Section 6.2, Using the Address Selector.
Your name is automatically added to the field of the appointment. When you send the appointment, it is automatically added to your calendar. If you do not want to be included in the message, delete your name from the field.
-
Type the location description in the field.
-
Specify the start date.
-
Specify a start time and duration. Duration can be in minutes, hours, or days.
-
Specify how you want the appointment to appear as from the drop-down menu. Appointments can appear as , , , or .
-
Type a subject and message.
If you want, change the font of the message text. For information, see Changing the Font in the HTML View.
-
If you want to make sure the people and resources for the appointment are available, you can do a busy search by clicking the tab. For more information, see Using Busy Search to Check Availability.
You can specify many options, such as making this appointment a high priority, requesting a reply from recipients, and more, by clicking the tab.
-
Click on the toolbar.
Using Busy Search to Check Availability
Use Busy Search to find a time when all the people and resources you want to schedule for a meeting are available.
-
In an appointment you are creating, specify user names and resource IDs in the field.
-
Specify the first possible day for the meeting in the field.
-
Specify the meeting's duration.
-
Click the tab.
You can accomplish the following tasks on the tab:
View which attendees have conflicting appointments: Attendees who have a conflict with the selected time are displayed with their names crossed out in the section.
Change the time of the appointment: Click a new time in the calendar to schedule the appointment for a different time.
Highlight the appointments for a specific user: Click the name of the user in the section whose appointments you want to highlight.
Hide a user’s appointments from being displayed: Click the icon next to the user whose appointments you want to hide.
Display all users’ appointments: Click to display all the appointments for each user in the section.
Update the calendar with current appointments: Click to display the current appointments for each user in the section.
Move to a different date on the calendar: Click the left-arrow
 and right-arrow
  icons to move to a different date on the calendar.
-
To remove a user or resource from the list, click the tab. In the field, click the user name or resource to remove, then press Delete.
This is useful if you want to include several conference rooms in the search to find one that is available, then eliminate those you do not want.
-
Complete the appointment, then click .
Rescheduling an Appointment
If you want to make changes to the people and resources for the appointment, you can reschedule an appointment.
-
Click the folder in the Folder List.
-
Select the appointment you want to reschedule and open it.
-
In the Appointment window, click on the toolbar.
-
Select to delete your original appointment.
-
Make your changes, then click on the toolbar.
Canceling an Appointment
You can cancel an appointment if you scheduled it or if you have the necessary Proxy rights to the scheduler's Mailbox.
-
In your calendar, right-click the appointment you want to cancel, then click .
-
Select to remove it from other users’ mailboxes. Leave this option deselected if you only want to delete it from your own mailbox.
-
(Optional) Type a message explaining the cancellation.
-
Click .
Scheduling a Recurring Appointment
You can schedule daily, weekly, monthly, or yearly recurring appointments.
-
On the toolbar, click .
-
Specify your meeting information, then select .
-
In the dialog box that appears, specify the following information:
When: Select , , , or .
Frequency Settings: Select the frequency settings for the recurring appointment. The options in this section differ depending on how often the appointment recurs.
Date Range: Specify when the appointment starts and when the appointment ends. You can specify the number of occurrences or an end date.
-
Click .
-
Click on the toolbar to send the appointment.
Canceling a Recurring Appointment
You can cancel a recurring appointment if you scheduled it or if you have the necessary Proxy rights to the scheduler's Mailbox.
-
In your calendar, right-click the recurring appointment you want to cancel, then click .
-
Select one of the following options: to remove the appointment from the mailboxes you sent it to. Leave this option deselected if you only want to delete the message from your own mailbox.
-
Delete From This Mailbox: Removes the appointment from your mailbox.
-
Delete From Recipients Mailboxes: Removes the appointment from the mailboxes of all recipients.
-
Delete From All Mailboxes: Removes the appointment from your mailbox and from the mailboxes of all recipients.
-
-
(Optional) In the field, specify a message explaining the cancellation.
-
Click to delete all instances of the recurring appointment, click to delete the current instance and all future instances of the appointment, or click to delete only the current instance of the recurring appointment.
4.3.3 Sending Reminder Notes
Reminder notes are like mail messages, except they are scheduled for a particular day and appear on the Calendar for that date. You can use reminder notes to show vacations, holidays, paydays, birthdays, and so forth.
Scheduling a Reminder Note for Yourself
A reminder note to yourself is called a posted reminder note. Posted reminder notes are placed in your Calendar on the date you specify. They are not placed in your Mailbox or in any other user's Mailbox.
-
In the Day view of your Calendar, type the reminder note message in the field of the section, then press Enter.
or
On the toolbar, click .
-
Select a date.
-
Type a subject and the reminder note message.
-
Click on the toolbar.
To access the information later, open your Calendar and select the date the information appears on. Double-click the reminder note in the Reminder Notes List.
Scheduling a Reminder Note for Other Users
-
On the toolbar, click .
-
In the field, type a user name, then press Enter. Repeat for additional users. If necessary, type user names in the and fields.
or
To select user names or resources from a list, click on the toolbar to use the Address Selector to add users. For more information on how to use the Address Selector, see Section 6.2, Using the Address Selector.
-
In the field, select the date this reminder note should appear in the recipients' Calendars.
You can specify many options, such as making this reminder note a high priority, requesting a reply from recipients, and more, by clicking the tab.
-
Type a subject and the reminder note message.
-
Click on the toolbar.