Configuring E-Mail Notification of Agent Problems
The Monitor Agent can notify you by e-mail when agent problems arise.
Configuring E-Mail Notification
You can configure the Monitor Agent to notify one or more users by e-mail if an agent goes down. You can also receive e-mail confirmation messages showing that the Monitor Agent itself is still running normally.
At the Windows Monitor Agent console:
-
Select the root agent group to set up e-mail notification defaults for all monitored agents.
or
Select any agent group to set up e-mail notification for the agents in the selected group.
or
Select any agent to set up e-mail notification for that individual agent.
-
Click Configuration > Notification.
or
On Linux, click Preferences > Setup to display the Notify settings.

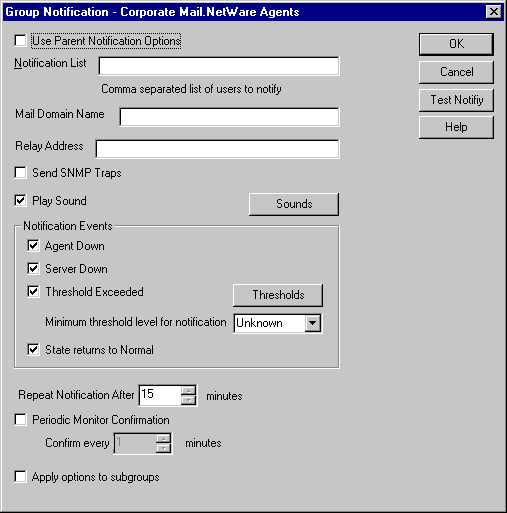
Unless you selected the root agent group, Use Parent Notification Options is selected and all options are dimmed. Deselect Use Parent Notification Options to set up e-mail notification for an agent group or an individual agent.
-
Specify one or more e-mail addresses or pager addresses to send notifications to.
-
Specify the Internet domain name of your GroupWise system.
-
If the mail system to which e-mail notification is being sent performs reverse DNS lookups, specify the IP address or hostname of a server to relay the notification messages through.
The Monitor Agent should relay e-mail notifications through a server that has a published DNS address.
-
Click Test Notify to determine if the Monitor Agent can successfully send to the addresses specified in the Notification List field.
A message informs you of the results of the test. If the test is successful, a test message arrives shortly at each address. If the test is unsuccessful, double-check the information you provided in the Notification List, Mail Domain Name, and Relay Address fields.
-
Select the events that you want to trigger e-mail notification messages.
- Agent down
- Server down
- Threshold exceeded
- State returns to normal
If you want to be notified of more specific states, see Customizing Notification Thresholds.
-
Select the amount of time that you want to elapse before repeat e-mail notifications are sent.
-
To monitor the Monitor Agent and assure it is functioning normally, select Periodic Monitor Confirmation, select the number of minutes between Monitor Agent e-mail confirmation messages.
-
Click OK to save the e-mail notification settings.
Customizing Notification Thresholds
To refine the types of events that trigger e-mail notification messages, you can create your own thresholds that describe very specific states. Using thresholds, you can configure the Monitor Agent to notify you of problem situations peculiar to your GroupWise system.
At the Windows Monitor Agent console:
-
Click Configuration > Notification.
-
Make sure that notification has been properly set up as described in Configuring E-Mail Notification.
-
Click Thresholds.
or
On Linux, click Preferences > Thresholds.

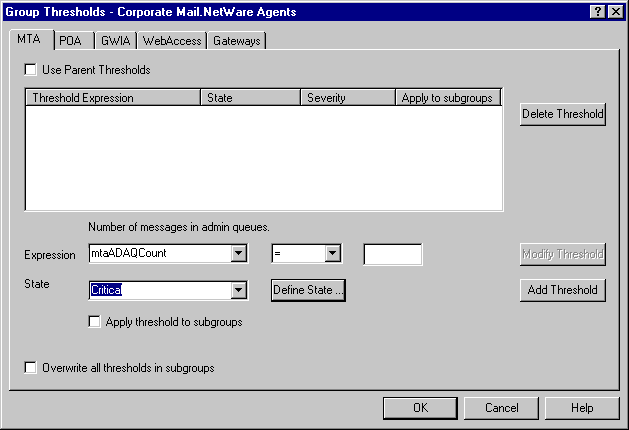
The tabs at the top of the dialog box enable you to create a separate threshold for each type of GroupWise agent.
-
Select the type of agent to create a threshold for.
-
In the Expression field, select a MIB variable.
GroupWise agent MIB files are located in the \agents\snmp directory of your GroupWise software distribution directory or GroupWise 6.5 Administrator CD. The MIB files list the meanings of the MIB variables and what type of values they represent. The meaning of the MIB variable selected in the Expression field is displayed above the field.
-
Select an operator from the drop-down list.
-
Type the value to test for.
-
In the State field, select an existing state.
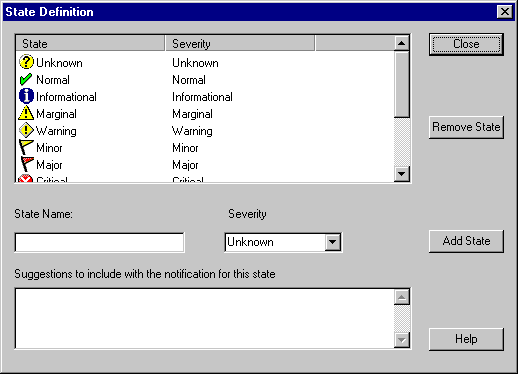
Icon State 
Unknown

Normal

Informational

Marginal

Warning

Minor

Major

Critical
or
Create a new state:
-
Click Define State
or
On Linux, click Preferences > States.
-
Type a name for the new state.
-
Select a severity level.
-
Provide instructions about how to handle the new state.
-
Click Close to save the new state.

-
-
Click OK to create the new threshold.
-
Repeat Step 3 through Step 9 for each type of agent that you want to create a customized state for.
-
Make sure Threshold Exceeded is selected in the Notification Events box.
-
Click OK to save the new notification settings.