Configuring User Access to the Post Office
As described in Post Office Access Mode, the GroupWise 6.x client defaults to client/server access mode. The following topics help you configure the POA to customize the types of client/server access provided to the post office:
- Using Client/Server Access to the Post Office
- Simplifying Client/Server Access with a GroupWise Name Server
- Supporting IMAP Clients
- Supporting CAP Clients
- Checking What GroupWise Clients Are in Use
- Supporting Forced Mailbox Caching
- Restricting Message Size between Post Offices
Using Client/Server Access to the Post Office
To make sure the GroupWise client has proper client/server access to the post office:
-
Make sure TCP/IP is properly set up on the server where the POA is running.
-
In ConsoleOne, browse to and right-click the POA object, then click Properties.
-
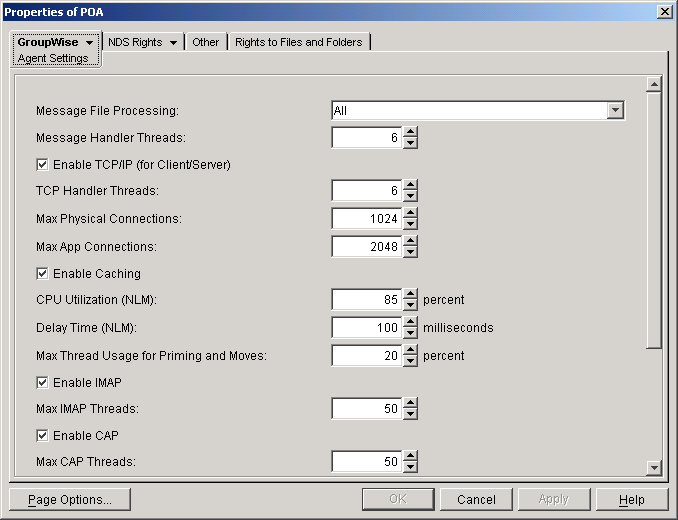
Click GroupWise > Agent Settings to display the Agent Settings page.
-
Make sure that Enable TCP/IP (for Client/Server) is selected.
The default numbers of physical connections and application connections are appropriate for a post office with as many as 500 users. If you are configuring the POA to service more than 500 users, see Adjusting the Number of Connections for Client/Server Processing for more detailed recommendations. Configuring the POA with insufficient connections can result in error conditions.
-
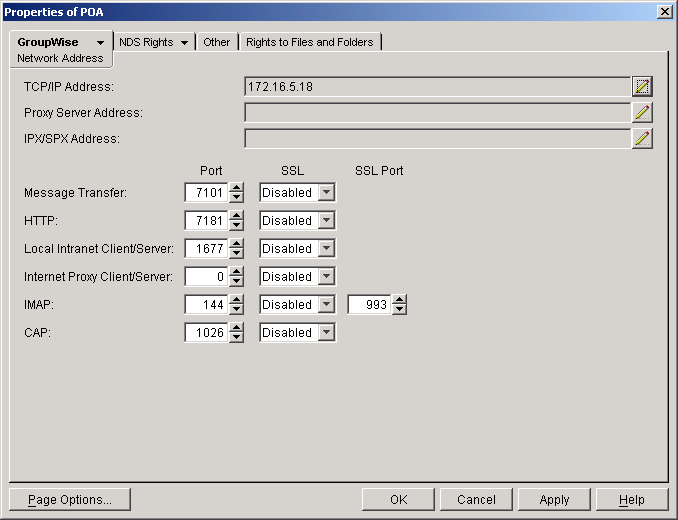
Click GroupWise > Network Address.
-
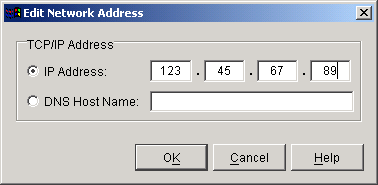
On the Network Address page, click the pencil icon for the TCP/IP Address field to display the Edit Network Address dialog box.
-
Select IP Address, then specify the IP address, in dotted decimal format, of the server where the POA is running.
or
Select DNS Host Name, then provide the DNS hostname of the server where the POA is running.
IMPORTANT: The POA must run on a server that has a static IP address. DHCP cannot be used to dynamically assign an IP address for it.
Specifying the DNS hostname rather than the IP address makes it easier to move the POA from one server to another, should the need arise at a later time. You can assign a new IP address to the hostname in DNS, without needing to change the POA configuration information in ConsoleOne.
-
Click OK.
-
To use a TCP port number other than the default port of 1677, type the port number in the Local Intranet Client/Server Port field.
If multiple POAs will run on the same server, each POA must have a unique TCP port number.
-
If needed, select Enabled or Required in the SSL drop-down list for local intranet client/server connections, Internet client/server connections, or both. For more information, see Enhancing Post Office Security with SSL Connections to the POA.
-
Click OK to save the network address and port information and return to the main ConsoleOne window.
ConsoleOne then notifies the POA to restart with client/server processing enabled.
For a sample message flow for this configuration, see "Message Delivery in the Local Post Office" in GroupWise 6.5 Troubleshooting 3: Message Flow and Directory Structure.
Corresponding Startup Switches
You could also use the /port switch in the POA startup file to provide the client/server port number. On a server with multiple IP addresses, you can use the /ip switch to bind the POA to a specific address.
POA Web Console
You can view the TCP/IP address and port information for the POA on the Configuration page under the Client/Server Settings heading.
Simplifying Client/Server Access with a GroupWise Name Server
If GroupWise users are set up correctly in eDirectory, the GroupWise client can determine which post office to access for each user based on the information stored in eDirectory. This lets the GroupWise client start automatically in client/server mode without users needing to know and provide any IP address information. However, some GroupWise users might be on platforms where eDirectory is not in use. To fill the same function for non-eDirectory users, you can set up a GroupWise name server.
A GroupWise name server redirects each GroupWise client user to the IP address and port number of the POA that services the user's post office. By setting up a GroupWise name server, non-eDirectory GroupWise client users do not need to know and provide any IP address information when they start the GroupWise client in client/server mode. The GroupWise name server takes care of this for them.
- Required Hostnames
- Required Port Number
- How a GroupWise Name Server Helps the GroupWise Client Start
- Setting Up a GroupWise Name Server
Required Hostnames
The primary GroupWise name server must be designated using the hostname ngwnameserver. You can also designate a backup GroupWise name server using the hostname ngwnameserver2.
Required Port Number
Each server designated as a GroupWise name server must have a POA running on it that uses the default port number of 1677. Other agents can run on the same server, but one POA must use the default port number of 1677 in order for the GroupWise name server to function. For setup instructions, see Using Client/Server Access to the Post Office.
How a GroupWise Name Server Helps the GroupWise Client Start
After a server has been designated as ngwnameserver, and a POA using the default port number of 1677 is running on that server, the GroupWise client can connect to the POA of the appropriate post office by contacting the POA located on ngwnameserver. If ngwnameserver is not available, the client next attempts to contact the backup name server, ngwnameserver2. If no GroupWise name server is available, the user would need to provide the IP address and port number of the appropriate POA in order to start the GroupWise client in client/server mode.
Setting Up a GroupWise Name Server
-
Make sure that TCP/IP is set up and functioning on your network.
-
Know the IP address of the server you want to set up as a GroupWise name server.
-
Make sure the POA on that server uses the default TCP port of 1677.
-
If you want a backup GroupWise name server, identify the IP address of a second server where the POA uses the default TCP port of 1677.
-
Use your tool of choice for modifying DNS.
NetWare Note: On a NetWare server, you could use INETCFG.
Linux Note: On a SUSE server, you could use the YaST Control Center. On a Red Hat server, you could use Server Settings > Domain Name Server on the Red Hat menu.
Windows Note: On a Windows server, you could use DNS Manager.
-
Create an entry for the IP address of the first POA and give it the hostname ngwnameserver.
-
If you want a backup name server, create an entry for the IP address of the second POA and give it the hostname ngwnameserver2.
You must use the hostnames ngwnameserver and ngwnameserver2. Any other hostnames are not recognized as GroupWise name servers.
-
Save your changes.
As soon as the hostname information replicates throughout your system, GroupWise client users can start the GroupWise client in client/server mode without specifying a TCP/IP address and port number.
Supporting IMAP Clients
You can configure the POA so that IMAP (Internet Messaging Application Protocol) clients such as Netscape Mail, Eudora Pro, Microsoft Outlook, and Entourage can connect to the post office much like the GroupWise client does.
-
In ConsoleOne, browse to and right-click the POA object, then click Properties.
-
Click GroupWise > Agent Settings to display the Agent Settings page.

-
Select Enable IMAP.
The default maximum number of IMAP threads is 50. This is adequate for most post offices, because each IMAP thread can service multiple IMAP clients. New threads are started automatically to service clients until the maximum number is reached.
-
If you want IMAP clients to use SSL connections to the post office, click GroupWise > Network Address, then select Enabled or Required in the IMAP SSL drop-down list.
For additional instructions about using SSL connections, see Encryption and Certificates.
-
Click OK to save the IMAP settings and return to the main ConsoleOne window.
ConsoleOne then notifies the POA to restart with IMAP enabled.
Corresponding Startup Switches
You could also use the /imap, /imapmaxthreads, /imapport, /imapssl, /imapsslport, and /imapreadlimit startup switches in the POA startup file to configure the POA to support IMAP clients.
POA Web Console
You can see whether IMAP is enabled on the Configuration page under the General Settings heading.
Supporting CAP Clients
You can configure the POA so that CAP (Calendar Access Protocol) clients can connect to the post office much like the GroupWise client does.
-
In ConsoleOne, browse to and right-click the POA object, then click Properties.
-
Click GroupWise > Agent Settings to display the Agent Settings page.

-
Select Enable CAP.
The default maximum number of CAP threads is 50. This is adequate for most post offices, because each CAP thread can service multiple CAP clients. New threads are started automatically to service clients until the maximum number is reached.
-
If you want CAP clients to use SSL connections to the post office, click GroupWise > Network Address, then select Enabled or Required in the CAP SSL drop-down list.
For additional instructions about using SSL connections, see Encryption and Certificates.
-
Click OK to save the CAP settings and return to the main ConsoleOne window.
ConsoleOne then notifies the POA to restart with CAP enabled.
Corresponding Startup Switches
You could also use the /cap, /capmaxthreads, /capport, and /capssl startup switches in the POA startup file to configure the POA to support CAP clients.
POA Web Console
You can see whether CAP is enabled on the Configuration page under the General Settings heading.
Checking What GroupWise Clients Are in Use
You can configure the POA to identify GroupWise client users who are running GroupWise clients that do not correspond to a specified release version and/or date. You can also force them to update to the specified version.
-
In ConsoleOne, browse to and right-click the Post Office object, then click Properties.
-
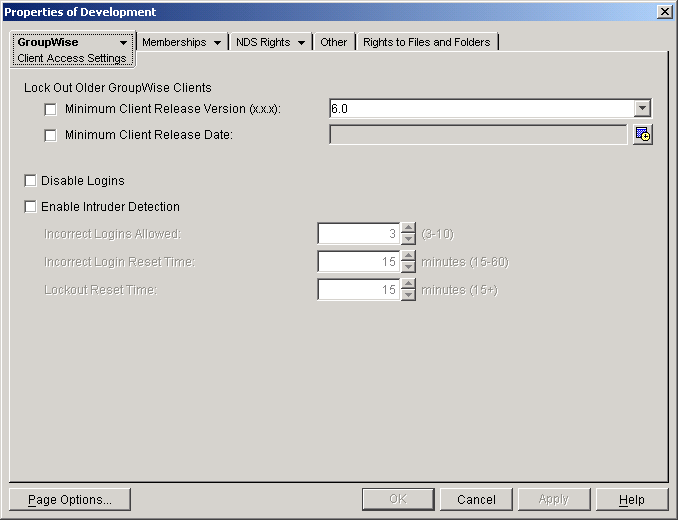
Click GroupWise > Client Access Settings to display the Client Access Settings page.
-
Specify the approved GroupWise release version, if any.
Only 6.x versions of the client are supported for lockout.
-
Specify the approved GroupWise release date, if any
You can specify the minimum version, the minimum date, or both. If you specify both minimums, any user for which both minimums are not true is identified as running an older GroupWise client.
-
Select Lock Out Older GroupWise Clients for the version and/or date if you want to force users to update in order to access their GroupWise mailboxes.
If you lock out older clients, client users receive an error message and be unable to access their mailboxes until they upgrade their GroupWise client software to the minimum required version and/or date.
-
Click OK to save the GroupWise version and/or date settings.
ConsoleOne then notifies the POA to restart so the new settings can be put into effect.
Corresponding Startup Switches
You could also use the /gwclientreleaseversion, /gwclientreleasedate, and /enforceclientversion startup switches in the POA startup file to configure the POA to check client version and/or date information.
POA Web Console
On the Status page of the POA Web console, click C/S Users to display the Current Users page, which lists all GroupWise users who are currently accessing the post office. Users who are running GroupWise clients older than the approved version and/or date are highlighted in red in the list.
Historical Note: The capability of identifying client version and date information was first introduced in GroupWise 5.5 Enhancement Pack Support Pack 1. Any clients with versions and dates earlier than GroupWise 5.5 Enhancement Pack Support Pack 1 do not appear at all on the Current Users page of the POA Web console.
Supporting Forced Mailbox Caching
GroupWise client users have the option to download their GroupWise mailboxes to their workstations so they can work without being continuously connected to the network. This is called Caching mode. For more information, see Caching Mode.
When client users change to Caching mode, the contents of their mailboxes must be copied to their hard drives. This process is called "priming" the mailbox. If users individually decide to use Caching mode, the POA easily handles the process.
If you force all users in the post office to start using Caching mode, as described in Allowing or Forcing Use of Caching Mode, multiple users might attempt to prime their mailboxes at the same time. This creates a load on the POA that can cause unacceptable response to other users.
To configure the POA to handle multiple requests to prime mailboxes:
-
In ConsoleOne, browse to and right-click the POA object, then click Properties.
-
Click GroupWise > Agent Settings to display the Agent Settings page.

-
Set Max Thread Usage for Priming and Moves as needed.
By default, the POA allocates only 20% of its TCP handler threads for priming mailboxes for users who are using Caching mode for the first time. In a default configuration, this would be only one thread. You might want to specify 60 or 80 so that 60% to 80% of POA threads are used for priming mailboxes. You might also want to increase the number of TCP handler threads the POA can start in order to handle the temporarily heavy load while users are priming their mailboxes. See Adjusting the Number of Connections for Client/Server Processing.
-
Click OK to save the new setting.
ConsoleOne then notifies the POA to restart so the new setting can be put into effect.
Corresponding Startup Switches
You could also use the /primingmax switch in the POA startup file to configure the POA to handle multiple requests to prime mailboxes.
POA Web Console
You can change the POA's ability to respond to caching requests for the current POA session on the Configuration page. Under the Client/Server Settings heading, click Max Thread Usage for Priming and Live Moves. To increase the number of client/server threads, click Client/Server Processing Threads under the Performance Settings heading.
Restricting Message Size between Post Offices
You can configure the POA to restrict the size of messages that users are permitted to send outside the post office.
-
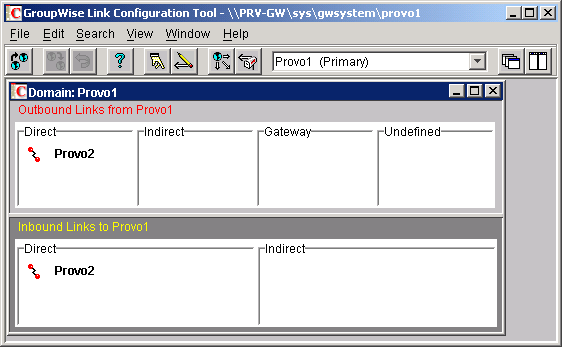
In ConsoleOne, click Tools > GroupWise Utilities > Link Configuration.
-
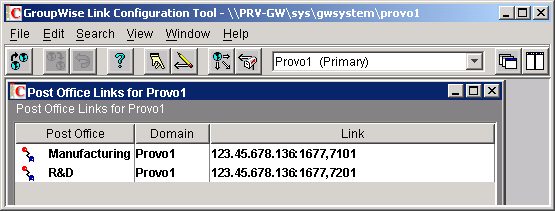
In the drop-down list, select the domain where the post office resides, then click Post Office Links.
-
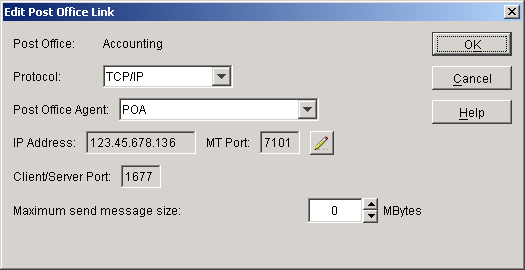
Double-click the post office where you want to restrict message size.
-
In the Maximum Send Message Size field, specify in megabytes the size of the largest message you want users to be able to send outside the post office, then click OK.
-
To exit the Link Configuration tool and save your changes, click File > Exit > Yes.
ConsoleOne then notifies the POA to restart using the new maximum message size limit.
If a user's message is not sent out of the post office because of this restriction, the user receives an e-mail message with a subject line of:
Delivery disallowed
plus the subject of the original message. This message provides information to the user about why and where the message was disallowed. However, the message is still delivered to recipients in the sender's own post office.
There are additional ways to restrict the size of messages that users can send, as described in Restricting the Size of Messages That Users Can Send.
Corresponding Startup Switches
You could also use the /mtpsendmax startup switch in the POA startup file to restrict message size.
POA Web Console
You can view the maximum message size on the Configuration page. You can change the maximum message size for the current POA session using the Message Transfer Protocol link on the Configuration page.