15.8 Configuring Network Settings
After initial setup, you seldom need to change the network settings unless something in your network changes, such as you add a new gateway or DNS server. This section describes the following tasks:
15.8.1 Viewing and Modifying Adapter Settings
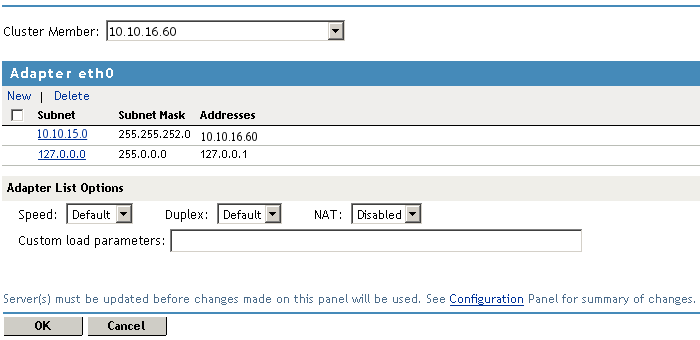
The adapter settings allow you to view the current configuration for the network adapters installed in the Access Gateway machine and manage the IP addresses that are assigned to them. If you want to configure an adapter to use more than one IP address, you can use this option to add them.
If you have multiple adapters installed on a Linux Access Gateway machine, you can only configure eth0 during installation. Use the procedure described in this section to configure the others.
To view or modify your current adapter settings:
-
In the Administration Console, click > > > .
-
(Conditional) If the Access Gateway is a member of a cluster, select the server you want to configure from the list of servers in the field. All changes made to this page apply to the selected server.
-
Select the adapter you want to modify, then select one of the following actions:
-
To add a new subnet to an existing adapter, click .
-
To delete a subnet, select a subnet, then click . More than one must be configured for you to delete a subnet.
-
To modify an existing subnet, click the IP address of the subnet.
-
-
To configure a new subnet or a new IP address for a subnet, configure the following fields:
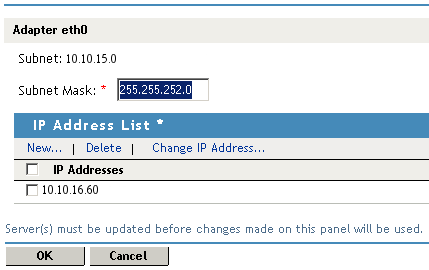
Subnet: Displays the address of the subnet that you are modifying. This is empty if you are creating a new one.
Subnet Mask: (Required) Specifies the subnet mask address for this subnet. The address can be specified in standard dotted format or in CIDR format
IP Addresses: Allows you to manage the IP addresses assigned to the subnet.
-
To add an address, click , specify the address, then click .
-
To delete an address, select the address, then click .
-
To change the IP address, see Section 4.3, Changing the IP Address of the Access Gateway.
-
-
Click .
-
Configure the .
These options let you change settings for the network adapters on the Access Gateway to ensure compatibility with an existing LAN. Modify the default settings only if your LAN requires specialized adapter card changes.
-
Speed: Select , , , or .
-
Duplex: Select , , or .
IMPORTANT:Some network adapter drivers do not correctly detect duplex settings. This is a general industry problem with Fast Ethernet technology.
If your Access Gateway isn't performing as expected, check to ensure that the duplex settings for its network adapters match your network configuration. It might be necessary to manually configure the duplex settings on both your Access Gateway and your Ethernet switch or hub.
-
NAT: Select or .
If the Access Gateway is serving as a router, and your network employs non-unique private IP addresses, you can configure the Access Gateway to provide Network Address Translation (NAT) services.
For example, if you have a 10.0.0.0 private network on eth0 and a registered public network such as 130.0.0.0 on eth1, the clients on the private network can access the Internet through the Access Gateway, provided that the option is selected in the NAT drop-down list for the eth1 adapter.
The Access Gateway then functions as a network address translator and dynamically maps the private, non-routable 10-net addresses to the registered public address assigned to eth1.
IMPORTANT:You cannot configure a reverse proxy on an IP address assigned to an adapter that has the option set for NAT. NAT and a reverse proxy cannot coexist on the same adapter.
Custom load parameters: (NetWare only) Allows you to specify non-standard load parameters for a custom driver. If you used the custom driver option during installation and the documentation for this driver specified some custom load parameters, enter these parameters in the text box.
-
-
To save your changes to browser cache, click .
-
On the Server Configuration page, click , then click > .
15.8.2 Viewing and Modifying Gateway Settings
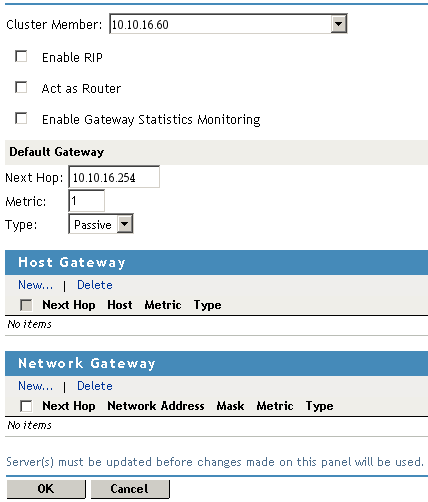
The gateway settings display the current gateway configuration that the Access Gateway is using to route packets. From this page, you can also to configure additional gateways. During installation, you could specify only a default gateway. You must have at least one gateway defined for the Access Gateway to function.
The Access Gateway routes requests to specific destinations through these gateways. If a request could be routed through multiple gateways, the Access Gateway chooses the gateway associated with the most restrictive mask (the smallest range of destination addresses). The default gateway is used only when no other routes apply.
Gateways fall within the following three basic groups:
-
Host gateways for specific destination addresses.
-
Network gateways for destination addresses that fall within specific subnets.
-
The default gateway for destination addresses that aren’t covered by host or network gateways.
The Access Gateway uses additional gateways only when the option is selected. When this option is selected, you can add Host Gateways and Network Gateways. When configuring a Host Gateway or Network Gateway, you specify the IP address of the host or network gateway in the field. This address must be on the same subnetwork as the IP address for the Access Gateway.
IMPORTANT:If you enter an IP address that is on a different subnetwork, the Linux Access Gateway reports this error on the Health page, after the configuration has been applied. The NetWare Access Gateway ignores the configuration error and does not report it.
To modify your current gateway configuration:
-
In the Administration Console, click > > > .
-
(Conditional) If the Access Gateway is a member of a cluster, select the server you want to configure from the list of servers in the field. All changes made to this page apply to the selected server.
-
Fill in the following fields:
Enable RIP: (NetWare only) Allows you to turn on the Routing Information Protocol 1. Through this protocol, the Access Gateway is able to learn routes.
Act as Router: Select this option if the Access Gateway functions as the default gateway for clients on the network. If you select this option, you can specify additional gateways.
Enable Gateway Statistics Monitoring: Select this option if you want to gather statistics and monitor the traffic on the gateways.
-
Configure your default gateway, which specifies the gateway to use when no other routes apply. Configure the following:
Next Hop: The IP address of the gateway.
Metric: A relative number indicating the bias you can add to the normal flow of gateway logic. Specifying a number higher than 1 makes this resource more expensive and alters the gateway logic used. Valid numbers include 1 through 16.
Type: Gateways are active if they publish their presence, or passive if they do not.
-
Configure your host gateways, which are the gateways to be used for packets being sent to specific hosts. When you select from the list, you are asked for the following information:
Next Hop: The address of the host gateway that is to be used.
Host: The IP address of the destination host. Valid addresses cannot be the first or last address of a class and must be unique.
Metric: A relative number indicating the bias you can add to the normal flow of gateway logic. Specifying a number higher than 1 makes this resource more expensive and alters the gateway logic used. Valid numbers include 1 through 16.
Type: Gateways are active if they publish their presence, or passive if they do not.
Click when the fields are configured.
-
Configure your network gateways, which are the gateways to be used for packets being sent to specific subnets. When you select from the list, you are asked for the following information:
Next Hop: The address of the gateway that is to be used.
Network Address: The subnet address for the destination IP address range. You can also enter a specific IP address on a given subnet, and the Access Gateway calculates the subnet address using the mask.
Mask: The subnet mask for the subnet or IP address above. A valid entry must be at least as large as a class mask where a Class A mask is 255.0.0.0, a Class B mask is 255.255.0.0, and Class C, D, and E masks are 255.255.255.0.
Metric: A relative number indicating the bias you can add to the normal flow of gateway logic. Specifying a number higher than 1 makes this resource more expensive and alters the gateway logic used. Valid numbers include 1 through 16.
Type: Gateways are active if they publish their presence, or passive if they do not.
Click when the fields are configured.
-
To save your changes to browser cache, click .
-
On the Server Configuration page, click , then click > .
15.8.3 Viewing and Modifying DNS Settings
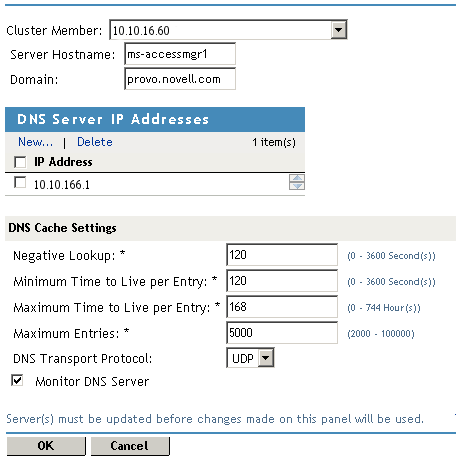
The DNS page displays the current configuration for domain name services and allows you to modify it.
-
In the Administration Console, click > > > .
-
(Conditional) If the Access Gateway is a member of a cluster, select the server you want to configure from the list of servers in the field. All changes made to this page apply to the selected server.
-
Fill in the following fields:
Server Hostname: Displays the unique host or computer name that you have assigned to the Access Gateway machine. If you modify this name, you need to modify the entry for the Access Gateway in your DNS server to resolve this new name.
Domain: Specifies the domain name for your network. Your DNS server must be configured to resolve the combination of the server hostname and the domain name to the Access Gateway machine. This field assumes you are using dotted names for your machines, such as sales.mytest.com, where sales is the and mytest.com is the .
DNS Server IP Addresses: Displays the IP addresses of the servers on your network that resolve DNS names to IP addresses. You can have up to three servers in the list. If you specified any addresses during installation, they appear in this list. To manage the servers in this list, select one of the following options:
-
New: To add a server to the list, click this option and specify the IP address of a DNS server.
-
Delete: To delete a server from the list, select the address of a server, then click this option.
-
Order: To modify the order in which the DNS servers are listed, select the server, then click either the up-arrow or the down-arrow buttons. The first server in the list is the first server contacted when a DNS name needs to be resolved.
-
-
Configure the DNS Cache Settings. These options allow you to control the refresh of DNS information. These are all standard DNS options.
Negative Lookup: Specifies how long a failed DNS lookup domain name remains in cache. If the Access Gateway cannot resolve a domain name, it stores that information in its cache for the specified amount of time. If the Access Gateway receives requests for that domain name within this period, it sends a “Bad Gateway” error message to the browser and does not resolve the domain name again. Valid field values include 0–3600 seconds. The default is120 seconds.
Minimum Time To Live per Entry: Specifies the minimum amount of time that DNS entries remain in cache before they expire. This is the minimum value the Access Gateway uses regardless of the value the DNS server returns. Valid field values include 0–3600 seconds. The default is 120 seconds.
Maximum Time To Live per Entry: Specifies the maximum amount of time that DNS entries remain in cache before they expire. This is the maximum value the Access Gateway uses regardless of the value the DNS server returns. Valid field values include 0–744 hours. The default is 168 hours.
Maximum Entries: Specifies the maximum number of DNS cache entries. When this number is reached, the Access Gateway deletes old entries to make room for newer ones. Valid field values include 2000–100000. The default is 5000.
DNS Transport Protocol: Specifies the transport protocol that DNS uses on the network where the Access Gateway is installed. Valid values are UDP and TCP. The default is UDP.
Monitor DNS Server: (NetWare only) If selected, allows the Access Gateway to monitor DNS server availability by pinging the configured servers every minute. This ensures timely handling of DNS requests. You should deselect this item if the Access Gateway accesses DNS through a connection that is not kept continually open, such as a dial-up phone line or ISDN connection.
Keep in mind, however, that deselecting this option causes the DNS configuration on the Health tab to display the following message: "(Passed) Domain and DNS Servers configured". When this option is enable, the Health tab displays the following message: "(Passed) Domain and DNS Servers configured and active".
-
To save your changes to browser cache, click .
-
On the Server Configuration page, click , then click > .
15.8.4 Configuring Hosts
(Linux only) You can configure the Linux Access Gateway to have multiple host names.
-
In the Administration Console, click > > >.
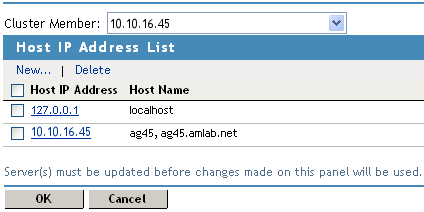
This page displays a list of host IP addresses.
-
(Conditional) If the Access Gateway is a member of a cluster, select the server you want to configure from the list of servers in the field. All changes made to this page apply to the selected server.
-
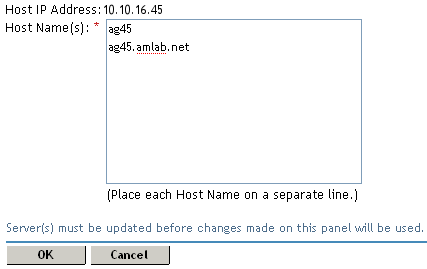
To add a new host name to an existing IP address, click the name of a.
-
In the text box, specify a name for the host. Place each host name on a separate line. Then click .
-
To add a new IP address and host name, click in the section, then specify the IP address. In the text box, specify a host name, then click .
-
To delete a host, select the check box next to the host you want to delete, then click .
-
To save your changes to browser cache, click .
-
On the Server Configuration page, click , then click > .
15.8.5 Adding New Network Interfaces to the Linux Access Gateway
If you add new network interface cards to the Linux Access Gateway machine after installation, you need to scan for these cards. Then you can configure them.
-
In Administration Console, click > [Name of Server].
-
Click to scan for new network interface, then click to confirm.
You can click the tab to check if the scan has completed.
-
Click , then click for the cluster or server that has the new card.
-
Click . If the server is a member of a cluster, select the cluster member you want to configure.
The newly added network interface is displayed here.
-
In the newly added adapter section, click , then configure the subnet mask and IP address.
-
To save your changes to browser cache, click .
-
On the Server Configuration page, click , then click > .