17.3 Managing Multiple Reverse Proxies
Each reverse proxy must have a unique IP address and port combination. If your Access Gateway has only one IP address, you must select unique port numbers for each additional reverse proxy that you create. You can configure the Access Gateway to use multiple IP addresses. These addresses can be configured to use the same network interface card, or if you have installed multiple network cards, you can assign the IP addresses to different cards. To configure IP addresses and network interface cards, see Section 15.8.1, Viewing and Modifying Adapter Settings.
If you are creating more than one reverse proxy, you must select one to be used for authentication. By default, the first reverse proxy you create is assigned this task. Depending upon your Access Gateway configuration, you might want to set up one reverse proxy specifically for handling authentication. The authentication reverse proxy is also used for logout. If you have Web applications that contain logout options, these options need to be redirected to the Logout URL of the authentication proxy.
17.3.1 Managing Entries in the Reverse Proxy List
-
In the Administration Console, click > > >

-
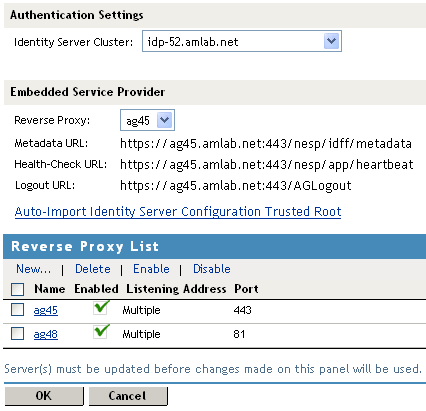
In the , select one of the following actions:
-
New: To create a new reverse proxy, click . You are prompted to enter a display name for the proxy. For configuration information, see Section 13.1, Creating a Reverse Proxy and Proxy Service.
Reverse proxy names and proxy service names must be unique to the Access Gateway. Protected resource names need to be unique to the proxy service, but they don’t need to be unique to the Access Gateway.
-
Delete: To delete a reverse proxy, select the check box by a specific reverse proxy, then click . To delete all reverse proxies, select the check box by the column, then click .
-
Enable: To enable a reverse proxy, select the check box by a specific reverse proxy, then click . To enable all reverse proxies, select the check box by the column, then click .
-
Disable: To disable a reverse proxy, select the check box by a specific reverse proxy, then click . To enable all reverse proxies, select the check box by the column, then click .
-
-
To save your changes to browser cache, click .
-
To apply the changes, click the link, then click > .
17.3.2 Changing the Authentication Proxy Service
If you have multiple reverse proxies, you can select the reverse proxy that users are redirected to for login and logout.
IMPORTANT:Changing the reverse proxy that is used for authentication is not a trivial task. For example, if you have customized the logout options on your Web servers to redirect the logout request to the Logout URL of the current authentication reverse proxy, you need to modify these options to point to a new Logout URL.
If you have set up SSL connections, you need to change your certificate configurations.
To select the reverse proxy to use for authentication:
-
In the Administration Console, click > > .
-
In the section, select a value for the option. This is the reverse proxy that is used for authentication.
The screen is refreshed and the , and are rewritten to use the selected reverse proxy.
-
(Conditional) If your Access Gateway certificates were generated by a different certificate authority than your Identity Server certificates, you need to import the trusted root of the Identity Sever into the trusted root keystore of the embedded service provider. Click , click , specify an alias, click , then click .
If you don’t know whether you need to import the trusted root, click the option. If the trusted root is already in the keystore, the duplicate key is not imported and you are informed of this condition.
-
In the , click the name of the reverse proxy that you have selected for authentication.
-
If you have enabled SSL between the embedded service provider and the Identity Server, you need to import the trusted root of the embedded service provider into the trusted root keystore of the Identity Server. Click , click , specify an alias, click , then click .
If you don’t know whether you need to import the trusted root, click the option. If the trusted root is already in the keystore, the duplicate key is not imported and you are informed of this condition.
-
To save your changes to browser cache, click .
-
To apply the changes, click the link, then click > .
-
(Conditional) If you have customized Web logout pages, update them to use the new Logout URL.