2.2 Creating Macintosh Bundles
Macintosh bundles allow you to configure, manage applications, and store the package updates on Macintosh devices.
You can use ZENworks Control Center or the zman command line utility to create bundles. The following procedure explains how to create a bundle using ZENworks Control Center. If you prefer the zman command line utility, see Bundle Commands
in ZENworks Command Line Utilities
.
To create a Macintosh bundle:
-
In ZENworks Control Center, click the Bundles tab.
-
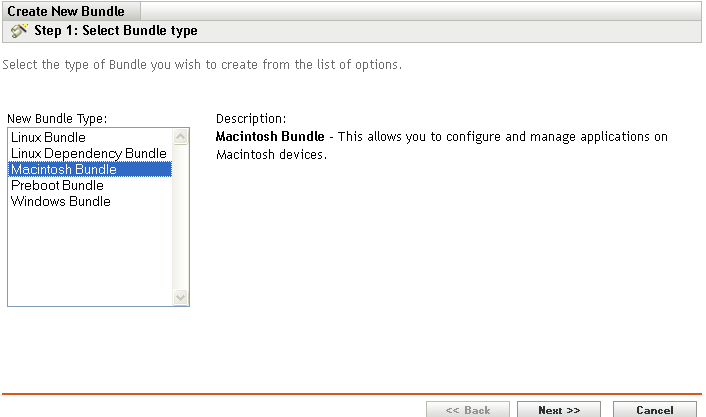
In the Bundle list, click New, then click Bundle to display the Select Bundle Type page.

-
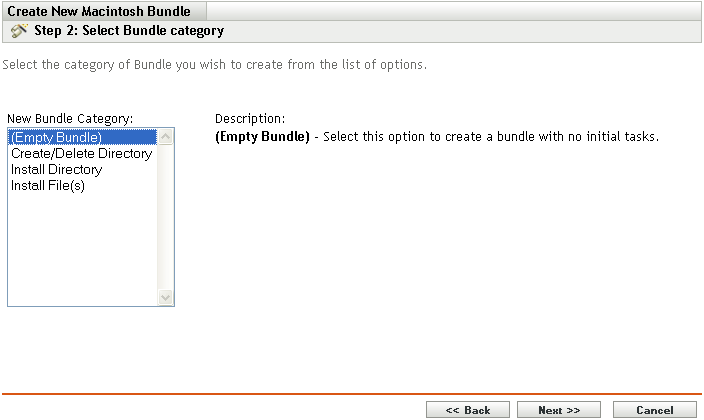
Select Macintosh Bundle, then click Next to display the Select Bundle Category page.

-
Select the desired bundle category:
Empty Bundle: A bundle with no initial tasks. This bundle category is useful to quickly create a bundle without performing all of tasks in the Create New Bundle Wizard. After you create the empty bundle, you can edit its details to add assignments, actions, and so forth, at a later time.
Create/Delete Directory: Creates or Deletes a directory on the managed device.
Install Directory: Uploads the contents of a directory and its sub-directories to the ZENworks content system and then installs them to the specified destination path on the managed device. By default, the content is replicated to all primary servers.
Install Files: Uploads the files to the ZENworks content system and then installs them to the specified destination path on the managed device. By default, the content is replicated to all primary servers.
-
Click Next to display the Define Details page, then fill in the fields:
Bundle Name: Provide a name for the bundle. The bundle name must be different than the name of any other item (bundle, group, folder, and so forth) that resides in the same folder. The name you provide displays in ZENworks Control Center and the ZENworks Adaptive Agent (on managed devices).
For more information, see
Naming Objects in ZENworks Control Center
in the ZENworks 11 SP4 ZENworks Control Center Reference.Folder: Type the name or browse to and select the ZENworks Control Center folder where you want the bundle to reside. The default path is the context from where the bundle creation wizard is invoked. For example, if you choose to create a new bundle from the bundles page, the default folder path is /bundles. However, if you choose to create a bundle from with a bundle folder named folder1, the default folder path is /bundles/folder1. You can also create additional folders to organize your bundles.
Icon: ZENworks Configuration Management lets you select an icon that users see during installation of a particular bundle. This icon applies only to the icon displayed by ZENworks Adaptive Agent on the managed device. ZCC uses default icons to represent the different bundles.
To select an icon, click , and then browse and select the icon you want to display on managed devices.
If you do not specify an icon, a default icon is used.
Description: Provide a short description of the bundle's contents. This description displays in ZENworks Control Center and in the ZENworks Adaptive Agent.
-
Click Next, then skip to the appropriate step, depending on which bundle category you chose in Step 4:
-
(Conditional) If you are creating an Create/Delete Directory bundle, follow the wizard prompts until you reach the Summary page, then skip to Step 17.
Click Help for information about each page or refer to the following table:
Wizard Page and Field
Details
page > Action Type field
Select one of the following:
-
Create Directory: Creates a directory on the managed device when the action is performed.
-
Delete Directory: Deletes a directory on the managed device when the action is performed.
page > Directory Name field
Specify the complete path of the directory you want to create or delete on the managed device.
If you have not installed ZCC Helper on this device, you must do it before you can browse to and select files or folders.
-
-
(Conditional) If you are creating an Install Directory bundle, follow the wizard prompts until you reach the Summary page, then skip to Step 17.
Click Help for information about each page or refer to the following table:
Wizard Page and Field
Details
page > Source Directory field
Click
 to display the Select Directory dialog box. Browse to and select the file to upload.
The Status field displays each file’s upload status.
Select the Upload all files within the source directory as a single package option to enable all the files within the specified source directory to be uploaded as a single content.
If the Novell ZENworks File Upload plug-in is not installed on this device, it must be installed before you can browse to and upload files to be copied. For more information, seeSection F.1, Installing the Novell ZENworks File Upload Plug-in.
page > Upload Files As field
Specifies whether the content has been uploaded as a single content or multiple contents to the ZENworks content repository.
If the Upload all files within the source directory as a single package option in the dialog box is not selected, then the files are uploaded by packaging in to multiple contents and the value of Upload Files As option is displayed as Multiple Content.
If the Upload all files within the source directory as a single package option in the dialog box is selected, then the files are uploaded by packaging in to single content and the value of Upload Files As option is displayed as Single Content.
page > Destination Directory field
Specify the destination path on the device where you want to install the directory.
page > Permissions field
You can configure permissions and set the access for the directory that you have installed.
Mode: Select this option and enter a 3 digit octal number to specify the permissions for owner, group, and others.
Owner: Select this option and set the access for Owner, Group, and Others.
page > Ownership field
You can configure permissions and set the access for the directory that you have installed.
Root: Select this option to provide the ownership for the root user.
User: Select this option to provide the ownership for a particular user. You can also specify the group of the user.
page > Copy Option
Select a copy option from the list. For more information on the options, click Help.
-
(Conditional) If you are creating an Install Files bundle, follow the wizard prompts until you reach the Summary page, then skip to Step 17.
Click Help for information about each page or refer to the following table:
Wizard Page and Field
Details
Select Files page > File field
Click Add to display the Select Files dialog box, specify the files you want to install on the device, then click Open. Repeat this step as many times as necessary to copy the desired files.
Click OK to upload the files to the server. The File option lists all the uploaded files, the size of the files, and how the content is packaged.
If the Novell ZENworks File Upload plug-in is not installed on this device, you must install it before you can browse for file paths. For more information, see Section F.1, Installing the Novell ZENworks File Upload Plug-in.
Select Files page > Destination Directory field
Specify the destination directory on the device in which you want to install the file.
page > Permissions field
You can configure permissions and set the access for the directory that you have installed.
Mode: Select this option and enter a 3 digit octal number to specify the permissions for owner, group, and others.
Owner: Select this option and set the access for Owner, Group, and Others.
page > Ownership field
You can configure permissions and set the access for the directory that you have installed.
Root: Select this option to provide the ownership for the root user.
User: Select this option to provide the ownership for a particular user. You can also specify the group of the user.
Select Files page > Unpack field
Select this option to indicate that the files that are compressed in gzip, bzip2, or zip formats should be decompressed and extracted on to the device where you want to install them.
By default, ZipperUtil.sh is used to unpack the files. If you want to unpack the files using Java API, in the xplatzmd.properties file, the value of install-file-unpack-with-java-first should be set to True.
Select Files page > Delete After Unpack field
Select this option to indicate that the gzip, bzip2 or zip files should be deleted after extracting them on to the device where you want to install them.
Select Files page > Copy Option
Select a copy option from the list. For more information on the options, click Help.
-
Review the information on the Summary page, making any changes to the bundle settings by using the Back button as necessary.
-
Skip to Step 13 to create the published version of the bundle.
-
(Conditional) Select the Create as Sandbox option to create a sandbox-only version of the bundle.
A sandbox-only version of a bundle enables you to test the bundle on your device before actually deploying it. For more information on a sandbox-only bundle, see Section 7.0, Understanding Bundle Change Management.
-
(Conditional) Select the Define Additional Properties option to display the bundle’s Action page after the wizard completes. You can use the various tabs to edit the bundle’s assignments, system requirements, actions, settings, and content replication settings.
-
Click Finish to create the bundle as configured per settings on the Summary page.
When you click Finish, the bundle is created but it does not have users or devices assigned, s, and group membership. At some point in the future, you need to configure additional options for the bundle by continuing with Section 9.1, Assigning Existing Bundles to Devices or Section 9.2, Assigning Existing Bundles to Users.
For information on the viewing the bundle information, see Section 3.0, Viewing the Bundle Information.