Replacing a Server

Instructions in the following section give information you need to know about eDirectory on a specific server when you upgrade or replace hardware. For information on backing up and restoring eDirectory on Windows NT/2000 on an entire tree, refer to Using Backup and Restore Services on Windows NT.
Options available in INSTALL.DLM allow you to prepare eDirectory information on a server for a planned hardware upgrade, hard drive upgrade, or replacement of the server. The following instructions are designed for situations where a server is actually replaced. For naming purposes, the old server is referred to as Server A and its replacement or the new server is referred to as Server B.
To prepare for the upgrade, the NT/2000 backup utility creates a backup file named BACKUP.NDS that stores all of the eDirectory information on a server, including replica information. It also locks and disables eDirectory on this server, preventing any data change. To other servers that normally communicate with this server, the server appears to be down. Any eDirectory information that is normally sent to the locked server is stored by other servers in the tree. The stored information is used to synchronize the server when it comes back online.
Because other servers in the eDirectory tree expect the server to come back online quickly, you should complete the upgrade promptly and restore eDirectory information on the server as soon as possible.
The Restore Local DS Information after Hardware Upgrade option uses the backup to restore eDirectory information on this server.
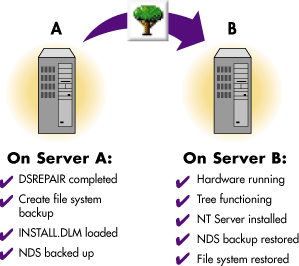
Figure 40 shows the procedure for replacing hardware.
Figure 40
Replacing a Server
Use the following checklist to determine if you are ready to start this procedure.
The eDirectory backup utility creates a backup file named $HWNDS.BAK in C:\NOVELL\NDS\DIBFILES directory to store all the eDirectory information on the server. Use the following instructions to prepare eDirectory for a hardware upgrade:
At the server console, run NDSCONS.EXE > click INSTALL.DLM > click Start.
Click Save Local DS Information Prior to Hardware Upgrade > press Next.
Enter the administrator name and password.
Enter the destination path for the backup file > click Finish.
The system creates the backup file in the same directory as the eDirectory database files, C:\NOVELL\NDS\DIBFILES\$HWNDS.BAK.
Server A's DS database is now locked. Complete the upgrade promptly and restore eDirectory information on Server B as soon as possible.
The Restore DS Information after a Hardware Upgrade option uses the files created during the backup to restore eDirectory information on Server B. Before eDirectory is restored, this utility ensures that the server is in the same relative state as before the upgrade. The INSTALL.DLM ensures that the server's object and authentication keys still exist and that the server still exists in all the replica rings for copies that were on this server before the upgrade.
In the eDirectory console click INSTALL.DLM > click Start.
Click Restore Local DS Information after Hardware Upgrade and press Next.
Verify the path to the C:\NOVELL\NDS\DIBFILES directory or enter a new path > click Finish.
Use your NT backup services to restore the file system backup you made of Server A and its trustees.
Make sure that login scripts and printing work correctly.
If Server B does not work correctly and you need to make Server A functional immediately, do the following:
Unplug Server B's network cable or down the server.
Reattach Server A to the network and start it.
Ignore system messages requesting you to run DSREPAIR.
Click INSTALL.DLM > click Start.
Click Restore Local DS Information after Hardware Upgrade > click Next.
Verify the path to the C:\NOVELL\NDS\DIBFILES directory or enter a new path > click Finish.
When restore is complete, click Done.
This unlocks the eDirectory on the server and returns it to its state before the upgrade.
Remove eDirectory from Server B and try the upgrade again.