1.2 Getting Acquainted with the Main GroupWise Window
Your main work area in GroupWise is called the Main Window. From the Main Window of GroupWise, you can read your messages, schedule appointments, view your Calendar, manage contacts, change the mode of GroupWise you’re running in, open folders, open documents, and much more.
The basic components of the Main Window are explained below.
1.2.1 Nav Bar
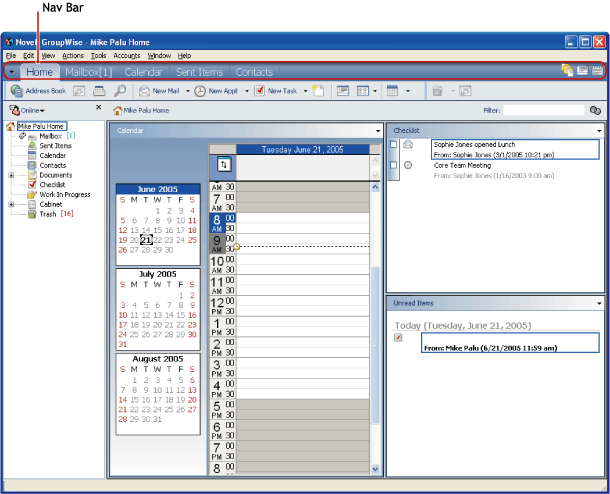
Figure 1-1 The GroupWise Nav Bar

The Nav Bar provides quick access to your most commonly used folders. By default, the Home, Mailbox, Calendar, Sent Items, and Contacts are on the Nav Bar. You can add to the Nav Bar. For more information about the Nav Bar, see Section 1.7, Using the Nav Bar.
1.2.2 Toolbar
Figure 1-2 The GroupWise Toolbar

The toolbar lets you quickly accomplish common GroupWise tasks, such as opening the Address Book, sending mail messages, and filtering items. For information about the toolbar, see Section 1.8, Using the Toolbar and Section 14.24, Customizing Your Toolbar.
1.2.3 Panels
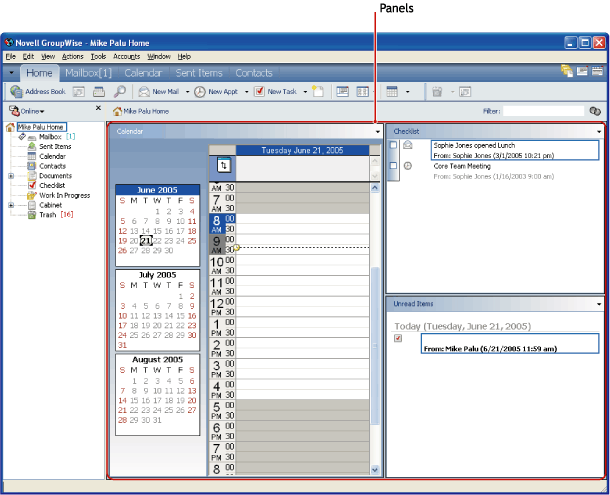
Figure 1-3 The GroupWise Panels

The panels display your frequently used information in a quick glimpse. You can add additional panels from a list of preconfigured panels, or you can create new panels and display the information you want. For more information about panels, see Section 1.6, Using Panels.
1.2.4 Folder and Item List Header
The Folder and Item List header provides a drop-down list where you can select the mode of GroupWise you want to run (Online, Caching, Remote, or Remote (Offline), select to open your archived or backup mailbox, and select a proxy mailbox. For information about these features, see Section 1.5, Using Different GroupWise Modes (Online, Caching, and Remote), Section 7.6, Archiving the Items in Your Mailbox, Section 7.14, Backing Up Your Mailbox, and Section 7.9, Giving Other People Access to Your Mailbox.
This header also provides the Show drop-down list, from which you can select to see only items of a specific category. For information about categories, see Using Categories to Organize Items.
The new Filter icon ( ) is also on this header, giving you convenient access to predefined and custom filters. For information about filtering, see Section 7.17, Filtering Items.
To change how information displays in headers, right-click the header and choose options. For more information, see Section 14.6, Customizing Headers.
1.2.5 Folder List
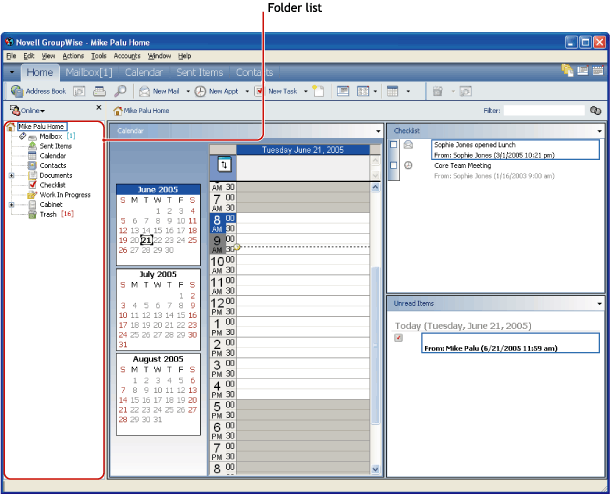
Figure 1-4 The GroupWise Folder List

The Folder List at the left of the Main Window lets you organize your GroupWise items. You can create new folders to store your items in. Next to any folder (except for shared folders), the number of unread items is shown in square brackets. Next to the Sent Items folder, the number in square brackets shows how many items are pending to be sent from Caching or Remote mode. For information about the different GroupWise folders, see Section 7.1, Using the Folder List.
There are two different Folder Lists, the Full Folder List and the Simple Folder List. The Full Folder List displays all folders, while the Simple Folder List displays only folders that pertain to the folder you are currently in. For example, if you are in the Mailbox folder, the Cabinet folders are displayed, and if you are in the Calendar folder, the Calendar folders are displayed.
You can close your folder list to leave more room for other views, such as the Calendar, in the Main Window. Click the icon in the upper right corner to open or close the Folder List display.
Here is what you’ll find in each of the default folders:
Home Folder
Your Home folder  (indicated by your name) represents your GroupWise database. All folders in you Main Window are subfolders of your user folder. The Home folder is where you go to access the Home view. For more information about the Home view, see Section 1.3, Understanding the Home View.
Mailbox Folder
The Mailbox  displays all the items you have received, with the exception of scheduled items (appointments, tasks, and reminder notes) you have accepted or declined. Accepted scheduled items and tasks are moved to the Calendar.
Sent Items Folder
The Sent Items folder  displays all sent items from the Mailbox and Calendar. The Sent Items folder in versions prior to GroupWise 6.5 was a query folder, which had some differences from the current Sent Items folder.
The following table is a comparison between the previous Sent Items query folder and the current Sent Items folder.
Table 1-1 Comparison of the New and Old Sent Items Folder
|
Sent Items Folder (Current) |
Sent Items Query Folder (Previous) |
|---|---|
|
A system folder that cannot be deleted. |
A Find Results folder that can be deleted and re-created. (For more information about Find Results folders, see Understanding Find Results Folders.) |
|
All sent items reside in this folder unless they are moved to a folder other than the Mailbox or Calendar. If a sent item is moved to another folder, it no longer displays in the Sent Items folder. |
No items actually reside in this folder. This folder is a Find Results folder, which means a Find is performed when you click the folder and the results of the Find (all sent items) are displayed in the folder. If you delete an item from this folder, the original item remains in its original folder and redisplays the next time you open this folder. |
|
You can resend, reschedule, and retract sent items from this folder. |
You can resend, reschedule, and retract sent items from this folder. |
Calendar Folder
The Calendar folder  shows several calendar view options. If you hide your Folder List by clicking > , the Main Window shows a better view of your Calendar. The Calendar folder contains any additional folders that you have created. You can use the Folder List to choose which calendars to display. The selected calendars are displayed in the calendar view.
Contacts Folder
The Contacts folder  , by default, represents the Frequent Contacts address book in the Address Book. (You can change the folder properties so that it represents a different address book in the Address Book. For information, see Changing the Address Book for the Contacts Folder.) Any modification you make in the Contacts Folder is also made in the Frequent Contacts address book.
From this folder, you can view, create, and modify contacts, resources, organizations, and groups.
Your proxies never see your Contacts folder.
Checklist Folder
Use the Checklist folder  to create a task list. You can move any items (mail messages, phone messages, reminder notes, tasks, or appointments) to this folder and arrange them in the order you want. Each item is marked with a check box so that you can check off items as you complete them.
If you want another folder to work the way the Checklist folder does, click the folder, click the drop-down list on the toolbar, then select . The folder then has a Checklist area at the top of the folder where you can drag items.
The following table is a comparison between the Checklist folder and the Task List query folder found in previous versions of GroupWise.
Table 1-2 Comparison of the Checklist Folder and the Old Task List Query Folder
|
Checklist Folder |
Task List Folder |
|---|---|
|
A system folder that cannot be deleted. |
A Find Results folder that can be deleted and re-created. (For more information about Find Results folders, see Understanding Find Results Folders.) |
|
This folder contains the following items:
|
No items actually reside in this folder. This folder is a Find Results folder, which means a Find is performed when you click the folder and the results of the Find (all scheduled tasks) are displayed in the folder. If you delete an item from this folder, the original item remains in its original folder and redisplays the next time you open this folder. |
|
Any item type can reside in this folder. |
Only tasks show in this folder. Tasks are scheduled items that are associated with a due date. |
|
To mark an item completed, click the check box next to the item in the Item List. |
To mark an item completed, open the item, then click . |
|
To set a due date, open the item, click the Checklist tab, then specify a date. |
Due dates are set by the person who sent you the task. If you post a task for yourself, you can set a due date. |
|
To set the priority of an item, drag the task to a new position in the checklist. |
To set the priority of an item, open the item, then type a priority in the field. |
|
Checklist items do not display in the Task List of the Calendar. |
Tasks display in the Task List of the Calendar and can be marked Completed from the Calendar. |
|
If a checklist item is due today, the check box in the Checklist is green. If a checklist item is past due, the check box is red. |
Tasks that are past due show as red in the Calendar. |
Cabinet
The Cabinet  contains all of your personal folders. You can rearrange and nest folders by clicking > . To sort the folders in the Cabinet alphabetically, right-click the folder, then click .
Documents Folder
Your document references are organized in the Documents folder  so you can easily locate them.
Any document references you create or open are added to the Documents folder; if you specify, any document references you view or import are also added. You can also specify that none of these actions adds a document reference to the Documents folder.
The Documents folder can contain only documents. If any other type of item is moved to this folder by a GroupWise client older than version 5.5 (for example, from an older version of GroupWise Remote), the item is deleted.
The Documents folder contains, by default, your 20 most recent document references. You can change this number from 0 to 5000 document references. After the maximum number is reached, the oldest document reference is deleted. You can also manually delete document references from the Documents folder.
The Documents folder has two Find Results folders. Authored contains document references for all the documents which you are the author of. Default Library contains document references for all the documents you have access to in the default library. You can change or delete the Author and Default Library folders. You can create other document Find Results folders according to your needs. For example, you can create a Find Results folder for a specific library, subject, author, or document type.
Work in Progress Folder
The Work In Progress folder  is a folder where you can save messages you have started but want to finish later.
Junk Mail Folder
All e-mail items from addresses and Internet domains that are junked through Junk Mail Handling are placed in the Junk Mail folder  . This folder is not created in the folder list unless a Junk Mail option is enabled.
While Junk Mail options are enabled, this folder cannot be deleted. However, the folder can be renamed or moved to a different location in the folder list. If all Junk Mail options are disabled, the folder can be deleted. The folder can also be deleted if the Junk Mail Handling feature is disabled by the system administrator.
To delete items from the Junk Mail Folder, right-click the folder, click , then click .
For more information about Junk Mail Handling, see Handling Unwanted Mail.
Trash Folder
All deleted mail and phone messages, appointments, tasks, documents, and reminder notes are stored in the Trash folder  . Items in the Trash can be viewed, opened, or returned to your Mailbox before the Trash is emptied. (Emptying the Trash removes items in the Trash from the system.)
You can empty your entire Trash, or empty only selected items. Items in the Trash are automatically emptied according to the days entered in the tab in , or you can empty the Trash manually. The system administrator can specify that your Trash is emptied automatically on a regular basis.
Shared Folders
A shared folder  is like any other folder in your Cabinet, except other people have access to it. You can create shared folders or share existing personal folders in your Cabinet. You choose whom to share the folder with, and what rights to grant each user. Users can post messages to the shared folder, drag existing items into the folder, and create discussion threads. You can’t share system folders, which include the Cabinet, Trash, and Work In Progress folders.
If you place a document in a shared folder, people with rights to the shared folder don’t automatically have rights to edit the document. Before they can edit the document, you must give them Edit rights on the tab.
IMAP4 Account Folder
If you add a folder for an IMAP4 account, a ![]() icon displays in your Folder List.
icon displays in your Folder List.
NNTP Newsgroup Account Folder
If you add a folder for an NNTP newsgroup account, a ![]() icon displays in your Folder List.
icon displays in your Folder List.