There are two methods for automating ZENworks Imaging at the workstation.
Imaging Option A . This is the traditional, out-of-the-box ZENworks for Desktops method of installing a ZENworks Imaging Partition, sometimes referred to as "the Linux partition," to the workstation hard drive. For more information, see Imaging Option A: Installing the ZENworks Imaging Partition .
Imaging Option B. This method uses an add-on product, ZENworks for Desktops 3.2 Preboot Services. For more information, see Imaging Option B: Using ZENworks for Desktops 3.2 Preboot Services .
If you have installed ZENworks for Desktops 3.2 Preboot Services, we recommend that you skip Option A and perform the steps in Option B instead.
If you have a PXE-ready workstation, it is strongly advised that you skip this option and use Imaging Option B: Using ZENworks for Desktops 3.2 Preboot Services .
WARNING: This procedure will destroy all partition data on your workstation hard drive. Do not perform these steps on a production workstation, or on any workstation that may have the only copy of important data. Ensure that you have manually created an image of this workstation following the procedure described in Manual Workstation Imaging .
Use the following steps to create a ZENworks Imaging partition:
Select a workstation for ZENworks Imaging.
The closer this hardware is to matching the hardware from which you created your previous workstation image, the better success you will have with the restored image. Windows* 2000 can usually automatically accommodate minor differences in hardware.
If your ZENworks Imaging boot media was not created from the November 21, 2001 Cool Solutions imaging update, then re-create your ZENworks Imaging boot media. For more information, see Creating ZENworks Imaging Media .
Reboot your workstation with your ZENworks Imaging boot media.
Enter install at the boot prompt of the ZENworks Imaging version 3.2 text screen.
This command wipes the hard disk of all non-system partitions.
If you are using floppy diskettes as your media, follow the prompts for each floppy disk as needed.
When prompted to press any key to reboot, remove the ZENworks Imaging media and shut down your workstation.
If you have already completed Option A, you can skip Option B. Proceed to Creating a Simple Workstation Image Object .
Ensure that your server and workstations are on an isolated network segment before you use these steps for imaging a workstation.
Select a workstation with PXE capabilities.
The closer this hardware is to matching the hardware from which you created your previous workstation image, the better success you will have with the restored image. Windows 2000 can usually automatically accommodate minor differences in hardware.
Boot the workstation and start its BIOS setup program.
The method for entering the BIOS setup program varies per equipment manufacturer and machine model.
In the workstation's BIOS Setup program, set the workstation to use PXE > save your new BIOS settings > exit.
This will also vary from machine model to machine model. It may be phrased "Enable Network Boot" or may be in the workstation boot order, such as floppy, CD, Hard Disk, Ethernet.
Power off your workstation.
Switch to your ZENworks for Desktops Windows 2000 server.
Click the Start menu > Settings > Control Panel > Administrative Tools > DHCP.
Open the LabScope DHCP scope and select Configure Options.
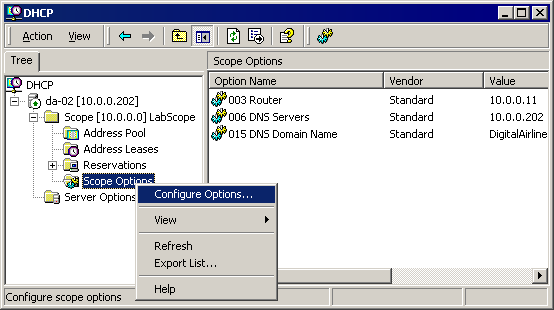
In the Scope Options list, try to find Option 060. If you can find the option, skip to Creating a Simple Workstation Image Object .
or
Because Option 060 is not standard on Windows 2000, you may need to add it from the command line. To do so, continue with Step 9.
Close the DHCP management console.
Open a Windows 2000 command line session (that is, start CMD.EXE).
At the Windows Command prompt, enter netsh.
The command prompt will be displayed as netsh>.
At the netsh prompt, enter dhcp server.
At the dhcp server prompt, enter add optiondef 60 ClassID STRING 0 PXEClient.
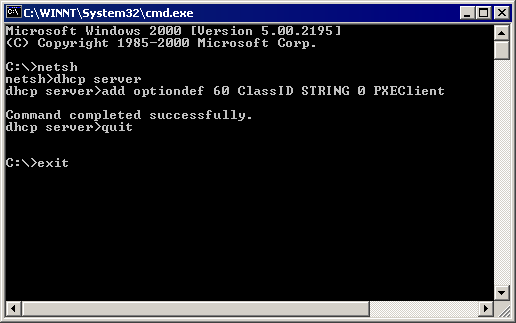
At the dhcp server prompt, enter quit > exit.
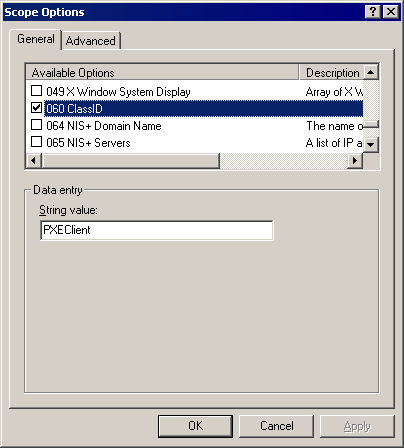
From the DHCP management console, click to open the LabScope DHCP scope > right-click Scope Options > click Configure Options.
Select DHCP option 060 ClassID > click OK.
Option 060 should now appear as a one of the Scope Options in your list.
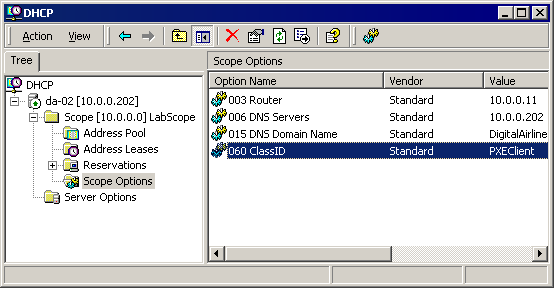
Close the DHCP console.