11.2 Windows: Installing and Setting Up a Basic Vibe Site
You should already have reviewed Section 8.0, Planning a Basic (Single-server) Vibe Installation and filled out the Single-server Installation Planning Worksheet. The following sections step you through the process of installing and starting OpenText Vibe on Windows:
11.2.1 Performing Pre-Installation Tasks on Windows
Verifying System Requirements
Ensure that the Windows server where you plan to install Vibe meets the system requirements listed in Server Operating System Requirements.
Stopping an Existing Web Server
If a web server is currently running on the Vibe server, stop it, and preferably disable it.
For example, to stop and disable the Internet Information Services (IIS) web server:
-
On the Windows desktop, click Start > Administrative Tools > Services.
-
Right-click World Wide Web Publishing Service, then click Properties.
-
In the Startup type drop-down list, select Disabled.
-
Click Stop, then click OK.
Setting Environment Variables
Ensure that the Windows PATH environment variable includes the path to your database server.
-
Right-click My Computer, then click Properties.
-
On the Advanced tab, click Environment Variables.
-
Check the PATH environment variable:
-
On the Advanced tab, click Environment Variables.
-
In the System variables list, locate the PATH environment variable.
-
If the path includes your database server software directory, click Cancel.
or
If the path does not include your database server software directory, add the directory, then click OK.
-
11.2.2 Running the Windows Vibe Installation Program
-
Log in to the Windows server as a user with Administrator rights.
-
In Windows Explorer, browse to the directory where you downloaded and extracted the Vibe software.
-
Ensure that there is a license-key.xml file in the directory.
The Vibe installation program does not start without a license file, and it has a different name when you download it.
For more information about licensing, see Section 13.0, Updating Your Vibe License.
-
Double-click the installer-teaming.exe file to start the Vibe installation program.
-
Accept the License Agreement, then click Next.

-
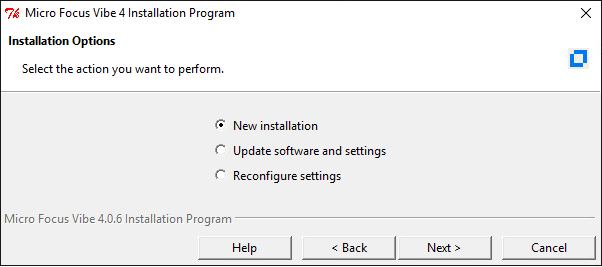
Click Next to accept the default of New installation.

-
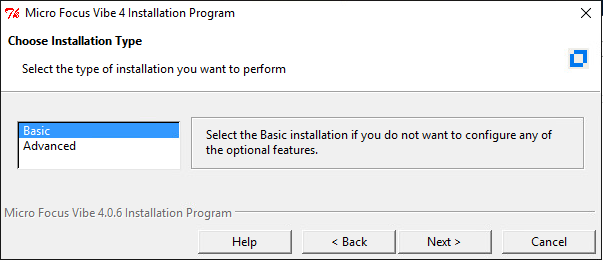
Click Next to accept the default of Basic.
-
Use the information that you have gathered on the Single-server Installation Planning Worksheet to provide the information that the Vibe installation program prompts you for:
- Installation Locations
- Default Locale for OpenText Vibe
- Network Information
- WebDAV Authentication Method
- Database Selection
- Database Type
- JDBC URL
- Credentials
- Setup
- Encryption Algorithm
- Outbound Email Configuration
- Protocol
- Host, Port, and Time Zone
- User Name, Password, and Authentication
- Allow Sending Email to All Users
- Inbound Email Configuration
- Adding File Types for HTML Conversions
The installation program stores the information that it gathers in the installer.xml file in the same directory where you started the installation program.
-
After you have provided all the requested information, click Install to begin the Vibe installation.
-
When the installation is complete, click Finish to exit the Vibe installation program.
Information about the installation process is written to the installer.log file in the same directory where you ran the Installation program. If a problem arises during the installation, the installer.log file provides information that can help you resolve the problem.
-
Continue with Creating the Vibe Database.
11.2.3 Creating the Vibe Database
IMPORTANT:The following procedures are performed at the command prompt.
Before you can start Vibe, you need to create the Vibe database.
-
If you haven’t done so already, install the database on the Vibe server.
For single-server installations running on Windows, install either the MySQL/MariaDB, Postgresql, or Microsoft SQL database. (For information about how to install the PostgreSQL, MySQL or MariaDB database on the Vibe server (on Windows), see PostgreSQL on Windows and MySQL or MariaDB on Windows).
For more information about installing the database for a multi-server Vibe system, see Section 19.0, Creating the Vibe Database on a Separate Server.
-
Open a command prompt window, then change to the following directory in your Vibe installation-source location:
vibe_installation_source\temp-installer\db\scripts\sql
This directory contains the following scripts for each database type (MySQL/MariaDB, Microsoft SQL, and Oracle):
-
mysql-create-empty-database.sql
-
Oracle-create-empty-database.sql
-
postgresql-create-empty-database.sql
-
sqlserver-create-empty-database.sql
-
-
(Optional) If you need to change the default database name from sitescape to something else, edit the .sql file for your database type to replace sitescape with the new name.
-
Open a command terminal, then use the database utility command for your database type to run the corresponding script for your database from the vibe_installation_source/temp-installer/db/scripts/sql directory:
MySQL/MariaDB:
mysql -uadmin-username -ppassword < "mysql-create-empty-database.sql"
Microsoft SQL:
psql -Uadmin-username -Ppassword -i sqlserver-create-empty-database.sql
You can also use the script with the SQL Server Express Utility to create the databasecd.
Oracle:
sqlplus "/ as sysdba"
SQL>spool update-oracle.out;
SQL>@oracle-create-empty-database
SQL>quit;
Postgresql:
psql -Uadmin-username < "postgresql-create-empty-database.sql"
You are prompted for the password that you set for the admin user.
-
Change to the db directory in the Vibe installation:
vibe_installation_source\temp-installer\db
This directory contains the following properties files:
-
mysql-liquibase.properties
-
Oracle-liquibase.properties
-
postgresql-liquibase.properties
-
sqlserver-liquibase.properties
-
-
In a text editor, open the properties file that corresponds with your database type and make the applicable changes in both the Driver and referenceDriver sections. Save and close the text editor when you are finished making changes.
-
Change the database user name and password for accessing the database.
-
(Conditional) Specify the IP address for the database if it is running on a remote server.
You need to replace localhost with the IP address of the remote server.
-
(Optional) Change the name of the Vibe database (the default name of the Vibe database is sitescape, the name of the company that previously developed the Vibe software).
-
-
In the same directory, execute the following commands to create the database schema:
manage-database.bat database_type updateDatabase
For example, if you are using a Microsoft SQL database:
manage-database.bat sqlserver updateDatabase
NOTE:You can safely ignore the following Liquibase log messages:
-
Warning: modifyDataType will lose primary key/autoincrement/not null settings for mysql
-
Any messages that contain the words info: failure or info: failed, as long as they are associated with a type INFO message
-
-
Start the Vibe server as described in Running Vibe as a Windows Service and Running Vibe as a Windows Application.
-
For security reasons, delete the password that you specified in Step 7:
-
Change to the following directory in your Vibe installation:
vibe_installation_source\temp-installer\db
-
In a text editor, open the database script that corresponds with your database type to delete the password.
-
-
Continue with Performing Post-Installation Tasks on Windows.
11.2.4 Performing Post-Installation Tasks on Windows
Checking for Available Hot Patches
After you install Vibe, ensure that you check on the Vibe download site where you downloaded the Vibe software for any hot patches that might be available.
Running Vibe as a Windows Service
Configuring Vibe as a Windows Service
The Vibe installation program created a service.bat file for configuring Vibe to run as a Windows service.
-
In a Command Prompt window, change to the following directory:
c:\Program Files\Novell\Teaming\apache-tomcat\bin\windows\x64
-
Copy all the files in the x64 directory to c:\Program Files\Novell\Teaming\apache-tomcat\bin directory.
-
Use the following command to configure Vibe as a Windows service:
service.bat install Teaming
This creates a service named Apache Tomcat Teaming.
Starting Vibe as a Windows Service
IMPORTANT:If you named your Vibe service something other than Teaming,
substitute your service name for Teaming in the sections that follow.
-
On the Windows desktop, click Start > Windows Administrative Tools > Services.
-
Right-click Apache Tomcat 9.0 Teaming, then click Properties.
-
Select the Log On tab.
-
Click Local System Account > Apply > OK.
Configuring the Vibe Service to Start Automatically on Reboot
When you run Vibe as a Windows service, you can configure Vibe to start automatically each time you reboot the Windows server.
-
On the Windows desktop, click Start > Administrative Tools > Services.
-
Right-click Apache Tomcat Teaming, then click Properties.
-
In the Startup type drop-down list, select Automatic (Delayed Start), then click OK.
Restarting the Vibe Service
You need to restart Vibe whenever you use the Vibe installation program to make configuration changes, as described in Section 16.0, Performing an Advanced Vibe Installation.
-
On the Windows desktop, click Start > Administrative Tools > Services.
-
Right-click Apache Tomcat Teaming, then click Restart.
-
Close the Services window.
Stopping the Vibe Service
-
On the Windows desktop, click Start > Administrative Tools > Services.
-
Right-click Apache Tomcat Teaming, then click Stop.
-
Close the Services window.
Removing Vibe as a Windows Service
The Vibe installation program creates a service.bat file that you can use to remove the Vibe service.
-
In the c:\Program Files\Novell\Teaming\apache-tomcat\bin\windows directory, copy the files from the appropriate subdirectory—x64 or ia64.
If you are unsure which subdirectory is appropriate for your server, use the readme.txt file located in the windows directory as a reference.
-
Paste the files into the c:\Program Files\Novell\Teaming\apache-tomcat\bin directory.
-
In a Command Prompt window, change to the following directory:
c:\Program Files\Novell\Teaming\apache-tomcat\bin
-
Use the following command to configure Vibe as a Windows service:
service.bat remove Teaming
This removes a service named Apache Tomcat Teaming.
Running Vibe as a Windows Application
Starting Vibe as an Application
The Vibe installation program created a startup.bat file for starting Vibe.
-
In a Command Prompt window, change to the following directory:
c:\Program Files\Novell\Teaming\apache-tomcat\bin
-
Run the startup.bat file to start Vibe as an application.
Stopping Vibe as an Application
-
In a Command Prompt window, change to the following directory:
c:\Program Files\Novell\Teaming\apache-tomcat\bin
-
Run the shutdown.bat file to stop the Vibe application.
Uninstalling Vibe
If you move the Vibe site to a different server, you can delete the Vibe files from the original server to reclaim disk space. The default Vibe file locations are:
|
Vibe Software |
c:\Program Files\Novell\Teaming |
|
Vibe File Repository and Lucene Index |
c:\Novell\Teaming |
|
MS SQL Database |
c:\Program Files\Microsoft SQL Server\MSSQL\Data |
For a complete list of your Vibe files, check the installer.xml file in the directory where you originally ran the Vibe Installation program.