Example of Dave's Configuration
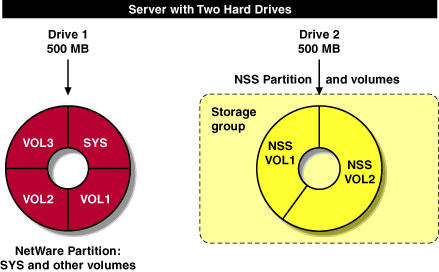
- Dave has two hard drives: each one has 500 MB.
- Dave has 500 MB assigned to NetWare on Drive 1; he has 500 MB free space on Drive 2 to use for his NSS volumes.
- Dave wants to create two NSS volumes: one with 200 MB on Drive 2 and one with 300 MB on Drive 2 (see the next figure).
NOTE: If Dave had configured NSS during NetWare 5 installation, NSS took the 500 MB of unpartitioned free space on Drive 2 and created one NSS volume for him on Drive 2. To prepare for changing his configuration to two NSS volumes, Dave would have to back up data on that volume and delete the single NSS volume created during installation, or he could add another hard disk with unpartitioned space which would allow him to create more NSS volumes. After creating the two new volumes, as described in the following example, Dave would then restore the data to one of the two new volumes if space was available.
Dave configures his storage groups and NSS volumes as explained next. Here's how Dave uses NWCONFIG to configure NSS on his server. Dave enters nwconfig at the server console to open the NWCONFIG utility. NSS loads automatically with NWCONFIG. From the Configuration Options menu, Dave selects NSS Disk Options and presses Enter. Dave selects Storage. He goes through each of these steps in turn to have NSS own free space. Scan the devices (Dave selects Update Provider Information). This is the first time Dave has used the NSS configuration. These steps make sure the provider recognizes all of the devices on his server. Dave would also use these steps if he installs a new device and he wants to make sure free space is recognized. Taking NSS ownership (Dave selects Assign Ownership). Dave selects the Storage Deposit object he wants for his NSS volumes. The Available Free Space box may show several objects that represent how much free space is available for Dave to configure, for example, 500 MB for his hard disk. Dave takes ownership of 500 MB on Drive 2 because he needs all of that free space for his NSS volumes. He confirms his choice and returns to Assign Ownership. An NSS partition is created on the disk and is made a managed object. When he is finished, Dave presses Return to the previous menu or Esc to return to the Available NSS Options menu.
Dave selects NSS Volume Options. Dave authenticates to NDS by entering his login name (the full context) and password. In order for Dave's new volumes to be added to NDS automatically, he must first authenticate to NDS using his administrator rights. Dave creates his storage group and volumes. Dave creates one storage group for his two NSS volumes. (He could also create one storage group for each NSS volume.) Configure the storage group (Dave selects Create > Storage Group). Dave selects the managed object he wants for his NSS volumes (the one he just assigned ownership to). The Select a Managed Object box shows one object that represents the 500 MB on his hard disk. Dave confirms his choice and returns to the Select Create Option screen.
Configure the NSS volumes (Dave selects NSS Volume). Dave selects the managed object, then the storage group he just created. He enters 200 MB for his first NSS volume. He then enters the NSS volume name and confirms his choice. An NSS volume is created with 200 MB. He repeats this step again at the Select Create Option screen for the second NSS volume of 300 MB. To confirm that his NSS volumes exist, Dave returns to the Available NSS Volume Options screen and selects NSS Volume Options > View Volumes. Dave's new NSS volumes are added to NDS automatically. Free space is gathered from one storage device to be used for one NSS volume. NOTE: If Dave configured NSS when he installed NetWare 5, NSS took the 200 MB of unpartitioned free space and created one NSS volume if that's what he decided to do. In that case, Dave is finished unless he wants to add other NSS volumes.
Here's how Dave uses the NWCONFIG utility to configure NSS on his server. Dave enters nwconfig at the server console to open the NWCONFIG utility. NSS loads automatically with NWCONFIG. From the Configuration Options menu, Dave selects NSS Disk Options. If Dave already updated and assigned his free space to NSS, he could skip Steps 4, 5, and 6 unless he added a new device. In this case, he would select NSS Volume Options rather than Storage. Dave selects Storage > Update Provider Information. Dave selects the media manager provider. Dave selects Assign Ownership at the Available NSS Storage Options screen. Dave selects the Storage Deposit object that represents the free space he will use for his NSS volume (the object shows 200 MB available). He confirms his choice. An NSS partition is created on the disk and is made in to a managed object. Dave creates his NSS volume. Dave presses Esc or Return to the previous menu to return to the Available NSS Options screen and selects NSS Volume Options. Dave authenticates to NDS using his full context. Dave selects Create. Dave selects NSS Volume. Dave selects the managed object marked Single. Single means no storage group was created for this volume. Group means a storage group was created for this volume. Dave enters a name for his NSS volume. Dave selects Yes to confirm his choice. Dave can now view his NSS volume by returning to the Available NSS Options screen and selecting View Volumes. Dave's volume is added to NDS automatically. Dave now mounts his NSS volume. See Mount an NSS Volume. Free space is gathered from several storage devices to be used for one NSS storage group and NSS volume using the NSS Administration menus. The One Step configuration takes available unpartitioned free space and creates one NSS volume for you. You cannot use NWCONFIG to perform this procedure because NWCONFIG does not have the capability to pool free space from several hard disks in to one NSS volume in one step. NOTE: If Dave configured NSS when he installed NetWare 5, NSS found 2 GB of free space and created one NSS volume if that's what Dave decided to do. In that case, Dave is finished unless he wants to create other NSS volumes.
This section provides the easiest way to create one storage group and one NSS volume. NOTE: In One Step Configuration, NSS does not recognize free space in NetWare volumes or removable media. This method only uses unpartitioned free space.
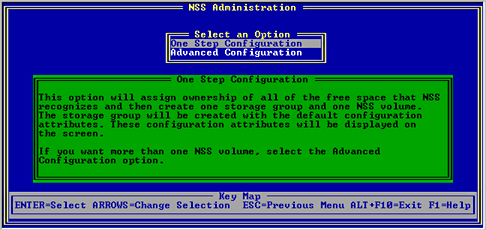
To create a volume in this procedure, One Step Configuration uses the default NSS volume attributes, takes all unpartitioned free space on the server's hard drives, and converts it to an NSS volume automatically. For example, if Dave has two hard drives with available free space, NSS will take ownership of the combined free space from the two drives and create one NSS volume. Dave enters nss at the server console. If Dave had already loaded NWCONFIG, his NSS modules are already loaded. Dave opens the NSS Administration menus. At the server console prompt, he enters nss /menu to open the menus. From Configure, Dave selects Create and presses Enter. The following screen appears. Figure 3
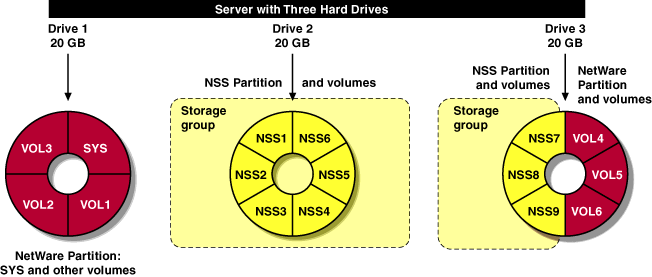
Dave selects One Step Configuration. Dave enters his NSS volume name. The default NSS volume name is NSSVOL. A maximum of 15 characters is allowed. We recommend you use the standard NetWare volume naming conventions. Dave selects Yes to confirm his decision. Dave presses Enter. Dave mounts his NSS volume. See Mount an NSS Volume. (Optional). Dave adds his NSS volume to NDS. See Add an NSS Volume to NDS. (Optional). Dave views his new NSS volume. See View the NSS Configuration. Free space is gathered from several storage devices to be used for NSS storage groups and NSS volumes. Dave wants to dedicate one drive to the NetWare partition and divide segments of other drives into storage groups and NSS volumes in addition to NetWare partitions. NOTE: If Dave had configured NSS during NetWare 5 installation, Dave could have had NSS take 10 GB or 20 GB of unpartitioned free space from each of the two drives and created one NSS volume from both drives. To prepare for changing his configuration to add more NSS volumes, Dave could add another hard drive, or he would have to back up and delete the single NSS volume created during installation. After creating the new NSS volumes, as described in the following example, Dave would then restore the data to the new volumes if space was available.
The next figure shows how Dave turned his 30 GB free space into two storage groups and nine NSS volumes.
Dave can set up his storage devices in any configuration he chooses as long as he sets up storage groups for his NSS volumes. He can have multiple NSS volumes in a storage group. Here's how Dave uses the NWCONFIG utility to configure NSS on his server. Dave enters nwconfig at the server console to open the NWCONFIG utility.NSS loads automatically with NWCONFIG. He follows the prompts on each screen to move around in the menus. From the Configuration Options menu, Dave selects NSS Disk Options and presses Enter. Dave selects Storage. He goes through each of these steps in turn to create storage groups for Drive 2 and Drive 3 (he needs two). Scan the devices (Dave selects Update Provider Information). This is the first time Dave has used the NSS configuration. These steps make sure the provider recognizes all of the devices on his server. Dave would also use these steps if he installs a new device and he wants to make sure free space is recognized. The provider will recognize 20 GB unpartitioned space on Drive 2 as an object and 10 GB unpartitioned space on Drive 3 as an object in the storage deposits list. Taking NSS ownership (Dave selects Assign Ownership). Dave selects the Storage Deposit object he wants for his NSS volumes. The Select a Storage Deposit box may show several objects that represent how much free space is available for Dave to configure, for example, 20 GB for Drive 2 for his fixed disk. Dave takes ownership of 20 GB on Drive 2 because he needs all of that free space for his volumes. He confirms his choice and returns to Assign Ownership. He repeats the same procedure for Drive 3 with 10 GB. When he is finished, Dave presses Esc to return to the Available NSS Options menu.
Dave selects NSS Volume Options.Dave authenticates to NDS by entering his login name and password using his full context. 6.In order for Dave's new volumes to be added to NDS automatically, he must first authenticate to NDS. Configure the storage group (Dave selects Create > Create a Storage Group). Dave selects the managed object (that represents Drive 2) he wants for his NSS volumes (the one he just assigned ownership to). The Select a Managed Object box may show several objects that represent how much NSS space is available for Dave to configure, for example, 20 GB for Drive 2 and 10 GB for Drive 3. Dave chooses 20 GB on Drive 2 and creates a storage group. Dave confirms his choice and returns to the Select Create Object screen. He repeats this procedure for his 10 GB on Drive 3.
Configure the NSS volumes (Dave selects NSS Volume). Dave selects the managed object for his first NSS volume on Drive 2 (the storage groups he just created will be listed as Group storage types). He enters 3 GB for his first NSS volume. He then enters the NSS volume name and confirms his choice. An NSS volume is created with 3 GB. He repeats this step again for the second NSS volume of 3 GB, the third NSS volume of 4 GB, and so on. When Dave finishes creating his volumes for Drive 2, he returns to the NSS Volume option, selects the managed object that represents Drive 3 and repeats the same volume creation procedure.
To confirm that his NSS volumes exist, Dave returns to the Available NSS Options screen and selects NSS Volume Options > View Volumes. Dave's new NSS volumes are added to NDS automatically. Spanning volumes means an NSS volume you create may reside on several devices. The steps for spanning volumes are the same as using previous examples in this section. See Create Multiple NSS Volumes with Multiple Hard Drives for information. NSS is designed to span volumes because it gathers free space for the storage pool from various hard drives on your server. The free space is placed in a list of managed objects from which you can choose which objects you want to join together to become a storage group.
Create Two NSS Volumes With Two Hard Drives
Using NWCONFIG to Create One Storage Group and Two NSS Volumes
Create One NSS Volume with One Hard Drive
Example of Dave's Configuration
Using NWCONFIG to Create One NSS Volume
Create One NSS Volume with Multiple Hard Drives
Example of Dave's Configuration
One Step Configuration
Procedure
Configuration Type Selections
Create Multiple NSS Volumes with Multiple Hard Drives
Example of Dave's Configuration

Using NWCONFIG to Create Multiple Volumes on Multiple Hard Drives
Create Multiple NSS Volumes on Multiple Hard Drives and Span the Volumes