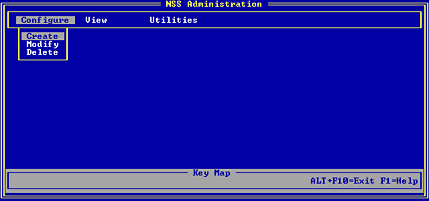
NSS Administration Main Menu

Most of the time, you may want to use NWCONFIG to create your storage groups and NSS volumes. (See Configure NSS Using NWCONFIG.)
NOTE: If you do not want to create NSS volumes in NWCONFIG, you will have to add your NSS volumes to NDS using NetWare Administrator. It's much faster and easier to use NWCONFIG, however.
The NSS Administration menus provide a few utilities that NWCONFIG does not support, such as REBUILD or VERIFY. Throughout the Managing section, various tasks show you how to use either NWCONFIG or the NSS Administration menus.
This section gives you a way, other than NWCONFIG, to create and manage storage groups and NSS volumes.
To use the NSS Administration menus, enter nss /menu at the server console.
When you open the NSS Administration menus, the following screen appears.
Figure 9
NSS Administration Main Menu
This section provides the easiest way to create one storage group and one NSS volume using the NSS Administration menus. NOTE: In One Step Configuration, NSS does not recognize CD-ROMs, free space in NetWare volumes, or removable media. This method only uses unpartitioned free space.
To create a volume in this procedure, One Step Configuration uses the default NSS volume attributes, takes all unpartitioned free space on the server's hard drives, and converts it to an NSS volume. For example, if you have two hard drives with available free space, NSS will take ownership of the combined free space from the two drives and create one NSS volume. Use Create > One Step Configuration if you are not sure how you want to configure your storage at this time. To save time and effort, however, we recommend that you know how you want to configure NSS volumes. You can always use the Advanced Configuration later if you decide to add more storage groups and NSS volumes. See Advanced Configuration for instructions on how to use the custom method. To see an example of how to set up more than one storage group and NSS volume, see Create Two NSS Volumes With Two Hard Drives.
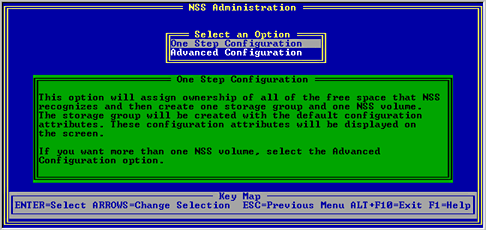
To create one NSS storage group and one NSS volume, do the following. Open the NSS Administration menus. At the server console prompt, enter nss /menu to open the menus. From Configure, select Create and press Enter. The following screen appears. Figure 10
Select One Step Configuration. Enter a name for your NSS volume or accept the default. The default NSS volume name is NSSVOL. A maximum of 15 characters is allowed. We recommend you use the standard NetWare volume naming conventions. Select Yes to confirm your decision. Press Enter. Mount your NSS volume. See Mount an NSS Volume. (Optional). Add your NSS volume to NDS. See Add an NSS Volume to NDS. (Optional). View your new NSS volume. See View the NSS Configuration. This section provides instructions for creating multiple storage groups and NSS volumes using the NSS Administration menus. Create as many storage groups and NSS volumes as you need. See Planning and Setup Examples for examples of some NSS storage groups and NSS volumes you can create using NWCONFIG. If you only want to create one storage group and NSS volume, see One Step Configuration. Advanced Configuration converts unpartitioned free space on an existing hard drive or free space in a NetWare volume to storage groups and NSS volumes. IMPORTANT: These instructions assume you have read through the Understanding and Planning modules and that you know how you want to set up storage groups and NSS volumes.
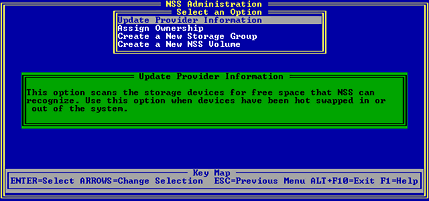
To create multiple storage groups and NSS volumes, do the following. Open the NSS Administration menus. At the server console prompt, enter nss /menu to open the menus. From Configure, select Create and press Enter. Select Advanced Configuration. The following screen appears. Figure 11
Select the following options in order. Press Esc at any time to return to the previous screen. Press F1 for Help. Follow the screen prompts to move through each of the following options in turn. Update Provider Information scans your storage and displays storage deposits. You may only need to do this when you hot swap new devices, or you want to make sure NSS is synchronized with your devices. The NetWare provider finds NetWare free space on an existing NetWare volume and the Media Manager provider finds unpartitioned free space on physical disks. The Group/Segment manager finds NSS-assigned space that is not yet part of an NSS volume. The provider then lists these free space objects as storage deposits. Assign Ownership assigns a consumer to the free space storage deposit you select and creates an NSS partition. NSS needs to own the free space before an NSS volume can be created. Create a New Storage Group lists storage deposits for storage group creation. In most cases, you create create a storage group before you create an NSS volume (NSS does this automatically in One Step). But you can create a storage group and several NSS volumes from a storage deposit that the consumer owns (now a managed object). In Create a New Storage Group, you repeat the steps for each storage group you want to create. Create a New NSS Volume creates NSS volumes from the list of storage groups. You can repeat this option for each NSS volume you want to create in a storage group. If you create more than one NSS volume now, make sure you also select the storage group you created in the Create a New Storage Group option. The default NSS volume name is NSSVOL. A maximum of 15 characters is allowed. We recommend that you use the standard NetWare volume naming conventions.
(Optional) Mount your NSS volume. See Mount an NSS Volume. (Optional) Add your NSS volume to NDS. If NDS is loaded and you are authenticated, your new NSS volume will be added to NDS automatically; otherwise, you can use NetWare Administrator to add it to NDS. See Add an NSS Volume to NDS (Optional) View your NSS volume. See View the NSS Configuration. To change your configuration, see Managing.One Step Configuration
Prerequisites
Procedure
Configuration Type Selections
Advanced Configuration
Prerequisites
Procedure
Advanced Configuration Menu Options